Stratux Webserver – what’s behind the scenes?

Stratux has a rich community of forums, and a lot of information about debugging Strtux, but so far good hacking information is really hard to find. One of the things of most interest to me was “What is severing up this webpage?”

Every search was a dead end, so I went back to my *NIX system administration roots and thought.. “Well, if someone wont admit what’s serving up the stream.. I’ll find out for myself.

Who’s Your Server? — gen_gdl90

A couple of quick commands told me which PID was hanging onto Port 80 and from there which process was associated with the PID:


root@raspberrypi:~# fuser 80/tcp
80/tcp: 3110
root@raspberrypi:~# ps aux | grep 3110
root 3110 51.9 2.9 973132 27600 ? Ssl 15:19 47:03 /usr/bin/gen_gdl90
root 6606 0.0 0.2 4276 1904 pts/0 S+ 16:50 0:00 grep 3110
What files does it have open?

Once I had an idea of who’m I was looking for, running lsof with the port number gave me 60 entries… and bingo.. there was the nugget of gold I was looking for:


root@raspberrypi:~# lsof -p 3110
COMMAND PID USER FD TYPE DEVICE SIZE/OFF NODE NAME
gen_gdl90 3110 root cwd DIR 179,2 4096 2 /
[...]
gen_gdl90 3110 root 35u IPv6 1849628 0t0 TCP StratuxWiFi.io:http->10.100.0.188:49157 (ESTABLISHED)
gen_gdl90 3110 root 36u IPv6 210216 0t0 TCP StratuxWiFi.io:http->10.100.0.188:64155 (ESTABLISHED)
gen_gdl90 3110 root 37u IPv6 1859641 0t0 TCP StratuxWiFi.io:http->10.100.0.188:49165 (ESTABLISHED)
gen_gdl90 3110 root 38u IPv6 1759876 0t0 TCP StratuxWiFi.io:http->10.100.0.188:65420 (ESTABLISHED)
gen_gdl90 3110 root 41u IPv6 1778784 0t0 TCP StratuxWiFi.io:http->10.100.0.188:65442 (CLOSE_WAIT)
gen_gdl90 3110 root 48r REG 179,2 146998 51146 /var/www/maui/js/angular.min.js
The Web Path

Once onto the trail of the web path, I see that this is an Angular based application (ugh.. I really despise Angular.. I just do.), and all based on some JS stuffs. I get it. for an app like this the two-way data binding of Angular is probably the right too; but I still do not (no do I have to) like it.


root@raspberrypi:~# cd /var/www/maui/
root@raspberrypi:/var/www/maui# ls -l
total 12
drwxr-xr-x 2 root root 4096 Mar 15 2016 css
drwxr-xr-x 2 root root 4096 Mar 15 2016 fonts
drwxr-xr-x 2 root root 4096 Mar 15 2016 js
root@raspberrypi:/var/www/maui#

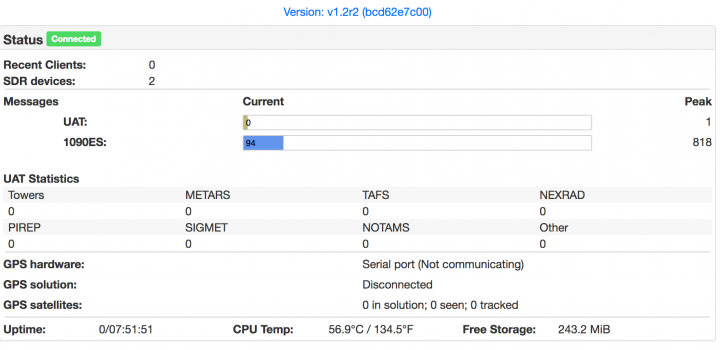
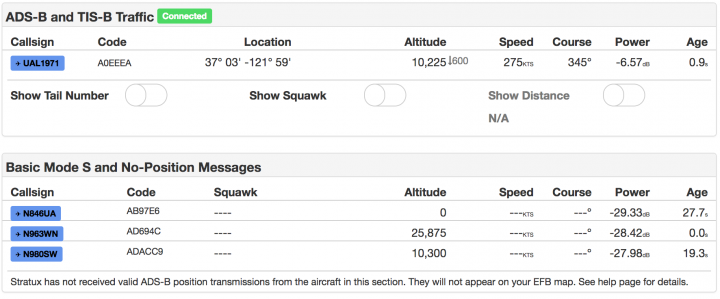
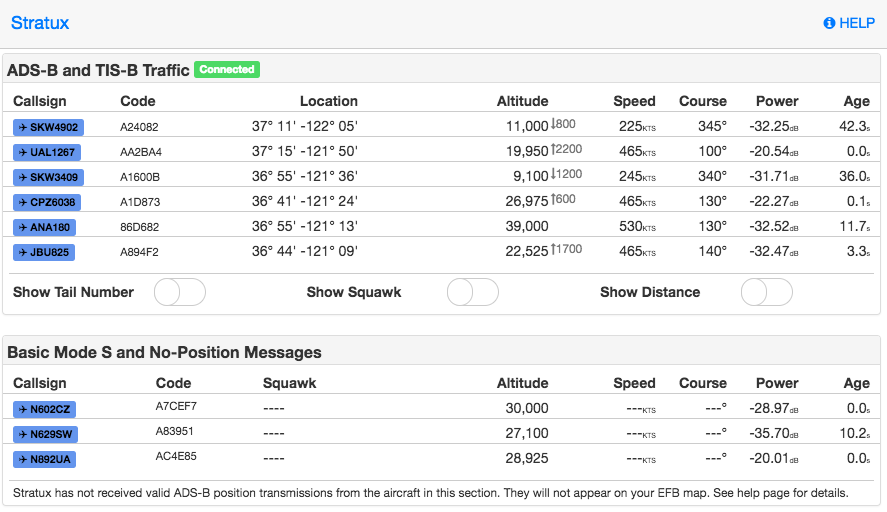
What I was hoping to find was the location of the that status page.. but.. I believe that what I’m looking for now is the .JS file that manages that label. Initially this looked like a dead end…


root@raspberrypi:/var/www/maui# egrep -r Distance *
root@raspberrypi:/var/www/maui#

Realiazing this was some templating sub-directory, and the root was likely at /var/www, I ran another search that found the location of the desired string, and likely the location of the parts I’m looking for:


root@raspberrypi:~# cd ..
root@raspberrypi:/var/www# egrep -lnr 'Distance' *

plates/js/traffic.js
plates/traffic-help.html
plates/traffic.html

STRATUX – Filesystem Full; Managing disk space redux

Checking in with my Starux project this morning, I found it unresponsive. A physical check shows a flashing red light on the Pi… something has gone haywire, and I couldn’t SSH into the little thing, so a really hard cold restart was in order.

Following the restart I quickly shut Stratux back down to start performing diagnostics:


pi@raspberrypi:~ $ sudo su -

root@raspberrypi:~# service stratux stop

Diagnostics 101

Check Filesystem Health

The last time the little Stratux suddenly had problems it was a filesystem space issue ( previous article ). It turns out the boot drive space was OK but the new Logging partition was again, completely consumed:

Filesystem     1K-blocks    Used Available Use% Mounted on
/dev/root        1815440 1391284    331164  81% /
devtmpfs          469688       0    469688   0% /dev
tmpfs             474004       0    474004   0% /dev/shm
tmpfs             474004    6340    467664   2% /run
tmpfs               5120       4      5116   1% /run/lock
tmpfs             474004       0    474004   0% /sys/fs/cgroup
/dev/mmcblk0p1     61384   20400     40984  34% /boot
/dev/mmcblk0p4   8125880 8109496         0 100% /var/log

Locate the Culprit

There are a number of ways to locate large file on a *NIX system. My favorite tool is find. First thing I want to do is locate any file that is larger than 1 Gigabyte, and sure enough it located a massive sqlite database file. The same one that ate up all the space on the boot drive. So.. this is going to require some more extrodinary measures to maintain 100% 24×7 operational status.


root@raspberrypi:~# cd /var/log
root@raspberrypi:/var/log# find . -size +1G -exec ls -l {} \;
-rw-r--r-- 1 root root 7463211008 Apr 29 21:48 ./stratux.sqlite
Start Solving

First order of business is to move aside the massive database, but try to preserve the data for examination. Since the filesystem is full, I can’t zip this thing in place, so first some space needs to cleared on the device. The things I’m least interested in go first.. like the zipped syslogs and any other ‘archived’ file (those with a .# suffix).

-rw-r----- 1 root adm      728756 Apr 25 06:25 syslog.5.gz
-rw-r----- 1 root adm     2552845 Apr 26 06:25 syslog.4.gz
-rw-r----- 1 root adm     2447263 Apr 27 06:25 syslog.3.gz
-rw-r----- 1 root adm     2498089 Apr 28 06:25 syslog.2.gz
-rw-r----- 1 root adm    33735478 Apr 29 06:25 syslog.1
-rw-r----- 1 root adm       54307 Apr 30 05:19 debug.1
-rw-r----- 1 root adm      380928 Apr 30 05:19 kern.log.1
-rw-r----- 1 root adm   332365824 Apr 30 06:18 daemon.log.1
-rw-r----- 1 root adm       48723 Apr 30 06:25 auth.log.1
-rw-r----- 1 root adm           0 Apr 30 06:25 syslog.1.gz
-rw-r----- 1 root adm     1032192 Apr 30 06:25 messages.1

root@raspberrypi:/var/log# rm -f *.gz *\.[0-9]

But.. that’s not going to doe the complete trick, especially if after deleting files df still shows 100% utilization. You need to figure out what is holding which deleted file(s).

Normallyh, the best way to do that on *NIX is with lsof. Much to my chagrin, it was not available on the OS… so I had to go grab it. Thankfully I had the main filesystem on a different partition that still had enough space to install more tools! Once lsof was installed, grep through the list of open file handles and find those marked for delete.. and those are the processes that have handles pointing to those files. However, this didn’t help me with Rasperian Jessie. I know that a reboot will recover the space so.. that was the next step.. a brutal warm-boot.


root@raspberrypi:/var/log# lsof
-su: lsof: command not found

root@raspberrypi:/# apt-get install lsof
Reading package lists... Done
Building dependency tree
Reading state information... Done
The following extra packages will be installed:
libperl4-corelibs-perl
The following NEW packages will be installed:
libperl4-corelibs-perl lsof
...

root@raspberrypi:/var/log# lsof | grep deleted
root@raspberrypi:/var/log#

root@raspberrypi:/var/log# init 6

Archiving Massive SQLite Database

The first thing was to move aside the current database, and then restart stratux to verify it can created a new empty database for it’s purposes.. then shut it right back down again.


root@raspberrypi:/var/log# mv stratux.sqlite stratux.sqlite.1
root@raspberrypi:/var/log# service stratux start
root@raspberrypi:/var/log# ls -l
total 7291480
[...]
-rw-r--r-- 1 root root 4096 Apr 30 14:27 stratux.sqlite
-rw-r--r-- 1 root root 7466160128 Apr 30 14:24 stratux.sqlite.1
[...]
root@raspberrypi:/var/log# service stratux stop

A new empty database file has been created [ 4096 Apr 30 14:27 stratux.sqlite ]. This tells me that moving aside the current database file on a periodic basis, compressing and then archiving it should be sufficient to maintain operational status.

Logging Insanity

Before restarting Stratux, I zerod out these log files. Running for first a few moments these files were already reading up a lot of space. Tailing one of them I see that Stratux, with my current settings is logging A LOT of data to these log files. I feel this was my first error.. enabling too much logging. My settings look like this:

With those settings enabled, there are a lot of GPS and other events that I don’t really have a use for, being dumped into the Statux log.


-rw-r--r-- 1 root root 1361778 Apr 30 14:39 stratux.log

Turning OFF ‘Verbose Message Log’ made that insanity stop.

Replay logging is what is writing to the SQLite database. So the question is. how much of that data do I want to keep, and how much will I lose if I turn off the replay logs. I think that will be research for another day… right now the goal is to recover disk space by compressing the massive database file that was moved aside, and get Stratux stabilized again. Once compressed, check filesystem and file size!


root@raspberrypi:/var/log# gzip stratux.sqlite.1

root@raspberrypi:/var/log# df

Filesystem     1K-blocks    Used Available Use% Mounted on
/dev/root        1815440 1392384    330064  81% /
devtmpfs          469688       0    469688   0% /dev
tmpfs             474004       0    474004   0% /dev/shm
tmpfs             474004   12272    461732   3% /run
tmpfs               5120       4      5116   1% /run/lock
tmpfs             474004       0    474004   0% /sys/fs/cgroup
/dev/mmcblk0p4   8125880  681792   7008276   9% /var/log
/dev/mmcblk0p1     61384   20400     40984  34% /boot

root@raspberrypi:/var/log# ls -lktr --color --block-size=M stratux.sqlite*

-rw-r--r-- 1 root root 643M Apr 30 14:24 stratux.sqlite.1.gz
-rw-r--r-- 1 root root   8M Apr 30 15:21 stratux.sqlite
-rw-r--r-- 1 root root   1M Apr 30 15:22 stratux.sqlite-shm
-rw-r--r-- 1 root root   5M Apr 30 15:22 stratux.sqlite-wal

With the file compressed, it could be copied elsewhere for analysis.

SQLite – get table schema

SQLite is a functional little SQL database that is often found used in embedded systems projects (such as one of my favorites, Stratux).

As far as I know, there are three ways to look at a table’s schema (the 3rd is just and extension of the 2nd).

.schema table_name

Running .schema will show you a ‘CREATE’ statement that can be used to build the database table. The issues I have with using this are that the command only shows the original CREATE, not any subsequent changes such as indexes, are worse yet, new fields! Regardless, here is an example:

.schema traffic
CREATE TABLE traffic (id INTEGER NOT NULL PRIMARY KEY AUTOINCREMENT, Icao_addr INTEGER, Reg TEXT, Tail TEXT, Emitter_category INTEGER, OnGround INTEGER, Addr_type INTEGER, TargetType INTEGER, SignalLevel REAL, Squawk INTEGER, Position_valid INTEGER, Lat REAL, Lng REAL, Alt INTEGER, GnssDiffFromBaroAlt INTEGER, AltIsGNSS INTEGER, NIC INTEGER, NACp INTEGER, Track INTEGER, Speed INTEGER, Speed_valid INTEGER, Vvel INTEGER, Timestamp STRING, PriorityStatus INTEGER, Age REAL, AgeLastAlt REAL, Last_seen STRING, Last_alt STRING, Last_GnssDiff STRING, Last_GnssDiffAlt INTEGER, Last_speed STRING, Last_source INTEGER, ExtrapolatedPosition INTEGER, Bearing REAL, Distance REAL, timestamp_id INTEGER);

PRAGMA table_info

This is my favored by far. Format can actually be taken and dropped int a Wiki page, or JIRA case or any other similar document system.. but it’s still not the most ideal, as you can see:


PRAGMA table_info(traffic);

0|id|INTEGER|1||1
1|Icao_addr|INTEGER|0||0
2|Reg|TEXT|0||0
3|Tail|TEXT|0||0
4|Emitter_category|INTEGER|0||0
5|OnGround|INTEGER|0||0
6|Addr_type|INTEGER|0||0
7|TargetType|INTEGER|0||0
8|SignalLevel|REAL|0||0
9|Squawk|INTEGER|0||0
10|Position_valid|INTEGER|0||0
11|Lat|REAL|0||0
12|Lng|REAL|0||0
13|Alt|INTEGER|0||0
14|GnssDiffFromBaroAlt|INTEGER|0||0
15|AltIsGNSS|INTEGER|0||0
16|NIC|INTEGER|0||0
17|NACp|INTEGER|0||0
18|Track|INTEGER|0||0
19|Speed|INTEGER|0||0
20|Speed_valid|INTEGER|0||0
21|Vvel|INTEGER|0||0
22|Timestamp|STRING|0||0
23|PriorityStatus|INTEGER|0||0
24|Age|REAL|0||0
25|AgeLastAlt|REAL|0||0
26|Last_seen|STRING|0||0
27|Last_alt|STRING|0||0
28|Last_GnssDiff|STRING|0||0
29|Last_GnssDiffAlt|INTEGER|0||0
30|Last_speed|STRING|0||0
31|Last_source|INTEGER|0||0
32|ExtrapolatedPosition|INTEGER|0||0
33|Bearing|REAL|0||0
34|Distance|REAL|0||0
35|timestamp_id|INTEGER|0||0

Now.. for my favorite modifier:

PRAGMA table_info with headers!

By turning headers ‘on’ you will now get a tabular list of what each of these fields mean. Note that the first operator command does not use a terminating semi-colon.

.headers on
PRAGMA table_info(traffic);

cid|name|type|notnull|dflt_value|pk
0|id|INTEGER|1||1
1|Icao_addr|INTEGER|0||0
2|Reg|TEXT|0||0
3|Tail|TEXT|0||0
[... you get the idea ...]

35|timestamp_id|INTEGER|0||0

There you go.. three (OK two) ways to list a table schema in SQLite.

Stratux – what’s in that database?

If you’re a hacker, and you’re a data geek.. you probably want to know what’s in that Stratus SQLite database!

Get a SQLite client

I wasn’t able to find a SQLite client on the Straux image, so I installed one with apt-get:


sudo apt-get install sqlite3

Next, run a basic function test to see if it installed and will run:


sqlite3

SQLite version 3.8.7.1 2014-10-29 13:59:56
Enter ".help" for usage hints.
Connected to a transient in-memory database.
Use ".open FILENAME" to reopen on a persistent database.

Cracking open the data file

The sqlist logging / database file is in /var/log, and is named stratux.sqlite.

Cracking open the database and checking the schema I found:


sqlite3 stratux.sqlite

SQLite version 3.8.7.1 2014-10-29 13:59:56
Enter ".help" for usage hints.
sqlite>
sqlite> .tables

dump1090_terminal messages startup traffic
es_messages mySituation status
gps_attitude settings timestamp

Stratux SQLite Tables

Some of these tables contain alot of data:

Table Name Record Count
dump1090_terminal 313290
messages 307
startup 29
traffic 47038
mySituation 0
status 5350
timestamp 252097
settings 0
es_messages 463973
gps_attitude 0
es_messages table

This contains some interesting things. Here are the last 5 records from the database:


select * from es_messages order by timestamp_id desc limit 5;

469502|0001-01-01 00:39:09.91 +0000 UTC|{"Icao_addr":11265096,"DF":0,"CA":0,"TypeCode":0,"SubtypeCode":0,"SBS_MsgType":7,"SignalLevel":0.002207,"Tail":null,"Squawk":null,"Emitter_category":null,"OnGround":false,"Lat":null,"Lng":null,"Position_valid":false,"NACp":null,"Alt":22625,"AltIsGNSS":false,"GnssDiffFromBaroAlt":null,"Vvel":null,"Speed_valid":false,"Speed":null,"Track":null,"Timestamp":"2017-04-24T19:04:54.804Z"}|296790
469503|0001-01-01 00:39:09.97 +0000 UTC|{"Icao_addr":10846969,"DF":0,"CA":0,"TypeCode":0,"SubtypeCode":0,"SBS_MsgType":7,"SignalLevel":0.039045,"Tail":null,"Squawk":null,"Emitter_category":null,"OnGround":false,"Lat":null,"Lng":null,"Position_valid":false,"NACp":null,"Alt":12075,"AltIsGNSS":false,"GnssDiffFromBaroAlt":null,"Vvel":null,"Speed_valid":false,"Speed":null,"Track":null,"Timestamp":"2017-04-24T19:04:54.901Z"}|296790
469498|0001-01-01 00:39:09.53 +0000 UTC|{"Icao_addr":11265096,"DF":0,"CA":0,"TypeCode":0,"SubtypeCode":0,"SBS_MsgType":7,"SignalLevel":0.003431,"Tail":null,"Squawk":null,"Emitter_category":null,"OnGround":false,"Lat":null,"Lng":null,"Position_valid":false,"NACp":null,"Alt":22600,"AltIsGNSS":false,"GnssDiffFromBaroAlt":null,"Vvel":null,"Speed_valid":false,"Speed":null,"Track":null,"Timestamp":"2017-04-24T19:04:54.426Z"}|296789
469499|0001-01-01 00:39:09.53 +0000 UTC|{"Icao_addr":10687795,"DF":11,"CA":1,"TypeCode":0,"SubtypeCode":0,"SBS_MsgType":8,"SignalLevel":0.001740,"Tail":null,"Squawk":null,"Emitter_category":null,"OnGround":null,"Lat":null,"Lng":null,"Position_valid":false,"NACp":null,"Alt":null,"AltIsGNSS":false,"GnssDiffFromBaroAlt":null,"Vvel":null,"Speed_valid":false,"Speed":null,"Track":null,"Timestamp":"2017-04-24T19:04:54.441Z"}|296789
469500|0001-01-01 00:39:09.69 +0000 UTC|{"Icao_addr":10687795,"DF":0,"CA":0,"TypeCode":0,"SubtypeCode":0,"SBS_MsgType":7,"SignalLevel":0.000488,"Tail":null,"Squawk":null,"Emitter_category":null,"OnGround":false,"Lat":null,"Lng":null,"Position_valid":false,"NACp":null,"Alt":28025,"AltIsGNSS":false,"GnssDiffFromBaroAlt":null,"Vvel":null,"Speed_valid":false,"Speed":null,"Track":null,"Timestamp":"2017-04-24T19:04:54.626Z"}|296789

Selected one of the records and decoded the JSON message:

{
	"Icao_addr": 11265096,
	"DF": 0,
	"CA": 0,
	"TypeCode": 0,
	"SubtypeCode": 0,
	"SBS_MsgType": 7,
	"SignalLevel": 0.002207,
	"Tail": null,
	"Squawk": null,
	"Emitter_category": null,
	"OnGround": false,
	"Lat": null,
	"Lng": null,
	"Position_valid": false,
	"NACp": null,
	"Alt": 22625,
	"AltIsGNSS": false,
	"GnssDiffFromBaroAlt": null,
	"Vvel": null,
	"Speed_valid": false,
	"Speed": null,
	"Track": null,
	"Timestamp": "2017-04-24T19:04:54.804Z"
}

These seems to be the 1090 ‘es’ messages, however (at least this example) is missing tail number and squawk information. It’s interesting.., but not very actionable.

The next table I looked at was a completely different story!

traffic table

This looks like a good dataset to mine. With about 47,000 contacts int it.. this might be the basic dataset I’m looking for to use for some visualization.


select * from traffic limit 5;

1|11017168|N621VA|eaVRD947|0|0|0|1|-18.1550731147|6742|1|36.9193725586|-122.0635986328|13075|650|0|7|8|310|287|1|-1536|2016-02-26 01:22:53.426 +0000 UTC|0|0.27|0.16|0001-01-01 00:04:45.29 +0000 UTC|0001-01-01 00:04:45.4 +0000 UTC|0001-01-01 00:04:45.08 +0000 UTC|13075|0001-01-01 00:04:45.08 +0000 UTC|1|0|0.0|0.0|4
2|11017168|N621VA|eaVRD947|0|0|0|1|-19.4002028306|6742|1|36.9202423096|-122.0649414062|13050|650|0|7|8|310|287|1|-1472|2016-02-26 01:22:54.57 +0000 UTC|0|0.22|0.0|0001-01-01 00:04:46.33 +0000 UTC|0001-01-01 00:04:46.55 +0000 UTC|0001-01-01 00:04:46.55 +0000 UTC|13050|0001-01-01 00:04:46.55 +0000 UTC|1|0|0.0|0.0|7
3|11017168|N621VA|eaVRD947|0|0|0|1|-21.540961611|6742|1|36.9209747314|-122.0660552979|13025|650|0|7|8|310|287|1|-1472|2016-02-26 01:22:55.503 +0000 UTC|0|0.23|0.23|0001-01-01 00:04:47.32 +0000 UTC|0001-01-01 00:04:47.32 +0000 UTC|0001-01-01 00:04:47.48 +0000 UTC|13025|0001-01-01 00:04:47.48 +0000 UTC|1|0|0.0|0.0|10
4|11017168|N621VA|eaVRD947|0|0|0|1|-24.8545224734|6742|1|36.9220275879|-122.0676879883|13000|650|0|7|8|310|287|1|-1472|2016-02-26 01:22:56.453 +0000 UTC|0|0.14|0.14|0001-01-01 00:04:48.41 +0000 UTC|0001-01-01 00:04:48.41 +0000 UTC|0001-01-01 00:04:47.48 +0000 UTC|13025|0001-01-01 00:04:47.48 +0000 UTC|1|0|0.0|0.0|12
5|11017168|N621VA|eaVRD947|0|0|0|1|-22.2004294875|6742|1|36.9220275879|-122.0676879883|12975|650|0|7|8|310|287|1|-1408|2016-02-26 01:22:57.573 +0000 UTC|0|1.14|0.0|0001-01-01 00:04:48.41 +0000 UTC|0001-01-01 00:04:49.55 +0000 UTC|0001-01-01 00:04:49.44 +0000 UTC|12975|0001-01-01 00:04:49.44 +0000 UTC|1|0|0.0|0.0|14

Question.. what are the top 10 traffic events by Tail number?
Let’s find out! The simplest way I know of to do this.. and it offers the advantage that the select query against the large dataset with aggregation only runs ONCE.. is to get the parts you want, and the summary count and jam them into a temporary table. With SQLite, you can do it like this:


CREATE TABLE traffic_summary AS select Reg,Tail,count(*) as hits from traffic group by Tail;

That produced a summary table with 423 records in it:


select count(*) from traffic_summary;

423

Now.. who’s the nosiest one of them all?


select * from traffic_summary WHERE Tail>'' order by hits DESC limit 10;

N713FR|ea1435|660
N214NN|CPZ6073|624
N887NN|eaAL2508|564
|eaAL8215|553
N76503|UAL1010|539
N141SY|SKW5982|511
N363VA|VRD1935|501
N204NN|CPZ6074|494
N630VA|VRD941|491
|eaAAR284|478

Using a little sleuthing.. I found that ‘N713FR’ is a Frontier Airlines Airbus 321

Upcoming Article: Creating some tools to automate acquisition of this information and find out just who’s flying over and how often.

Stratux – handling a full filesystem

Running a Stratux in test-bench mode (not in an aircraft, and for days at a time), you’ll likely run into an issue with disk space. The ISO image I acquired from Stratux only provided a 1.8 BG partition for things to live in, and it’s quickly exhausted.

Here is the status of my system after running for about 36 hours… it’s full.

Filesystem Size Used Avail Use% Mounted on
/dev/root 1.8G 1.8G 0 100% /
devtmpfs 459M 0 459M 0% /dev
tmpfs 463M 0 463M 0% /dev/shm
tmpfs 463M 30M 434M 7% /run
tmpfs 5.0M 4.0K 5.0M 1% /run/lock
tmpfs 463M 0 463M 0% /sys/fs/cgroup
/dev/mmcblk0p1 60M 20M 41M 34% /boot

Now to get about the business of increasing the partition and filesystem size without destroying it. First

Locate the disk device

Instructions on the web are not exactly correct, some suggest /dev/sda as the main device, however my testing shows it’s actually this named ‘/dev/mmcblk0’.


root@raspberrypi:~# fdisk -l | grep Disk
[...]
Disk /dev/mmcblk0: 14.5 GiB, 15523119104 bytes, 30318592 sectors

… with the following partitions:

Device Boot Start End Sectors Size Id Type
/dev/mmcblk0p1 8192 131071 122880 60M c W95 FAT32 (LBA)
/dev/mmcblk0p2 131072 3887103 3756032 1.8G 83 Linux
Running fdisk

With the physical partition located.. start fdisk:


fdisk /dev/mmcblk0

Welcome to fdisk (util-linux 2.25.2).
Changes will remain in memory only, until you decide to write them.
Be careful before using the write command.

I ended up creating 3 primary partitions. The plan is to delete partition 3 and then re-size the main partition to use up remaining space:


Device Boot Start End Sectors Size Id Type
/dev/mmcblk0p1 8192 131071 122880 60M c W95 FAT32 (LBA)
/dev/mmcblk0p2 131072 3887103 3756032 1.8G 83 Linux
/dev/mmcblk0p3 2048 8191 6144 3M 5 Extended
/dev/mmcblk0p4 3887104 20664319 16777216 8G 83 Linux

Command (m for help): d
Partition number (1-5, default 5): 3

Partition 3 has been deleted.

Device Boot Start End Sectors Size Id Type
/dev/mmcblk0p1 8192 131071 122880 60M c W95 FAT32 (LBA)
/dev/mmcblk0p2 131072 3887103 3756032 1.8G 83 Linux
/dev/mmcblk0p4 3887104 20664319 16777216 8G 83 Linux

Write out the partition and… then run to enable it:


Command (m for help): w
The partition table has been altered.
Calling ioctl() to re-read partition table.

partprobe

Next, put a filesystem on this new partition. Using df to determine the type of filesystem currently in use; I recommend that you stick with it for this most basic of operations:


df -T

Filesystem Type 1K-blocks Used Available Use% Mounted on
/dev/root ext4 1815440 1799056 0 100% /

Run mkfs


/sbin/mkfs -t ext4 /dev/mmcblk0p4

Creating filesystem with 2097152 4k blocks and 524288 inodes
Filesystem UUID: e36a8f6c-a457-4531-b67d-bea4885a9583
Superblock backups stored on blocks:
32768, 98304, 163840, 229376, 294912, 819200, 884736, 1605632

Allocating group tables: done
Writing inode tables: done
Creating journal (32768 blocks): done
Writing superblocks and filesystem accounting information:... this might go on for a bit..

Once completed.. mount this where the logs and databases live. To do this the first thing that needs to happen is to check your current fstab:


cat /etc/fstab
proc /proc proc defaults 0 0
/dev/mmcblk0p1 /boot vfat defaults 0 2
/dev/mmcblk0p2 / ext4 defaults,noatime 0 1
# a swapfile is not a swap partition, no line here
# use dphys-swapfile swap[on|off] for that

My first order of business was to mount the new filesystem to a temporary location (/var/log2) and then copy the contents of /var/log to that location, then delete everything in the log directory, and then unmount log2.


/var/log2

mount -t ext4 /dev/mmcblk0p4 /var/logs

cp -R log/* log2/.

cd log
rm -rf *

umount /dev/mmcblk0p4

Edit the fstab file to create a mount point for the new partition where the logs used to be written (added the orange line), and ran mount to verify that it will automount on a restart.


vi /etc/fstab

proc /proc proc defaults 0 0
/dev/mmcblk0p1 /boot vfat defaults 0 2
/dev/mmcblk0p2 / ext4 defaults,noatime 0 1
/dev/mmcblk0p4 /var/log ext4 defaults,noatime 0 0

mount -a

df

Filesystem 1K-blocks Used Available Use% Mounted on
/dev/root 1815440 1768992 0 100% /
devtmpfs 469688 0 469688 0% /dev
tmpfs 474004 0 474004 0% /dev/shm
tmpfs 474004 35972 438032 8% /run
tmpfs 5120 4 5116 1% /run/lock
tmpfs 474004 0 474004 0% /sys/fs/cgroup
/dev/mmcblk0p1 61384 20400 40984 34% /boot
/dev/mmcblk0p4 8125880 333800 7356268 5% /var/log

Restart and verify

Restart the little box and verify that the mount was preserved.


init 6

Log back in, and run df to check the filesystem health. It should now has the the main filesystem has some breathing room again:

                                                                                              
 ad88888ba  888888888888  88888888ba          db    888888888888  88        88  8b        d8  
d8"     "8b      88       88      "8b        d88b        88       88        88   Y8,    ,8P   
Y8,              88       88      ,8P       d8'`8b       88       88        88    `8b  d8'    
`Y8aaaaa,        88       88aaaaaa8P'      d8'  `8b      88       88        88      Y88P      
  `"""""8b,      88       88""""88'       d8YaaaaY8b     88       88        88      d88b      
        `8b      88       88    `8b      d8""""""""8b    88       88        88    ,8P  Y8,    
Y8a     a8P      88       88     `8b    d8'        `8b   88       Y8a.    .a8P   d8'    `8b   
 "Y88888P"       88       88      `8b  d8'          `8b  88        `"Y8888Y"'   8P        Y8  

NOTE TO DEVELOPERS: Make sure that your system has an acceptable clock source, i.e., a GPS
with sufficient signal or enable ntpd (internet connection required).

Everything here comes with ABSOLUTELY NO WARRANTY, to the extent
permitted by applicable law.

Type 'stratux-help' (as root) for a few debugging commands.
pi@raspberrypi:~ $ df

Filesystem 1K-blocks Used Available Use% Mounted on
/dev/root 1815440 1389856 332592 81% /
devtmpfs 469688 0 469688 0% /dev
tmpfs 474004 0 474004 0% /dev/shm
tmpfs 474004 6336 467668 2% /run
tmpfs 5120 16 5104 1% /run/lock
tmpfs 474004 0 474004 0% /sys/fs/cgroup
/dev/mmcblk0p4 8125880 329820 7360248 5% /var/log
/dev/mmcblk0p1 61384 20400 40984 34% /boot

At a later date I’ll work on expanding the main partition, but for now this should stabilize the machine and resolve the main disk consumption issue.

Monitor local Aircraft (for baiscally free) using Stratux

An ADS-B listening station has long been on my list of things to build.

Our current residence is located right under the domestic approach to San Francisco International Airport (see picture), so I believed there should be plenty of data for testing and tuning.

Local Air Traffic


What is Stratux

So, what are we talking about here? It’s Stratux, and Open Source complete software package that leverages inexpensive SDRs (Software Defined Radios).

“Stratux is a homebuilt ADS-B In receiver for pilots. It’s easy to assemble from inexpensive, off-the-shelf hardware, and probably already works with your electronic flight bag (EFB) of choice. Even better, if you’re so inclined, the software is open-source and hackable so you can build the system that’s right for you. “

This is some powerful stuff!


The Raspberry Pi 3 (revision b)

Raspberry PI 3
After completing a proof-of-concept residential IP space data acquisition project for a client, I found myself with a Raspberry Pi just sitting on shelf.

The Raspberry Pi 3b is a neat little device. A full Linux computer in a form factor the size of a pack of card, including a graphics chip that drives and HDMI output making it a real (compact and low power) desktop project computer.

SoC: Broadcom BCM2837
CPU: Quad-core ARM Cortex-A53, 1.2GHz
GPU: Broadcom VideoCore IV 3D graphics
RAM: 1GB LPDDR2 (900 MHz)
Networking: 10/100 Ethernet, 2.4GHz 802.11n wireless
Bluetooth: Bluetooth 4.1 Classic, Bluetooth Low Energy
Storage: microSD
GPIO: 40-pin header, populated
Ports: HDMI, 3.5mm analogue audio-video jack, 4× USB 2.0, Ethernet, Camera Serial Interface (CSI), Display Serial Interface (DSI)

My first Raspberry Pi purchase (as requested by the client) was a complete kit that cost me about $75 [ link to super size kit ], but you can certainly get the bare Raspberry Pi for under $40 (assuming you have some spare things like a micro-USB cable and a micro SD card).

Adding ADS-B radios

Adding ADS-B radios to the Raspberry Pi was as easy as ordering a kit form Amazon for under $40. [ Dual-Band ADS-B (978MHz UAT & 1090MHz 1090ES) Bundle For Stratux ]. For some reason, I’d debating buying the radios and building a kit. There are several complete kits with the computer, radios, specialized case, memory card etc. Prices vary between $120 to $250 depending on what parts you want. When I found this little kits with 2 sets of antennas, radios and coax for under $40.. it was just too easy to pull the trigger. So far they have been well worth the very inexpensive purchase!

Assembling the Sysetm

Custom Stratux Pi Case
Being a proof of concept, I didn’t feel like dropping another $20 on a specialized case such as this one (right), because I wasn’t sure if I’d be happy with this project.

The previous projects housing was too small (in my opinion) to provide what I wanted, which was a single item housing all the parts. Again, wanting to minimize costs while building project, I opted to re-purpose an small plastic ammo can into a make-shift housing. The unfortunate side effect of that decisions is that the final product looks like some sort of nefarious device (see final photos somewhere below).

Using the drill press / mill I have setup for another project, I quickly milled some vents to the plastic box to vent out the heat created by the Pi and the two nano radios. And believe me, this is something you want to do. Using the Stratux software, I’m typically seeing CPU temperatures around 140F (toasty), and the radio run a lot hotter.

SDRs installed into Raspberry Pi
Hot enough to blacken the decals I’d put on the bottoms of the radios (this is what they looked like before they were cooked).

Once I had all the milling completed I installed the radios, Pi and coax into the box. The coax are reasonable flexible but still barely looped around inside the box. This photo was before I added another port for an Ethernet cable (that hack to be discussed in a subsequent post). It might not look pretty, but it does work!

Milled ammo box
SDRs and Pi installed in the ammo box.
Final Stratux in Ammo Box project

Making it all work

Once the physical construction was done, the last step was to download the software, burn it to a little MicroSD card and fire it up!

UPDATED: 14-MAY-2017 — I have a new setup procedure documented in this newer article: STRATUX – Hacking together a WiFi connected Ground Station.

What does it look like?

Once you have connected to the ad-hoc stratux WiFi network, navigate to this IP address: http://192.168.10.1 . If your system is up and running you’ll see a page that looks like this:

Stratux landing page at 192.168.10.1

If you have some aircraft overhead (as I almost always do), you should see them listed on the ‘Traffic’ page. This is what mine looked like just a few minutes before writing this article:

Stratux Air Traffic page

Now that you have this up and running, it can provide a GDL 90 data feed to variety of flight planning / monitoring software, including some free apps for iOS and Android. The full current list of software supported on the Stratux main page. Here is a snapshot of software support at this time:

Stratux Software support