I have been working on distributed harvesting projects for the last 5 years. Generally the projects used a raft of AWS EC2 instances and Gearman to manage the workflow. Having recently heard of some similar solutions using AWS Lambda functions, I wanted to explore this as a possible new architecture for these projects. So.. I dug in.
Article Contents:
- Designing the Test
- Writing the Test Code
- Beyond the Build – Packaging your Java
- Example Gradle Config
- Testing your Function
- Conclusion
The learning curve for me has been a little steep. There is a limited number of languages supported (AWS doc linked here), but the only two that came close to meeting my needs were NodeJS and Java.
Most of my project code is written in CasperJS, a NodeJS extension, so I thought that perhaps that was the path of least resistance.. but it was not clear to me how to ‘install’ PhantomJS and CapserJS components into this Lambda Function, so I switched to working with Java.
Designing the Test
This is a VERY simple test blob, but it took me about a day to get to this point, since it was not totally clear to me how the AWS API Gateway might work and how the data is packaged/posted to the <Lambda Function. After a lot of poking around, uploading my first hunk of (totally broken) code; I was presented the a test CLI. The test CLI has only a few options or packaging up data payloads (at least for test), singular scalar string and a JSON string (which turns into an Object.. the source of the frustration I faced figuring this out).
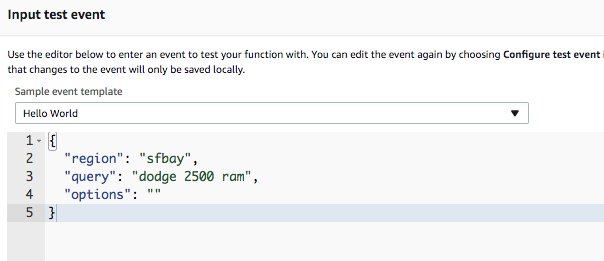
Boiling it down, this is what the test harness input looks like, when you use the “Hello World” test case, after changing the properties to match my desired inputs:
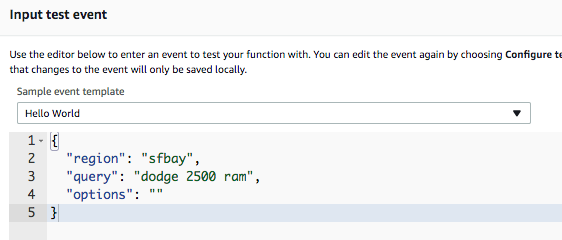
This will work fine for my needs, I prefer JSON payloads over a fixed (brittle) set of parameters.. this lets me muck around with the internals and add more capacity without having to work about external inputs; I’m just that way.
Having decided that JSON was the payload to accept.. next I needed to write a chunk of code to accept it.
Writing the Test Code
Knowing that I would be using a Json string as my input, I’d first coded my function like this:
public String searchAuto(String json){
return String.format(“%s”,json);
}
What I discovered quickly is that the string of JSON in the test payload (which looks like this), is deserialized as a Json Object, and not a string. This required me to step up my simple test to actually deal with the data as JSON. To do this, I selected simple.JsonObject. This is where the “fun” began. Hopefully this helps you avoid spending the time I did to figure out how to get the code cleanly compile locally.. AND to run when uploaded to AWS.
NOTE: I’m not going to say this is the right way to do this.. it’s just the way it worked for me. It’s kludgy and I don’t really like having a two step process but it’s working to get my version of HELLO WORLD working.
Long story short, I needed to get copies of these three .jar files added to my project’s build path, to get things going. Where you place them in your project might vary, but in a basic NetBeans project, these are in the lib/ directory off the project root:
ls -l lib/*.jar
7,267 lib/aws-lambda-java-core-1.1.0.jar
75,355 lib/aws-lambda-java-events-2.0.jar
57,607 lib/json-simple-2.1.2.jar
Locating the jars was not the simplest task either, Amazon’s horrible documentation sent me fishing around on various Github repos, but in the end.. I found them with a good ol search. I’ve linked the libs in the above block to where I sourced mine.
AWS Lambda requires use of specific handler hooks, when initiating the function. I’d like to wax poetic about what it all means but at this time, I just need a proof of concept, so using a code example.. this is the code I compiled:
package lambdaTest;
import com.amazonaws.services.lambda.runtime.Context;
import com.amazonaws.services.lambda.runtime.LambdaLogger;
import org.json.simple.JsonObject;/**
*
* @author david
*/public class LambdaTest {
public String myHandler(int myCount, Context context) {
LambdaLogger logger = context.getLogger();
logger.log(“received : ” + myCount);
return String.format(“Received value of %d”,myCount);
//String.valueOf(myCount);
}/* search options */
public String searchAuto(JsonObject json){return String.format(“Search Region [%s] for ‘%s'”,json.getString(“region”),json.getString(“query”));
}
}
Beyond the Build – Packaging your Java
Again, the think the AWS documentation is pretty crappy, and this extends to every AWS service I’ve had to use. Once you figure out what I really means, they work very well.. but decoding Seattle AWS-speak (for me) is often not easy. You might be smarter than me and able to see the path right off the bat.. well.. good for you. For me and the rest of the inelastic brain crowd.. I’ll try to give you the Cliff Notes version…
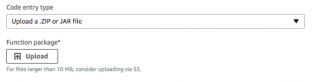
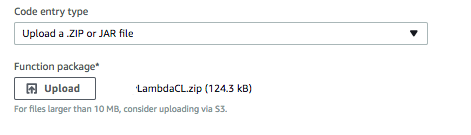
When I simply wanted to test my JAR, and I didn’t need the JSON libary, it was a simple matter of uploading the Jar file in the Lambda dialog; it looks like this:
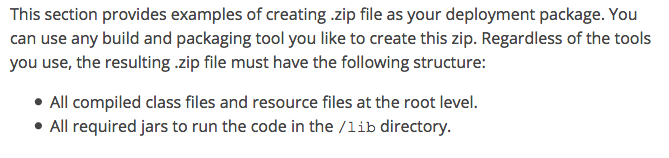
However, uploading more than 1 jar, things start to get a little wonky. The instructions say this:
Example Gradle Config
The page also provides a rather extensive rundown on using Gradle to run your build and make the package. Since creating my own .ZIP with the files in the ‘root’ as designated didn’t work, I went Gradle. If you decide to go Gradle, here is the build file I ended up using. When I made the mistake of including the Mavin paths for AWS into the Gradle build, I ended up with ALL if the AWS .jar files being downloaded and zipped into the library, creating a 7.8 MB upload!! For a Hello World program.. INSANE! Anyhow.. this is my gradle config that changes the default Gradle configs (build.gradle text file) to work with NetBeans paths. You might need to tweak this further to your own needs:
apply plugin: ‘java’
//repositories {
// mavenCentral()
//}sourceSets {
main {
java {
srcDir ‘src’
}
}
test {
java {
srcDir ‘test’
}
}
}dependencies {
compile (
fileTree(dir: ‘lib’, include: ‘*.jar’)
)
}task buildZip(type: Zip) {
from compileJava
from processResources
into(‘lib’) {
from configurations.runtime
}
}build.dependsOn buildZip
Using Gradle to run the build looks like this, run the command gradle build and you are on your way… as long as your code has a clean compile:
gradle build
BUILD SUCCESSFUL in 1s
3 actionable tasks: 3 executed
This allowed me to build a ZIP file that uploaded and worked. What I found out, was that the structure of the file is NOT really the way it was described in the docs. The contents of the zip file look like this for my project; note that when uploading this way, you are *not* packaging the .jar file for your class, but the compiled class file. Also not that it is *not* in the root of the path. With this knowledge, I can probably dispense with dual-building with Gradle and just package up the contents in this way. Hack the process!
Lambda/lambdaTest:
1612 Sep 29 15:18 LambdaTest.classLambda/lib:
7267 Sep 26 10:40 aws-lambda-java-core-1.1.0.jar
75355 Sep 26 10:13 aws-lambda-java-events-2.0.jar
57607 Sep 26 18:30 json-simple-2.1.2.jar
Now, you should be able to upload your zip file. Not that a file of 10MB or more, they’d like you to spend extra money storing it on S3… (niiiiice).
Testing your Function
Once uploaded, you can configure your test…
… and run it!

Conclusion
After a day of putting around and getting frustrated with the AWS docs that always leave (for me) gaping knowlege gaps.. I have a proof of concept test coded, compiled, uploaded and run. Now.. what needs to be sorted out is how to setup the AWS API Gateway to trigger this function… and look at how much each of those iterations will cost. With a planned execution batch that will range from 40-60 events per query.. this could add up fast.
So….. I’m not yet convinced this will function economically for my latest project; but I’m going to be testing out the concept pretty thoroughly over the coming week.