This is generally a simple process to install CapserJS on a *NIX box, but had not done this on a Raspberry Pi before, and ran into a couple of minor gotchas. This is a stripped down explanation of what I needed to do, but it will server as a reference for me, and maybe for some other people as well.
Prerequisites for installing CapserJS
Node
npm
PhantomJS
Node
Installing node is very simple, but you should grab root access to do it. This should be simple and run without any issues.
apt-get install nodejs
npm
The Node Package Manager will be used later to actually install CasperJS, once PhantomJS has been successfully installed.
apt-get install npm
PhantomJS
PhantomJS is a web automation framework, that CasperJS uses to run it’s extended suite of tools. NOTE. I found that I needed to modify my user’s (pi in this case) environment to tell Phantom that not to expect a console for rendering webpages; I’ll document that at the bottom.
apt-get install phantomjs
CasperJS
Installing CasperJS is done most simply via the npm (Node Package Manager):
npm install -g casperjs
Handling the PhantomJS Display Error
pi@raspberrypi:~ $ casperjs QXcbConnection: Could not connect to display
PhantomJS has crashed. Please read the bug reporting guide at and file a bug report.
Aborted
The fix is to add this line to the .bashrc file, which will stop the error. I simply added this to the last line of the file.
export QT_QPA_PLATFORM=offscreen
Trying to catch up to the year 2010, I’ve finally installed a purpose made dash cam, as opposed to my temporary GoPro installs (which were disappointing at best) of the years past.
After a few days of testing, I feel that the installation location is good, and the amount of dashboard reflections I’m seeing have been minimized to the maximum extent I can.
To date I have clipped a hand full of videos, looking at hte day and nighttime performance. I plan a more informational post in the next week, but for now, his is a short example I shot while getting gas at a local Buc-ee’s station here in Texas.
Here is a snapshot for a night time clip. There may be settings I can adjust on the camera to improve night capture. It works OK, but unless headlights are on, it’s able to resolve almost nothing.
It’s back! The STRAUX project lives again. With a fresh build of Stratux, it’s time to re-configure the SD card for swap space (new!) and a large logging partition to keep a full filesystem from crashing the device.
Get Current Partition Information
Once logged into the Straux box, switch to the root user and interrogate the disk partitions.
pi@raspberrypi: sudo su -

root@raspberrypi:  fdisk -l

[...]
Device Boot Start End Sectors Size Type
/dev/mmcblk0p1 8192 131071 122880 60M W95 FAT32 (LBA)
/dev/mmcblk0p2 131072 3700592 3569521 17.G Linux
The important aspects you will want to record as the End block ids for each partition, this is important in the next step, creating more partitions.
Creating the Extended Partition
First task is I want to create the extended partition that can be used for swap. This will eventually contain the swap and log partitions.
Running the fdisk tool, start to edit the partition. You will want to reference the base block of the device.. eg: /dev/mmcblk0
root@raspberrypi: fdisk /dev/mmcblk0
Command (m for help): p
Device Boot Start End Sectors Size Type
/dev/mmcblk0p1 8192 131071 122880 60M W95 FAT32 (LBA)
/dev/mmcblk0p2 131072 3700592 3569521 17.G Linux
Command (m for help): n
Partition type
p primary (2 primary, 0 extended)
l logical (numbered from 5)
Select (default p): l
At this point, the tool threw an error adding partition 5… Partition 5 is already defined. Delete it before re-adding it
Listing the partitions shows this: Device Boot Start End Sectors Size Type
/dev/mmcblk0p1 8192 131071 122880 60M W95 FAT32 (LBA)
/dev/mmcblk0p2 131072 3700592 3569521 1.7G Linux
/dev/mmcblk0p3 3700593 62333951 5863d359 28G Extended
/dev/mmcblk0p5 2191 4194446 4192256 2G Linux
Re-running ‘n option and letting it setup partition 6, got me where I wanted to be. This process didn’t seem like it worked right.. but the end result matches up with my goal of a huge partition and a smaller 2G to be used for swap:
Command (m for help): n
Partition type
p primary (2 primary, 0 extended)
l logical (numbered from 5)
Select (default p): l
Adding logical partition 6
First Sector: 4198400
Last Sector: 62333951
Created a new partition 6 of type 'Linux and a size of 27.7 GiB
Command (m for help): p Device Boot Start End Sectors Size Type
/dev/mmcblk0p1 8192 131071 122880 60M W95 FAT32 (LBA)
/dev/mmcblk0p2 131072 3700592 3569521 1.7G Linux
/dev/mmcblk0p3 3700593 62333951 5863d359 28G Extended
/dev/mmcblk0p5 2191 4194446 4192256 2G Linux
/dev/mmcblk0p6 4198400 62333951 58135552 27.7G Linux
Command (m for help): w
.. this is where the Ending block of your p2 partition number comes into play. The starting sector will be the ending number of your last partition (3569521) + 1 for next sector:
First Sector: 3700593
Last Sector: 62333951(this was the default/max)
Created a new partition 3 of type 'Extended' and of size 28 GiB
Command (m for help): n
Partition type
p primary (2 primary, 0 extended)
l logical (numbered from 5)
Select (default p): l
Adding the largest partition, for log file storage
Now repeat this process to add the 2nd new partition, this one will consume the rest of the device, and eventually will be where the `/log` directory is mounted.
root@raspberrypi: fdisk /dev/mmcblk0
Command (m for help): p
Device Boot Start End Sectors Size Type
/dev/mmcblk0p1 8192 131071 122880 60M W95 FAT32 (LBA)
/dev/mmcblk0p2 131072 3700592 3569521 1.7G Linux
/dev/mmcblk0p3 3700593 7895039 4194447 2G Extended
Command (m for help): n
Partition type
p primary (2 primary, 0 extended)
l logical (numbered from 5)
Select (default p): l
Space in the /var/log directory of a Stratux device, can quickly become consumed, if you don’t have a log management / rotation strategy.
I use a couple of mitigation methods, including a dedicated filesystem for /var/log (so the system does not become unstable and crash).
On the Stratux device itself, I use the following script to auto-rotate the sqlite database file every 24 hours, using a crontab entry.
crontab entry
PATH=/root/go/bin:/usr/local/sbin:/usr/local/bin:/usr/sbin:/usr/bin:/sbin:/bin

# Run the Stratux DB Rollover
5 6 * * *  /root/stx-rollover.sh >> /var/log/stx-rollover.log
Rotation script
stx-rollover.sh
#!/bin/bash

# Startup Settings
STARTTIME=`date +%m-%d_%T`;
TIMESTAMP=`date +%m-%d`;
LOGPATH="/var/log";
OLDFILE="$LOGPATH/stratux.sqlite";
NEWFILE="$LOGPATH/stratux.sqlite.$TIMESTAMP";

echo "$STARTTIME === Stratux Rollover === "

echo "Stratux STOP"
service stratux stop

echo "Check for $OLDFILE"
ls -ltr $OLDFILE

if [ -e "$OLDFILE" ]
then
	echo "Moving $OLDFILE ==> $NEWFILE"
	mv $OLDFILE $NEWFILE
else
	echo "ERROR - Unable to locate database $OLDFILE"
fi

## Startup Stratux Now.
echo "Stratux START"
service stratux start

if [ -s "$NEWFILE" ]
then
	echo "Moved DB to $NEWFILE"
	ls -l $NEWFILE
	echo "Compressing $NEWFILE"
	gzip $NEWFILE
else
	echo "ERROR - Unable to locate $NEWFILE"
fi

echo "Rollover Completed"
End result of this process, is a list of gzipped date stamped databases:
[...]
    152905988 Nov  4 01:05 stratux.sqlite.11-04.gz
    135434058 Nov  6 11:04 stratux.sqlite.11-05.gz
    148176518 Nov  6 11:45 stratux.sqlite.11-06.gz
    157341677 Nov  7 13:10 stratux.sqlite.11-07.gz
[...]
In addition to this logfile rotation strategy, I also pull off these files on a daily basis and archive them to another *NIX based system in my local network. This process is handled using the rsync utility. This process is run every 24 hours, using a cron job on the archival system.
rsync file archiving process
download.dbs.sh
echo '======================================'
date
rsync -a --remove-source-files -e "ssh -l root" 192.100.0.21:/var/log/stratux.sqlite.*.gz /Development/STRATUX/sqlite-dbs/.
This should be a good starting point for your own Stratux logfile management strategy.
Following my initial vanilla setup of STRATUX, I decided to make some networking and file system modifications to turn it into a fix (ground) monitoring station.
The initial effort was quite successful; that is until I ran out of disk space and during my cleanup effort accidentally wrecked the source tree, rendering it mostly inoperable. So, I’m taking that opportunity to re-document the setup process I used to accomplish the following:
The first step was performing a default STRATUX install to a micro SD card. I selected a 16GB card for this project, but Stratux will run on anything down to 4 GB, based on what I observed with the default file system (default size is under 2GB).
I won’t repeat the installation instruction here, since they might have changed since this article was written. The instructions I used, and link to the latest Pi Image are located here: [ STRATUX.me ]
Preliminary Work
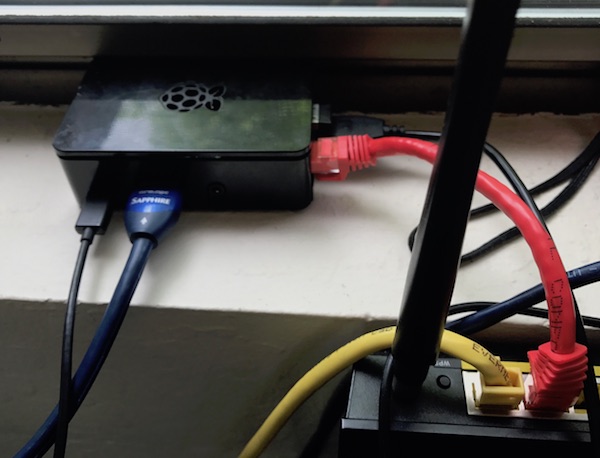
Once the card was imaged, I plugged in an HDMI cable, keyboard, mouse and Ethernet cable to start work. Stratux Pi preliminary setup
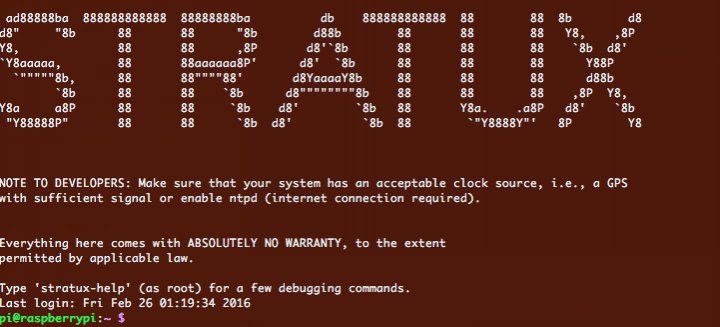
Once powered up and the boot sequence completes, your are challenged with a simple login prompt. The initial login is: pi and the password is raspberry.
Once you login, you’ll see this welcome screen (sorry for the crappy photo.. if I can figure out how to PiP the HDMI output to my Mac to snap a good screen shot, I’ll re-do this! Stratux first login
You will WANT to change that default password first!
Changing Default Password
Switch user to root and change the pi user’s password. You do not NEED to be root to change your own password, but we’ll need to be root from here on out.. and why not just do it that way?
pi@raspberrypi: sudo su -
root@raspberrypi: passwd pi

Enter new UNIX password:  enter your password here

Retype new UNIX password: re-enter your password here
Enable eth0 for wired LAN
Next step involves enabling eth0 and turning on it’s DHCP setting. Once this is complete, it should be possible to SSH into the pi and continue the modifications from your ‘master’ computer.
root@raspberrypi:~# cd /etc/network
root@raspberrypi:~# vi interfaces
At the top of the file you will see the line auto lo, below that add the following ‘auto eth0’. Then below the line iface lo inet loopback, add the line ‘iface eth0 inet dhcp’
auto lo

auto eth0
iface lo inet loopback

iface eth0 inet dhcp

...
At this point I do not plan to try enable the WiFi, first want to verify that eth0 will come up with a LAN address.
Close the edited file, and then restart networking, then run ifconfig to verify that eth0 is up with and assigned IP address (my local DHCP range is 10.10.1.10 – 1.50).
At this point you should be able to ssh into the machine directly and continue the work. From your main computer (hopefully a *NIX variant), open up a shell and ssh to the Pi. You will receive a password challenge:
IngeniiGroup:STRATUX$ ssh pi@10.10.0.11
pi@10.10.0.11's password:   _enter your password_
If the login was successful, you will see this welcome banner: STRATUX welcome banner
Next, will be the modifications to disable the adhoc network and enable local WiFi connectivity.
Disable adhoc ‘stratux’ WiFi
Now that you are logged into the Stratux via ssh, assume root user and then cd to the networking directory again:
pi@raspberrypi:~ $ sudo su -
root@raspberrypi:~# cd /etc/network
root@raspberrypi:~# vi interfaces
Now, this time the interfaces file will be heavily modified to configure the eth0 and wlan0, along with some rational routing, using the ‘metric’ setting to prioritize route assignments.
Once again, at the top of the file another new line will be added:
auto lo

auto wlan0

auto eth0
iface lo inet loopback
Then replacing the entire eth0 and wlan0 entries with the following block of text. NOTE: The line `wireless-power off` will disable the power management for WiFi. If this is not done, I have found that the chip will shut down after a couple of hours and the device will become unreachable via wifi, until it’s rebooted. This discovery took no short amount of time to discovery and remedy.
Restart networking and verify everything is working by logging back in.
root@raspberrypi:~# service networking restart
IngeniiGroup:STRATUX$ ssh pi@10.10.0.11

pi@10.10.0.11's password:   _enter your password_

pi@raspberrypi:~ $ sudo su -
If you were able to log in again, using the fixed IP address, then the first part of the static IP configurations are completed.
Configure the wlan0 WiFi
NOTE!: As of 14-MAY-2017 and Raspberry Pi 3b; 5.0GHz Wifi IS NOT SUPPORTED.
Now.. the really fun part.. connecting the Pi to your WiFi network. Obviously I will not be displaying my own real WiFi access credentials, so you will need to find the SSID you want to connect to and the password for that network before starting.
The networking configuration that you setup in the previous step contains this setting: ‘wpa-conf /etc/wpa_supplicant/wpa_supplicant.conf‘. The next step is to create/configure that file.
The file is fairly simple, and with the SSID and Password you already obtained for your network (you did that already.. right?). You’ll simple fill that information into the blanks named _SSID_ and _NETWORK_PASS_.
Open the file and edit:
root@raspberrypi:~# vi /etc/wpa_supplicant/wpa_supplicant.conf
Add this block below the original lines, using your settings:
network={
        ssid="_SSID_"
        psk="_NETWORK_PASS_"
}
Save this file, restart networking, signal a daemon reload, and then, reboot of the device. While it is rebooting, unplug the Ethernet cable (from eth0). Once the networking is back up, check to make sure you are able to contact the machine via it’s WiFi connection.
root@raspberrypi:~# service networking restart
root@raspberrypi:~# ystemctl daemon-reload
root@raspberrypi:~# reboot
After 2-3 Min. the Pi should have completed restarting and you should be able to verify a successful WiFi login.
IngeniiGroup:STRATUX$ ssh pi@10.100.0.21
Increasing Root Filesystem Space
By default, the size of the disk partitions on the image is VERY small; less than 2GB. Most of that space is used by by the base Stratux install, leaving about 400MB of space to save logs (and your replay database if you turn it on). You can see this with the ‘df’ command:
This just isn’t enough space, especially for the ‘/var/log’ directory where a lot of transient/logging data is written. My solution is to create a disk partition and mount it to `/var/log`.
Locate the disk device
Instructions on the web are not exactly correct, some suggest /dev/sda as the main device, however my testing shows it’s actually this named ‘/dev/mmcblk0’.
root@raspberrypi:~# fdisk -l | grep Disk

[...]

Disk /dev/mmcblk0: 14.5 GiB, 15523119104 bytes, 30318592 sectors
… with the following partitions:
Device         Boot  Start     End Sectors  Size Id Type

/dev/mmcblk0p1        8192  131071  122880   60M  c W95 FAT32 (LBA)

/dev/mmcblk0p2      131072 3887103 3756032  1.8G 83 Linux
Running fdisk
With the physical partition located.. start fdisk:
fdisk -u /dev/mmcblk0
Welcome to fdisk (util-linux 2.25.2).

Changes will remain in memory only, until you decide to write them.

Be careful before using the write command.
First, order of business is to increase the size of the main partition, to give it a big more room than just 1.8GB. I like to bump it up to around 4GB to leave room for installing more system updates and tools. To do this you will need to know the starting and ending blocks of the partition. That is available with the ‘print’ command:
Command (m for help): p
Disk /dev/mmcblk0: 14.5 GiB, 15523119104 bytes, 30318592 sectors

Units: sectors of 1 * 512 = 512 bytes

Sector size (logical/physical): 512 bytes / 512 bytes

I/O size (minimum/optimal): 512 bytes / 512 bytes

Disklabel type: dos

Disk identifier: 0xe6a544c8
Device         Boot  Start     End Sectors  Size Id Type

/dev/mmcblk0p1        8192  131071  122880   60M  c W95 FAT32 (LBA)

/dev/mmcblk0p2      131072 3887103 3756032  1.8G 83 Linux
Now delete the partition. Yes.. feels VERY dangerous.. and it is.. but as long as the starting block is maintained, and the end block number is increased.. this will end up being a safe operation. Verify that you targeted the correct partition by using ‘p’ again:
Command (m for help): d

Partition number (1,2, default 2): 2
Partition 2 has been deleted.
Command (m for help): p

Disk /dev/mmcblk0: 14.5 GiB, 15523119104 bytes, 30318592 sectors

Units: sectors of 1 * 512 = 512 bytes

Sector size (logical/physical): 512 bytes / 512 bytes

I/O size (minimum/optimal): 512 bytes / 512 bytes

Disklabel type: dos

Disk identifier: 0xe6a544c8
Device         Boot Start    End Sectors Size Id Type

/dev/mmcblk0p1       8192 131071  122880  60M  c W95 FAT32 (LBA)
If this is correct, now recreate it with same number (2), start and type but with a bigger end (taking care not to overlap with other partitions). Try to align things on a megabyte boundary that is for end, make it a multiple of 2048 minus 1. Change the type if needed with t (for partitions holding an extX or btrfs filesystem, the default of 83 is fine). Then `w` to write and `q` to quit.
Command (m for help): n

Partition type

   p   primary (1 primary, 0 extended, 3 free)

   e   extended (container for logical partitions)

Select (default p): p

Partition number (2-4, default 2): 2

First sector (2048-30318591, default 2048): 131072

Last sector, +sectors or +size{K,M,G,T,P} (131072-30318591, default 30318591): 8451072
Created a new partition 2 of type 'Linux' and of size 4 GiB.
Command (m for help): w

The partition table has been altered.

Calling ioctl() to re-read partition table.

Re-reading the partition table failed.: Device or resource busy
The kernel still uses the old table. The new table will be used at the next reboot or after you run partprobe(8) or kpartx(8).
root@raspberrypi:~#
The partition table will have been modified but the kernel will not be able to take that into account as some partitions are mounted.
However, if in-use partitions were only enlarged, you should be able to force the kernel to take the new layout with:
root@raspberrypi:~# partx /dev/mmcblk0

NR  START     END SECTORS SIZE NAME UUID

 1   8192  131071  122880  60M      e6a544c8-01

 2 131072 8451072 8320001   4G      e6a544c8-02
If the command works the next step is to expand the filesystem. In my case I needed to reboot before the kernel picked up the new partition size, despite running partx to fill up this new space.
root@raspberrypi:~# init 6
Following the restart, execute `resize2fs` and run an on-line expansion of the filesystem, and finally verify it again with ‘df -h’
root@raspberrypi:~# resize2fs /dev/mmcblk0p2
resize2fs 1.42.12 (29-Aug-2014)
Filesystem at /dev/mmcblk0p2 is mounted on /; on-line resizing required
old_desc_blocks = 1, new_desc_blocks = 1
The filesystem on /dev/mmcblk0p2 is now 1040000 (4k) blocks long.
The next step is to add a 3rd partition which will then be mounted to `/var/log`
Creating a dedicated filesystem for logging / database
I ended up creating 3 primary partitions, the largest of which will be mounted to `/var/log`.
fdisk /dev/mmcblk0
Command (m for help): n

Partition type

   p   primary (2 primary, 0 extended, 2 free)

   e   extended (container for logical partitions)

Select (default p): p

Partition number (3,4, default 3): 3

First sector (2048-30318591, default 2048): 8451073

Last sector, +sectors or +size{K,M,G,T,P} (8451073-30318591, default 30318591): 30318591
Created a new partition 3 of type 'Linux' and of size 10.4 GiB.
Command (m for help): w

The partition table has been altered.

Calling ioctl() to re-read partition table.

Re-reading the partition table failed.: Device or resource busy
The kernel still uses the old table. The new table will be used at the next reboot or after you run partprobe(8) or kpartx(8).
root@raspberrypi:~# partprobe
Checked to make sure the device was crated by checking the `/dev` directory:
root@raspberrypi:~# ls -l /dev/mmcblk0*

brw-rw---- 1 root disk 179, 0 May 15 15:11 /dev/mmcblk0

brw-rw---- 1 root disk 179, 1 May 15 15:11 /dev/mmcblk0p1

brw-rw---- 1 root disk 179, 2 May 15 15:11 /dev/mmcblk0p2

brw-rw---- 1 root disk 179, 3 May 15 15:11 /dev/mmcblk0p3
Next, put a filesystem on this new partition. Using df to determine the type of filesystem currently in use; I recommend that you stick with it for this most basic of operations:
Creating filesystem with 2733439 4k blocks and 684096 inodes
Filesystem UUID: 94f004af-7008-4dbe-8805-3eb2d739436b
Superblock backups stored on blocks:
32768, 98304, 163840, 229376, 294912, 819200, 884736, 1605632, 2654208
Allocating group tables: done
Writing inode tables: done
Creating journal (32768 blocks): done
Writing superblocks and filesystem accounting information:... this might go on for a bit..
Once completed.. mount this where the logs and databases live. To do this the first thing that needs to happen is to check your current fstab:
cat /etc/fstab

proc            /proc           proc    defaults          0       0

/dev/mmcblk0p1  /boot           vfat    defaults          0       2

/dev/mmcblk0p2  /               ext4    defaults,noatime  0       1

# a swapfile is not a swap partition, no line here

#   use  dphys-swapfile swap[on|off]  for that
My first order of business was to copy the current `/var/log` to a new location, create a new clean mount point for `/var/log` and then mount the new filesystem, and then verify it’s mounted using `df -h`
Edit the fstab file to create a mount point for the new partition where the logs used to be written (added the orange line), and ran mount to verify that it will automount on a restart.
root@raspberrypi:~# vi /etc/fstab
proc            /proc           proc    defaults          0       0

/dev/mmcblk0p1  /boot           vfat    defaults          0       2

/dev/mmcblk0p2  /               ext4    defaults,noatime  0       1

/dev/mmcblk0p3 /var/log         ext4    defaults,noatime  0       0

# a swapfile is not a swap partition, no line here

#   use  dphys-swapfile swap[on|off]  for that
root@raspberrypi:~# mount -a
Restart and verify
Restart the little box and verify that the mount was preserved.
init 6
Log back in, and run df to check the filesystem health. It should now has the the main filesystem has some breathing room again:
If you do not have a GPS receiver attached to your Stratux, then it might not be able to determine proper system time. When this is the case, enabling ntpd will be your solution. Using national time sync services, it will keep your system clock correct. If you have your GPS plugged in, it’s getting really good timing signals already.. or the location function would not work at all! For the non GPS users:
Install ndptdate:
root@raspberrypi:~# apt-get install ntpdate

Reading package lists... Done

Building dependency tree

Reading state information... Done

[...]

Do you want to continue? [Y/n] Y

Get:1 http://mirrordirector.raspbian.org/raspbian/ jessie/main liblockfile-bin armhf 1.09-6 [18.2 kB]

Get:2 http://mirrordirector.raspbian.org/raspbian/ jessie/main liblockfile1 armhf 1.09-6 [14.7 kB]

Get:3 http://mirrordirector.raspbian.org/raspbian/ jessie/main ntpdate armhf 1:4.2.6.p5+dfsg-7+deb8u2 [69.0 kB]

[...]

Setting up ntpdate (1:4.2.6.p5+dfsg-7+deb8u2) ...

Processing triggers for libc-bin (2.19-18+deb8u3) ...
It should now start at bootup and resolve any timing issues you might have.
Update your Pi with the latest updates and security patches
Some might remember “Black Friday” when a worm created some serious disruption in the tech world.. including at hospitals in the UK. And it happened primarily because people are not applying their security patches! Although the risk of your Pi being botified and ransomed my not be high.. you should be updating it regardless! So, let’s do that now.
Finish up with this command to clean up some of the used disk space. Since you’ve already bumped the numbers on your partitions in the previous steps.. this is not nearly as necessary, but why leave unused stuff lying around? Your mother taught you to clean up afteryourself, right?
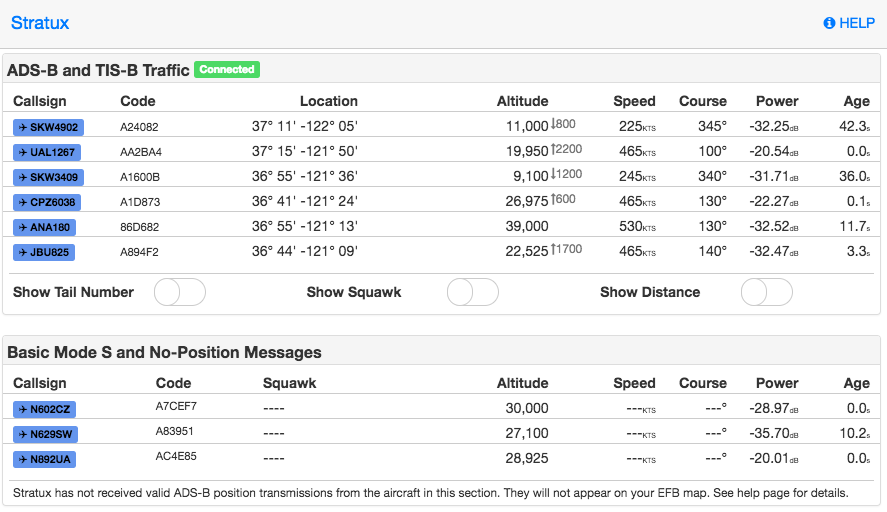
Stratux has a rich community of forums, and a lot of information about debugging Strtux, but so far good hacking information is really hard to find. One of the things of most interest to me was “What is severing up this webpage?”
Every search was a dead end, so I went back to my *NIX system administration roots and thought.. “Well, if someone wont admit what’s serving up the stream.. I’ll find out for myself.
Who’s Your Server? — gen_gdl90
A couple of quick commands told me which PID was hanging onto Port 80 and from there which process was associated with the PID:
Once I had an idea of who’m I was looking for, running lsof with the port number gave me 60 entries… and bingo.. there was the nugget of gold I was looking for:
Once onto the trail of the web path, I see that this is an Angular based application (ugh.. I really despise Angular.. I just do.), and all based on some JS stuffs. I get it. for an app like this the two-way data binding of Angular is probably the right too; but I still do not (no do I have to) like it.
root@raspberrypi:~# cd /var/www/maui/

root@raspberrypi:/var/www/maui# ls -l

total 12

drwxr-xr-x 2 root root 4096 Mar 15  2016 css

drwxr-xr-x 2 root root 4096 Mar 15  2016 fonts

drwxr-xr-x 2 root root 4096 Mar 15  2016 js

root@raspberrypi:/var/www/maui#
What I was hoping to find was the location of the that status page.. but.. I believe that what I’m looking for now is the .JS file that manages that label. Initially this looked like a dead end…
Realiazing this was some templating sub-directory, and the root was likely at /var/www, I ran another search that found the location of the desired string, and likely the location of the parts I’m looking for:
 This is generally a simple process to install CapserJS on a *NIX box, but had not done this on a Raspberry Pi before, and ran into a couple of minor gotchas. This is a stripped down explanation of what I needed to do, but it will server as a reference for me, and maybe for some other people as well.