Tag Archives: gearman

Installing Gearman on OSX Yosemite (usually)

logo

Another round of Gearman installs, following the update to OSX Yosemite. (Updated 12-AUG-2015)

Here is your guide to getting it done!

Make sure you have XCode developer tools

First step is to make sure you have the Command Line developer tools installed. To do this, or verify that it’s already done, while logged in as a non-root user, type:

xcode-select –install

A system dialog box should open up and request that you grant it permission to perform the command line install. Follow the steps and instructions in the dialogs to complete this step.

Collected the Packages

You will need the following packages

  • libevent
  • boost
  • gearmand

libevent

The latest version can be acquired here: http://libevent.org/

Unpack and compile

gunzip libevent-2.0.22-stable.tar.gz

tar xvf libevent-2.0.22-stable.tar

./configure

make install

boost

The latest version can be acquired here:
http://www.boost.org/users/download/

Unpack and compile

gunzip boost_1_58_0.tar.gz

tar xvf boost_1_58_0.tar

./bootstrap.sh

./b2 –a –build-type=complete –layout=versioned

Note: these paths reported by b2 during build are important to save:

The Boost C++ Libraries were successfully built!

The following directory should be added to compiler include paths:

/opt/boost_1_58_0

The following directory should be added to linker library paths:

/opt/boost_1_58_0/stage/lib

Gearman

The latest code can be acquired here: https://launchpad.net/gearmand

It is possible that the compiler won’t find libevent so the following environment variables may need to be set:

export CPPFLAGS=’-I/opt/boost_1_58_0′
export LDFLAGS=’-L/opt/boost_1_58_0/stage/lib’

Unpack and compile

gunzip gearmand-1.1.12.tar.tgz

tar xvf gearmand-1.1.12.tar

./configure –with-boost –with-boost-libdir=/opt/boost_1_58_0/stage/lib –prefix=/opt –with-sanitize –enable-fast-install –with-gnu-ld –enable-ssl

make && make install

At this point, you should be up and running!

If you also need to install gearman for PHP libraries, my post here should help: https://blog.daviddemartini.com/archives/5312

Upgrading OSX and impacts to Gearman PHP components

Originally posted June 2013
Being on the Apple Developers list, I’ve installed the latest edition of the OS and am doing some Beta testing of my apps.

A few days after upgrading, my Gearman test code stopped working with this error:

Fatal error: Class ‘GearmanClient’ not found in connect.class.php on line 35

That triggered a slight bit of panic, however I knew my libraries were mostly in tact as I was able to start my gearmand service without a problem at all. Hoping against odds I decided to simply run a new make and install of the Gearman PHP components.

UPDATE: If you do not have the latest Gearman libraries for PHP, they are located here: http://pecl.php.net/package/gearman I recommend you download the latest version and build from that.. My page on building PHP Gearman on OSX is located [HERE]

I cd’d to the directory where I’d built my Gearman PHP libraries a few days prior:

david$ cd /usr/local/gearman-1.1.2

NOTE: If you have not recently built PHP Gearman modules, this page [ HERE ] detailed getting to the next step.

Then I ran a make and a make install in the directory.

gearman-1.1.1 david$ make
/bin/sh /usr/local/gearman-1.1.2/libtool –mode=install cp ./gearman.la /usr/local/gearman-1.1.2/modules
cp ./.libs/gearman.so /usr/local/gearman-1.1.2/modules/gearman.so
cp ./.libs/gearman.lai /usr/local/gearman-1.1.2/modules/gearman.la
[…]
Build complete.
Don’t forget to run ‘make test’.

gearman-1.1.1 david$ sudo make install
/bin/sh /usr/local/gearman-1.1.2/libtool –mode=install cp ./gearman.la /usr/local/gearman-1.1.2/modules
cp ./.libs/gearman.so /usr/local/gearman-1.1.2/modules/gearman.so
cp ./.libs/gearman.lai /usr/local/gearman-1.1.2/modules/gearman.la
———————————————————————-
Libraries have been installed in:
/usr/local/gearman-1.1.2/modules

[…]
———————————————————————-
Installing shared extensions: /usr/lib/php/extensions/no-debug-non-zts-20090626/

This worked perfectly, and following a RE-CREATION of my /etc/php.ini file (which I also lost), I was good to go!

include_path=.:/mnt/crawler
extension=”gearman.so”

Viola.. Gearman development back underway!!

Installing Gearman PHP components for OSX

Locating the latest PHP Components

The Gearman.org page has links to the PHP code on the Downloads page, however the link is very old. The latest code is located at: http://pecl.php.net/package/gearman.

As of 23-OCT-2014, the current stable version is gearman-1.1.2.

I like to drop these files in my /opt directory, and work on them there and unball the package.

mv ~/Downloads/gearman-1.1.2.tgz /opt/.
tar xvzf gearman-1.0.2.tgz
cd gearman-1.0.2

Configuring for Build

The following commands prepared the PHP package to build on OSX Yosemite (10.10).

phpize
Configuring for:
PHP Api Version: 20121113
Zend Module Api No: 20121212
Zend Extension Api No: 220121212

./configure
checking for grep that handles long lines and -e… /usr/bin/grep
checking for egrep… /usr/bin/grep -E
checking for a sed that does not truncate output… /usr/bin/sed
[…]
appending configuration tag “CXX” to libtool
configure: creating ./config.status
config.status: creating config.h

Building the Library

Next step is to run the compile and install the built objects:

make
/bin/sh /opt/gearman-1.1.2/libtool –mode=compile cc -I. -I/opt/gearman-1.1.2 -DPHP_ATOM_INC -I/opt/gearman-1.1.2/include -I/opt/gearman-1.1.2/main -I/opt/gearman-1.1.2 -I/usr/include/php -I/usr/include/php/main -I/usr/include/php/TSRM -I/usr/include/php/Zend -I/usr/include/php/ext -I/usr/include/php/ext/date/lib -I/usr/local/include -I/usr/local/include -DHAVE_CONFIG_H -g -O2 -Wall -c /opt/gearman-1.1.2/php_gearman.c -o php_gearman.lo
mkdir .libs
[…]
Build complete.
Don’t forget to run ‘make test’.

make install
Installing shared extensions: /usr/lib/php/extensions/no-debug-non-zts-20121212/

Telling PHP about gearman

You will need to identify your relevant php.ini file, and edit it, letting PHP know where the library file are located.

Typically under OSX, this file does not exist, and it must be created.

Edit the file:

vi /etc/php.ini

Either way, make sure these two lines are in the file:

Add these lines:

include_path=.:/mnt/crawler
extension=gearman.so

DONE

At this point you should be able to reference Gearman library in your PHP code.

These lines of code, should not throw an error:

$client = new GearmanClient(); // instance
$worker = new GearmanWorker(); // instance

Amazon AWS – spinning up a micro for Gearman Client

Walkthough for spinning up a micro EC2 for use as a GearMan worker node.

This is a preliminary effort, and the steps may very well change over the next few weeks as these are tested out. The documentation I’m presenting here is based on my previous work [HERE] Install Gearman + Gearman-PHP on AWS ec2.

Getting Started

This assumes you already have an AWS account setup. If you don’t you need to go do that now. You can get started [HERE].

Once logged in, go to your dashboard. From here you’ll be selecting the EC2 area.
Screen Shot 2013-06-17 at 10.26.23 AM

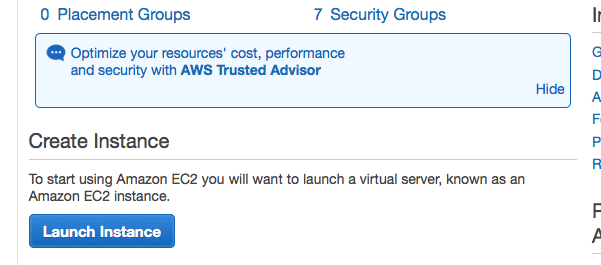
Under resources you’ll find a button “Launch Instance”. This is the button you want to click. This is where the fun begins.
Screen Shot 2013-06-17 at 10.27.57 AM

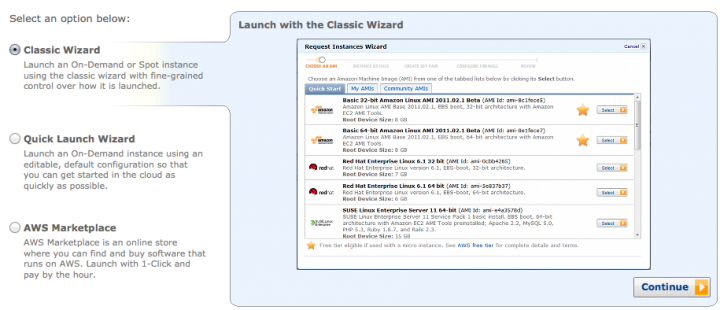
In this case I’m going to use the ‘Classic Wizard’. It’s really not that magical but Wizard is such a super-awesome-cool-name (ala Windoze ’95) you’ll see it used here. Anyhow, I’m going classic:
Screen Shot 2013-06-17 at 10.30.04 AM

I want to keep things EVERY simple here so I’m going use the default Amazon AWS distribution/AMI.
Screen Shot 2013-06-17 at 10.31.52 AM

For this exercise, I’m using an ‘On Demand’ Micro instance:
Screen Shot 2013-06-17 at 10.34.01 AM

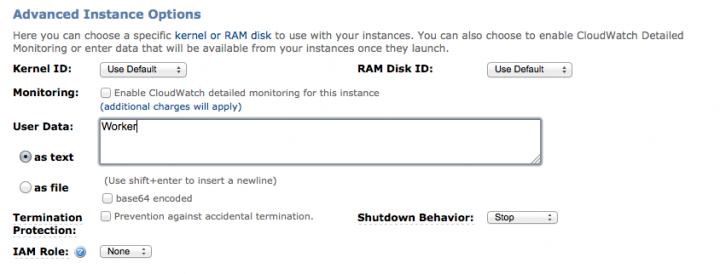
No Advanced features should be required, so I’ve left everything on this page set to it’s default settings:
Screen Shot 2013-06-17 at 10.36.20 AM

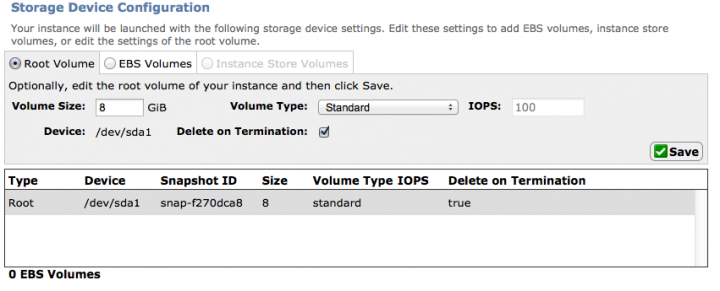
Next the storage requirements are defined. Since this is a worker that should be able to be spun up on need, and shouldn’t require much in the way of local storage, I’m going to opt out of defining and EBS volume and rely upon Ephemeral storage.
Screen Shot 2013-06-17 at 10.40.43 AM

At this point, I don’t see the need to define any keys for EC2 management, so I’m leaving this area blank:
Screen Shot 2013-06-17 at 10.41.30 AM

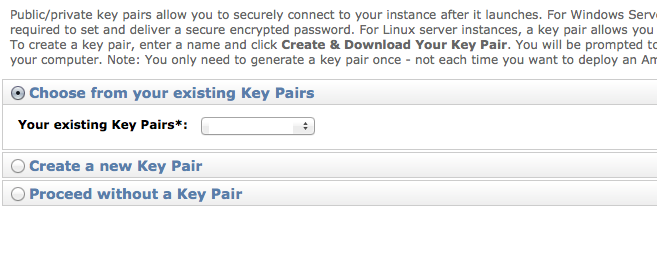
Next, select the .ssh key file (it’s stored in a .pem file) that you want to use to access this system. If you don’t have a set of these keys setup already, you’ll want to define them. I’m using one specific to this node class already defined.. you’ll need to handle this step as your policy/needs dictate. It’s not that complex, but word to you, DOWNLOAD THAT KEY, once you create it, there is no known way (according to all places I’ve checked) to download it again. BE WARNED.
Screen Shot 2013-06-17 at 10.47.16 AM

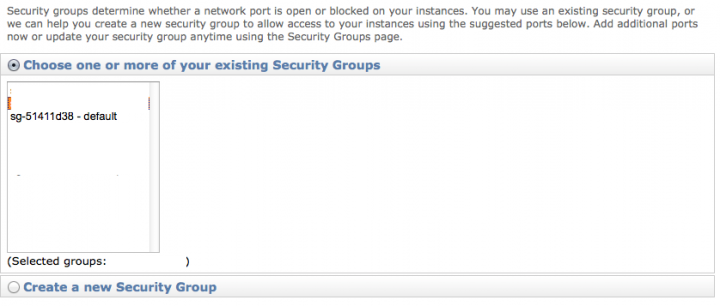
Next step will be do select a security profile for your node. I’ve found that the default one is sufficient for these purposes. You may want to further restrict the number of ports open, as the default opens a few extra things you might not want. This is another area where you’re own needs an policy will need to be carefully considered. Otherwise, start with default and iterate to the optimal configuration.
Screen Shot 2013-06-17 at 10.52.02 AM

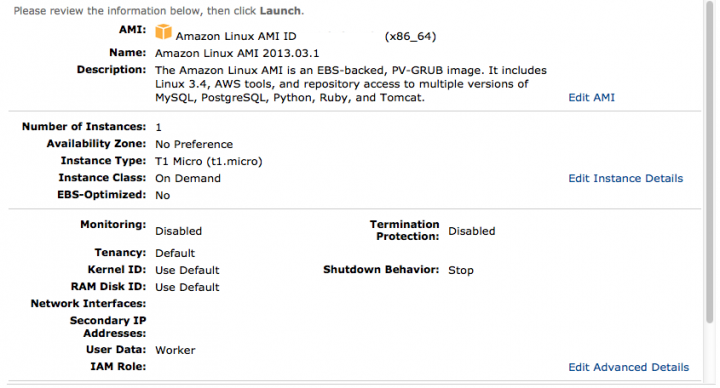
Check your settings on this review page, and if everything is to your preference, then you can spin it up!!
Screen Shot 2013-06-17 at 10.55.38 AM

One you click launch, it will take a little while for the instance to go live.
Screen Shot 2013-06-17 at 10.57.20 AM

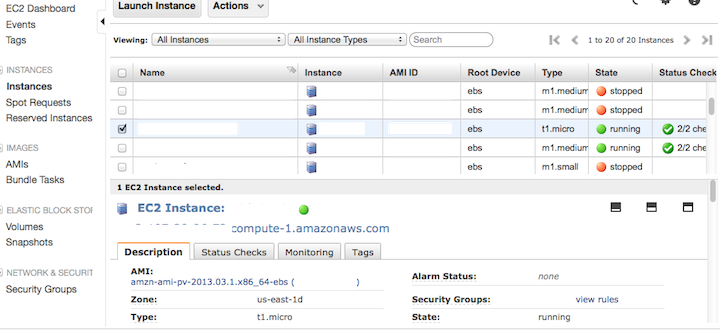
Once launched, you’ll be able to see your instance in the dashboard! Sorry bout all the greyd out information, but the instance I’m talking about is slightly highlighted in blue.
Screen Shot 2013-06-17 at 11.00.22 AM

NOW, YOU CAN START TO INSTALL YOUR GEARMAN COMPONENTS

Install Gearman + Gearman-PHP on AWS ec2

The fun and games continue!! As with every Gearman implementation I’ve done, there are trick for each environment. Here are the Cliff Notes (originally sourced from [Planet MySQL page] with my own twist) for getting Gearman setup on an Amazon Web Services (AWS) EC2 (Elastic Computing 2) node running the default AWS distribution. As always, your experience may vary.

Install required libraries

First, get all the required libraries installed using yum:

[ec2-user@]$ sudo yum install -y gcc
[ec2-user@]$ sudo yum install -y gcc-c++
[ec2-user@]$ sudo yum install -y gperf
[ec2-user@]$ sudo yum install -y boost
[ec2-user@]$ sudo yum install -y boost-devel
[ec2-user@]$ sudo yum install -y memcached
[ec2-user@]$ sudo yum install -y libuuid
[ec2-user@]$ sudo yum install -y libuuid-devel
[ec2-user@]$ sudo yum install -y libevent-devel
[ec2-user@]$ sudo yum install -y php-devel
[ec2-user@]$ sudo yum install -y php-xml

Compile Gearmand from Source

Very straight forward config and build.

[ec2-user@]$ cd gearmand-1.1.9
[ec2-user@]$ sudo ./configure --with-boost=/usr/include --prefix=/usr
[ec2-user@]$ sudo make
[ec2-user@]$ sudo make install

Compile Gearman PHP Library from Source

Fairly simple build, but you must first phpize.

[ec2-user@]$ cd gearman-1.1.1
[ec2-user@]$ sudo phpize
[ec2-user@]$ sudo ./configure --prefix=/usr
[ec2-user@]$ sudo make
[ec2-user@]$ sudo make install

Run ldconfig to Reload Dynmaic Library Cache

If you don’t run ldconfig, you’re going to get errors when you edit the php.ini file (last step).


bad:
PHP Warning: PHP Startup: Unable to load dynamic library '/usr/lib64/php/modules/gearman.so' - libgearman.so.8: cannot open shared object file: No such file or directory in Unknown on line 0

[ec2-user@]$ sudo ldconfig

Edit the PHP ini file

This is the last step.

finding location of your php.ini file
[ec2-user@]$ php -i | grep php.ini
Configuration File (php.ini) Path => /etc
Loaded Configuration File => /etc/php.ini

Edit your config file, adding these lines:

[ec2-user@]$ sudo vi /etc/php.ini
[Gearman]
; Add Gearman shared object to config
extension="gearman.so"

Now your install is complete!!

Installing Gearman PHP components for OSX- (less fun that it should be)

gearmanlogo

NOTES: Installing Geaman’s PHP components on OSX is a frustrating and rather complex task. Know this going in. The only way I was finally able to do this was by reading this page here, from one of PHP’s own engineers, got me pretty close but it was still not a full solution. [HERE]. YOU HAVE BEEN WARNED!!

FIRST THINGS FIRST — Get the right versions!!

Do not use gearman.1.1.7!
As of this writing (7-JUN-2013) the current version of gearmand (gearmand-1.1.7) has a bug that prevents it from properly building on OSX. I waste probably 2 days before in a deep corner of the mind I thought.. “If 1.1.7 has a known bug in OSX, and they have not fixed it yet.. let’s try 1.1.6!, and that worked!! The main Gearman download page has multiple versions so just avoid 1.1.7.

Get the lateset PHP source, (gearman-1.1.2) NOT the one linked off the Gearman page!
Yes.. this wasted even more time. The Gearman page didn’t have a quick easy link to the full set of available versions, and the linked version from the page was very much out of date. There is another build bug regarding PHP. One of the engineers decided to get fancy and change the privacy of the objects members somewhere in 1.0.x tree. This BREAKS build on OSX. They did as recently as this year release a FIX for this which is version gearman-1.1.2. All of them can be had on this page [HERE].

Getting Library Dependancies Worked Out

After fighting with source code, screaming at the screen, and even getting completely frustrated with what I was able to (or not able to) install with MacPorts.. I decided to install HomeBrew and give that a run. It’s not a big deal but I moved that to it’s own page located [HERE].

libevent must be built/installed

You’re going to need libevent, and installing it straight up from brew (nor Mac Ports) did the job for me. Check out my previous pages on installing libevent located [HERE] for details on that exciting exercise.

You Must Install Gearmand (sever) regardless

Regardless of how you plan to user Gearman with PHP, you must have the GearmanD server compiled to create the required libraries. There are no two ways about it, just resign yourself to that and keep moving forward!

First, obtain the Gearmand source code for compile from [HERE]. I dropped min in /usr/local

Unball the file and cd into source code directory, configure and build with the following commands:

david$ cd gearmand-1.1.12/
david$ ./configure -disable-shared -prefix=/usr/local
david$ make && make install

A couple of adjunct notes

If you are having problems location the libevent.. or basically seeing this error:

checking test for a working libevent… no
configure: error: Unable to find libevent

Try setting these two environment variables, to tell the configurator exactly where to locate these libraries, if you’ve managed to build libevent from source:

[gearmand]$ export CPPFLAGS=’-I/usr/local/include’
[gearmand]$ export LDFLAGS=’-L/usr/local/lib’

Gearman — Starting the Java-Gearman-Service process

gearmanlogo
These notes apply to testing on a MAC OSX portable, and may or may not apply to your implementation. They are provided as an adjunct to my main Getting Gearman Going post elsewhere in this blog.

The project page for Java-Gearman-Service is located [HERE] on Google Code.

The full set of instructions for staring up Gearman’s Java-Gearman-Service were not clearly linked to the main Gearman project page, so I’m including the link [HERE] to save you the few Google dorkings I did to find it.

Starting up the Java service should be as simple as this:


java -jar java-gearman-service-0.6.6.jar

HOWEVER, I received this instead.. an error:


david$ java -jar java-gearman-service-0.6.6.jar
Exception in thread "main" java.lang.UnsupportedClassVersionError: org/gearman/impl/Main : Unsupported major.minor version 51.0
at java.lang.ClassLoader.defineClass1(Native Method)
at java.lang.ClassLoader.defineClassCond(ClassLoader.java:631)
at java.lang.ClassLoader.defineClass(ClassLoader.java:615)
at java.security.SecureClassLoader.defineClass(SecureClassLoader.java:141)
at java.net.URLClassLoader.defineClass(URLClassLoader.java:283)
at java.net.URLClassLoader.access$000(URLClassLoader.java:58)
at java.net.URLClassLoader$1.run(URLClassLoader.java:197)
at java.security.AccessController.doPrivileged(Native Method)
at java.net.URLClassLoader.findClass(URLClassLoader.java:190)
at java.lang.ClassLoader.loadClass(ClassLoader.java:306)
at sun.misc.Launcher$AppClassLoader.loadClass(Launcher.java:301)
at java.lang.ClassLoader.loadClass(ClassLoader.java:247)

Checking my version shows that I am on 1.6 not 1.7 as I had thought;


david$ java -version
java version "1.6.0_45"
Java(TM) SE Runtime Environment (build 1.6.0_45-b06-451-11M4406)
Java HotSpot(TM) 64-Bit Server VM (build 20.45-b01-451, mixed mode)

To get the proper version, I navigated to the Oracle page located [HERE], agreed to their terms (do I really have a functional choice… not if I want/need to use Java…) and pushed forward.

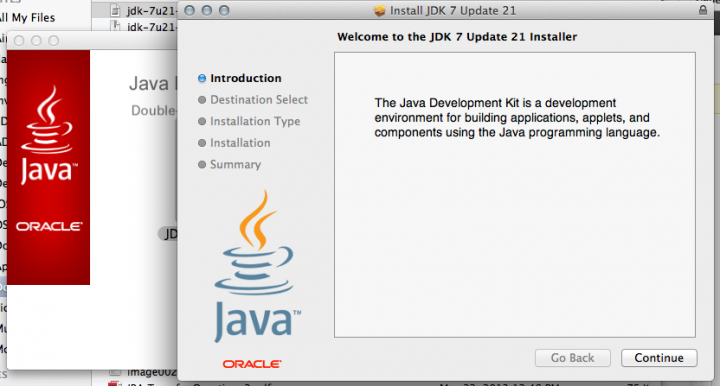
If you are running the install for 1.7, you should see a dialog like this:
Screen Shot 2013-06-03 at 2.12.16 PM

That has at least resolved this part of the issue, and will attempt to restart the server.


david$ java -version
java version "1.7.0_21"
Java(TM) SE Runtime Environment (build 1.7.0_21-b12)
Java HotSpot(TM) 64-Bit Server VM (build 23.21-b01, mixed mode)

Now I’m going to restart, specific a custom port and get it kicked off in the background:


david$ java -jar java-gearman-service-0.6.6.jar -p6315 &

At this point the process is running on my Job Service box and next step will be to craft some code to see how it all works.

Deploying Java Gearman Job Server

gearmanlogo
OK, after more than a year it’s time to get down to really building out a Gearman system.

I’ve recently taken on a project that I believe to be the perfect fit for the pipelined distributed work manager of Gearman. I’m of course, not at liberty to discuss the various details of this project, but I can provide some high-level description for the purposes of justification.

The Project – distributed harvesting

The objective of the project is to provide a distributed method of web page scraping and parsing. This project requires that the scraping and profiling occur for 2,000,000+ websites in under 18 hours. No small feat for certain. The good news is that I’ve built a systems in the past (circa 2006) that did just this using MySQL as the task manager. It worked, but it had it’s issues, and almost every single one of them can be mitigated by using Gearman. The rest will be mitigated with the application of NoSQL solutions for site list management.

What is Gearman

Here is the synopsis from the Gearman.org main page.

Gearman provides a generic application framework to farm out work to other machines or processes that are better suited to do the work. It allows you to do work in parallel, to load balance processing, and to call functions between languages. It can be used in a variety of applications, from high-availability web sites to the transport of database replication events. In other words, it is the nervous system for how distributed processing communicates.

The Job Server — implementing in Amazon’s ES2 environment

For the project I’m working on, I’ve opted for the Java implementation of the Job Server. This implementation’s main page is located [HERE].

Information about the Java Job Server:

Java Gearman Service is an easy-to-use distributed network application framework implementing the gearman protocol used to farm out work to other machines or processes that are better suited to do the work. It allows you to do work in parallel, to load balance processing, and to call functions between languages.

04-23-2012 java-gearman-service v0.6 has been released. [DOWNLOAD]

  • The service now uses the slf4j logging facade, allowing the user to have better control over logging
  • Persistent background jobs are now supported though an application hook
  • The API has been updated to be more user friendly, and it makes it easier to create divide-and-conquer/mapreduce applications (breaks the code of previous versions)
  • A .properties file now may be used to set property values and fine-tune the application.
Requirements to deploy the Java job server:
  • Java SE 7
  • slf4j 1.6.4+

For my implementation, I’ve extracted the zip into a vendor directory form where I’ll plan to launch the .jar. Development is occurring on an Apple OSX portable, then deployed to the AWS EC2 cluster for production. It’s expected that some library pathing and configuration will be required to make this all work.

Starting up the Java Gearman Service

It took a little time to locate the instructions for Starting up the Java implementation of the Gearman Service. It is located [HERE].

Instructions on how I started the GearMan server on my OSX development machine are located [HERE].

Once started, you should be able to communicate with it with your Client and Worker code!!

Next steps:

Installing Gearman PHP components

Build a GearMan Client Demonstrator

Build a GearMan Worker Demonstrator

Starting gearmand deamon

Getting the gearmand deamon running. Should be simple work, yet, as with a lot of thing in the software world, it’s not quite that simple. My first attempt to start up gearmand failed with the following error:

Corsa-3:~ root# gearmand
Error creating socket: IO::Socket::INET: Address already in use
Corsa-3:~ root#

Now, I’m not sure why that would be the case, since I checked the system process list and did NOT see any other instance of gearman executing (if you are not sure what you are looking at, the only thing found matching gearman, was the grep against the process list itself, not what I’m looking for)

Corsa-3:~ root# ps -ealf | grep gearman
0 33324 32942 4006 0 31 0 2425520 168 - R+ 5bb5a80 ttys000 0:00.00 grep gearman 0:00.00

A check of netstat did not reveal a listener on either of the known gearman ports (7003 or the new official port: 4730 ).

** TO BE COMPLETED **

Installing Gearman APIs for JAVA and PERL


Following yesterday’s marathon package installation ‘experiment’, today I started to acquire and install the Client/Worker API modules.

JAVA – installing gearman-java-0.03.jar

Java modules can be located on the downloads page for Gearman. It is also available at the Launchpad page for Gearman. I selected the code from the gearman.org site to try first, which ended up directing me to: https://launchpad.net/gearman-java.

I downloaded all three available files:

  • gearman-java-0.03.jar
  • geareman-java-0.03-javadocs.jar
  • gearman-java-0.03-src.tar.gz

Once downloaded, I moved all three files, and the original gearmand-C source to my Development directory.

PERL – installing Gearman::XS

For the PERL implementation, I’m going with the PERL wrapper, around the core gearman C libraries. I’d rather leverage as much C as possible. The focus for me is on speed.
It is available via CPAN under Gearman::XS.

Installing PERL packages is generally pretty painless.


#root:  cpan Gearman::XS
[...]
Running install for module 'Gearman::XS'
Running make for D/DS/DSCHOEN/Gearman-XS-0.8.tar.gz
Fetching with LWP:
http://www.perl.org/CPAN/authors/id/D/DS/DSCHOEN/Gearman-XS-0.8.tar.gz
[...]
Writing /Library/Perl/5.10.0/darwin-thread-multi-2level/auto/Gearman/XS/.packlist
Appending installation info to /Library/Perl/Updates/5.10.0/darwin-thread-multi-2level/perllocal.pod
DSCHOEN/Gearman-XS-0.8.tar.gz
/usr/bin/make install  -- OK

With the installation completed, I wrote and executed a very simple script, to test PERL’s ability to locate the new module.


#!/usr/bin/perl -w
use strict;
use Gearman::XS qw(:constants);
use Gearman::XS::Client;

print “\nLoaded and ran fine\n”;
exit 0;

This was the result:

david$ ./gtest0.pl

Loaded and ran fine

Installation of the PERL module Gearman::XS was successful.


NOTE: This is part of a series of posts, centered around installation and evaluation of Gearman as a distributed scheduling product. Here are the other articles in this group: