While working on a service to read data published by the STRATUX open source ADS-B receiver, it became a big of a guessing game regarding which ports where open and what protocol they might support.
In the event others are interested, there is the the port inventory from a STRATUX v1.6r1 device built on 03-MAR-2021
| Port | Protocol | Service | Analysis |
|---|---|---|---|
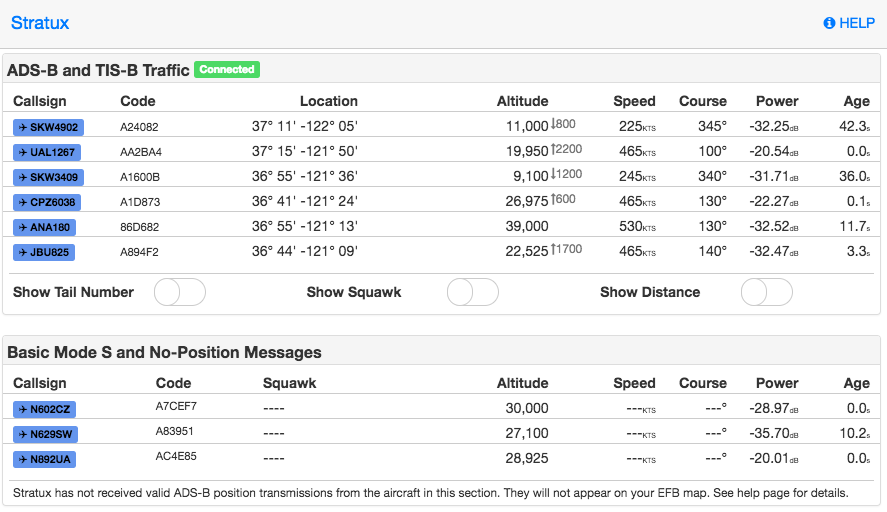
| 80 | tcp | http | Golang net/http server AngularJS web interfae |
| 8080 | tcp | http-proxy | says Dump1090 but always returns 404 error |
| 9977 | tcp | http | Json Pi System Info – temp, memory, etc. |
| 30001 | tcp | pago-services ? | -TBD- |
| 30002 | tcp | pago-services ? | appears to be a string of hashstrings (e.g.: *8DAB1D28990C37BB78042B8E5676; ) |
| 30003 | tcp | basestation | announced as “ADS-B flight data” |
| 30004 | tcp | listener | This is a binary “Beast” input port |
| 30005 | tcp | unknown | -TBD- possibly some binary data stream (e.g.: ‘JXf#<' ) |
| 30006 | tcp | ADS Json | Json of partial ADS-B data – always seems to be missing loation and speed info example:
{
  "Icao_addr": 11403422,
  "DF": 17,
  "CA": 5,
  "TypeCode": 4,
  "SubtypeCode": 6,
  "SBS_MsgType": 1,
  "SignalLevel": 0.000344,
  "Tail": "LEXUS05 ",
  "Squawk": null,
  "Emitter_category": 6,
  "OnGround": false,
  "Lat": null,
  "Lng": null,
  "Position_valid": false,
  "NACp": null,
  "Alt": null,
  "AltIsGNSS": false,
  "GnssDiffFromBaroAlt": null,
  "Vvel": null,
  "Speed_valid": false,
  "Speed": null,
  "Track": null,
  "Timestamp": "2021-03-05T17:16:47.203Z"
}
|
| 30104 | tcp | unknown | -TBD- possibly raw dump1090 data stream |
Diving into the Port Data
Port 30002
Text stream of data, available via a tcp connection. Each message is a hash of some sort, value of which is undetermined at this point.
Here is an example of the message stream
*5DA8C3EA379B4F;
*02E195B70936B4;
*5DA21603EB2A06;
*02C60BB129C2D0;
*02C60BB129C2D0;
*8DAD21C1592DD7EF9896504E8E50;
*02E19718EEFD09;
*8DA1B52B596233C53D9901456D9D;
*8DA216035913378FE2327C198F8A;
*8DA2160399104987B8340BFCE929;
*8DA9942E585F100DBA20C5712D44;
*8DA9942E9908212C509814A6DF7A;
Port 30003
Text stream of data, available via a tcp connection. Each message is comma delimited, and appears to the the ICAO integer converted to Base16 hex.
Here is an example of the message stream
MSG,3,111,11111,A4AB64,111111,2021/03/06,17:16:35.554,2021/03/06,17:16:35.573,,8900,,,30.41666,-98.63536,,,,,,0 MSG,4,111,11111,A4AB64,111111,2021/03/06,17:16:35.554,2021/03/06,17:16:35.574,,,159,93,,,-448,,,,,0 MSG,3,111,11111,A313BF,111111,2021/03/06,17:16:35.587,2021/03/06,17:16:35.626,,36000,,,29.68039,-98.32875,,,,,,0 MSG,7,111,11111,A8DB58,111111,2021/03/06,17:16:35.602,2021/03/06,17:16:35.627,,5900,,,,,,,,,,0 MSG,3,111,11111,A2A18A,111111,2021/03/06,17:16:35.607,2021/03/06,17:16:35.627,,5625,,,29.66141,-98.47789,,,,,,0 MSG,4,111,11111,A2A18A,111111,2021/03/06,17:16:35.607,2021/03/06,17:16:35.628,,,221,248,,,128,,,,,0 MSG,7,111,11111,A8DB58,111111,2021/03/06,17:16:35.608,2021/03/06,17:16:35.628,,5900,,,,,,,,,,0 MSG,3,111,11111,A417D6,111111,2021/03/06,17:16:35.609,2021/03/06,17:16:35.628,,24000,,,30.09300,-97.62418,,,,,,0
Port 30005
Binary stream of data, available via a tcp connection.
Here is an example of the message stream
y# ??2??)k?????3]?Sx?l3??.?@?????B?xf~3??.??yRX??L?ma??3??/?8 q?!I????3??1Q???? Z?O??3??69???+(X??????-N2??6??”ᕸ?eP3??7??#??o???,???3??;W#??o#?t?l??Zg3??>?&???Y}?o? ???I3??C k??+(???P,2N?3??D????yR? ??-3?3??F,???Y??x?_??2??F6? ?8\`3??Hg???+?ȱ?/?2??I????p2??Ke`#ᕸ?eP2??P?]?+(??A2??U^ ?8\`2??Un<ᕸ???3??XWW???.X?????_?3??X????Y???{?+3??X?h%??o?B?`_?_b?2??Z?f???~?2??Z?j??p2??]- ??|+?3??_e? ??SxX??56S?J?3??_?????.@ ???2??`????2??e?F%]?o7C?3??jt??Sx?y%?`2??l/???? 3??n??????? ??-??3??q?U q? ?-0?Jc3??q?)???Y??)? T??2????7?8?}?2???γ 8إ?2????H ?FU3????|????Y??1??2???L?]?\g??2????E]??.???3??|?{??????>?0 2????]?\g??3????????!;
Port 30006
High volume text stream, available via tcp connection. Messages are in a Json format. Observation is that these always seem to lack geo-location, speed and altitude data.
Here is an example of the message stream
{“Icao_addr”:10627880,”DF”:11,”CA”:5,”TypeCode”:0,”SubtypeCode”:0,”SBS_MsgType”:8,”SignalLevel”:0.000816,”Tail”:null,”Squawk”:null,”Emitter_category”:null,”OnGround”:false,”Lat”:null,”Lng”:null,”Position_valid”:false,”NACp”:null,”Alt”:null,”AltIsGNSS”:false,”GnssDiffFromBaroAlt”:null,”Vvel”:null,”Speed_valid”:false,”Speed”:null,”Track”:null,”Timestamp”:”2021-03-06T17:34:12.129Z”} {“Icao_addr”:10645249,”DF”:11,”CA”:5,”TypeCode”:0,”SubtypeCode”:0,”SBS_MsgType”:8,”SignalLevel”:0.000846,”Tail”:null,”Squawk”:null,”Emitter_category”:null,”OnGround”:false,”Lat”:null,”Lng”:null,”Position_valid”:false,”NACp”:null,”Alt”:null,”AltIsGNSS”:false,”GnssDiffFromBaroAlt”:null,”Vvel”:null,”Speed_valid”:false,”Speed”:null,”Track”:null,”Timestamp”:”2021-03-06T17:34:12.139Z”} {“Icao_addr”:11402414,”DF”:4,”CA”:0,”TypeCode”:0,”SubtypeCode”:0,”SBS_MsgType”:5,”SignalLevel”:0.001636,”Tail”:null,”Squawk”:null,”Emitter_category”:null,”OnGround”:false,”Lat”:null,”Lng”:null,”Position_valid”:false,”NACp”:null,”Alt”:6075,”AltIsGNSS”:false,”GnssDiffFromBaroAlt”:null,”Vvel”:null,”Speed_valid”:false,”Speed”:null,”Track”:null,”Timestamp”:”2021-03-06T17:34:12.142Z”} {“Icao_addr”:10645249,”DF”:11,”CA”:5,”TypeCode”:28,”SubtypeCode”:1,”SBS_MsgType”:8,”SignalLevel”:0.000837,”Tail”:null,”Squawk”:null,”Emitter_category”:null,”OnGround”:false,”Lat”:null,”Lng”:null,”Position_valid”:false,”NACp”:null,”Alt”:null,”AltIsGNSS”:false,”GnssDiffFromBaroAlt”:null,”Vvel”:null,”Speed_valid”:false,”Speed”:null,”Track”:null,”Timestamp”:”2021-03-06T17:34:12.158Z”}