Category Archives: Software Development

Monitor local Aircraft (for baiscally free) using Stratux

An ADS-B listening station has long been on my list of things to build.

Our current residence is located right under the domestic approach to San Francisco International Airport (see picture), so I believed there should be plenty of data for testing and tuning.

Local Air Traffic


What is Stratux

So, what are we talking about here? It’s Stratux, and Open Source complete software package that leverages inexpensive SDRs (Software Defined Radios).

“Stratux is a homebuilt ADS-B In receiver for pilots. It’s easy to assemble from inexpensive, off-the-shelf hardware, and probably already works with your electronic flight bag (EFB) of choice. Even better, if you’re so inclined, the software is open-source and hackable so you can build the system that’s right for you. “

This is some powerful stuff!


The Raspberry Pi 3 (revision b)

Raspberry PI 3
After completing a proof-of-concept residential IP space data acquisition project for a client, I found myself with a Raspberry Pi just sitting on shelf.

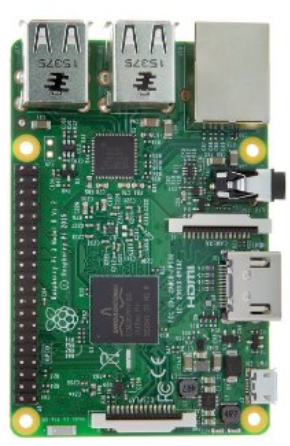
The Raspberry Pi 3b is a neat little device. A full Linux computer in a form factor the size of a pack of card, including a graphics chip that drives and HDMI output making it a real (compact and low power) desktop project computer.

SoC: Broadcom BCM2837
CPU: Quad-core ARM Cortex-A53, 1.2GHz
GPU: Broadcom VideoCore IV 3D graphics
RAM: 1GB LPDDR2 (900 MHz)
Networking: 10/100 Ethernet, 2.4GHz 802.11n wireless
Bluetooth: Bluetooth 4.1 Classic, Bluetooth Low Energy
Storage: microSD
GPIO: 40-pin header, populated
Ports: HDMI, 3.5mm analogue audio-video jack, 4× USB 2.0, Ethernet, Camera Serial Interface (CSI), Display Serial Interface (DSI)

My first Raspberry Pi purchase (as requested by the client) was a complete kit that cost me about $75 [ link to super size kit ], but you can certainly get the bare Raspberry Pi for under $40 (assuming you have some spare things like a micro-USB cable and a micro SD card).

Adding ADS-B radios

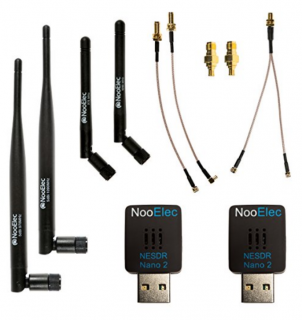
Adding ADS-B radios to the Raspberry Pi was as easy as ordering a kit form Amazon for under $40. [ Dual-Band ADS-B (978MHz UAT & 1090MHz 1090ES) Bundle For Stratux ]. For some reason, I’d debating buying the radios and building a kit. There are several complete kits with the computer, radios, specialized case, memory card etc. Prices vary between $120 to $250 depending on what parts you want. When I found this little kits with 2 sets of antennas, radios and coax for under $40.. it was just too easy to pull the trigger. So far they have been well worth the very inexpensive purchase!

Assembling the Sysetm

Custom Stratux Pi Case
Being a proof of concept, I didn’t feel like dropping another $20 on a specialized case such as this one (right), because I wasn’t sure if I’d be happy with this project.

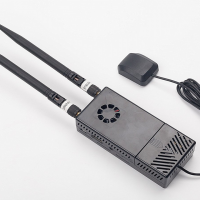
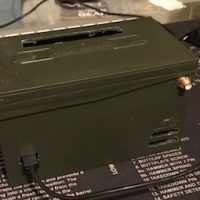
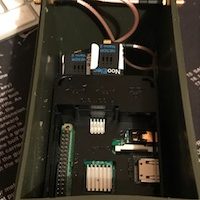
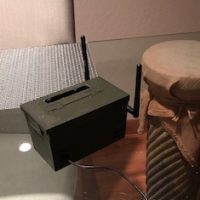
The previous projects housing was too small (in my opinion) to provide what I wanted, which was a single item housing all the parts. Again, wanting to minimize costs while building project, I opted to re-purpose an small plastic ammo can into a make-shift housing. The unfortunate side effect of that decisions is that the final product looks like some sort of nefarious device (see final photos somewhere below).

Using the drill press / mill I have setup for another project, I quickly milled some vents to the plastic box to vent out the heat created by the Pi and the two nano radios. And believe me, this is something you want to do. Using the Stratux software, I’m typically seeing CPU temperatures around 140F (toasty), and the radio run a lot hotter.

SDRs installed into Raspberry Pi
Hot enough to blacken the decals I’d put on the bottoms of the radios (this is what they looked like before they were cooked).

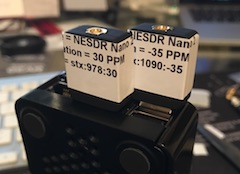
Once I had all the milling completed I installed the radios, Pi and coax into the box. The coax are reasonable flexible but still barely looped around inside the box. This photo was before I added another port for an Ethernet cable (that hack to be discussed in a subsequent post). It might not look pretty, but it does work!

Milled ammo box
SDRs and Pi installed in the ammo box.
Final Stratux in Ammo Box project

Making it all work

Once the physical construction was done, the last step was to download the software, burn it to a little MicroSD card and fire it up!

UPDATED: 14-MAY-2017 — I have a new setup procedure documented in this newer article: STRATUX – Hacking together a WiFi connected Ground Station.

What does it look like?

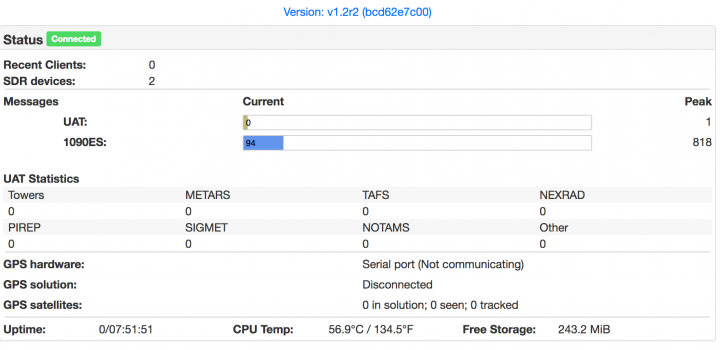
Once you have connected to the ad-hoc stratux WiFi network, navigate to this IP address: http://192.168.10.1 . If your system is up and running you’ll see a page that looks like this:

Stratux landing page at 192.168.10.1

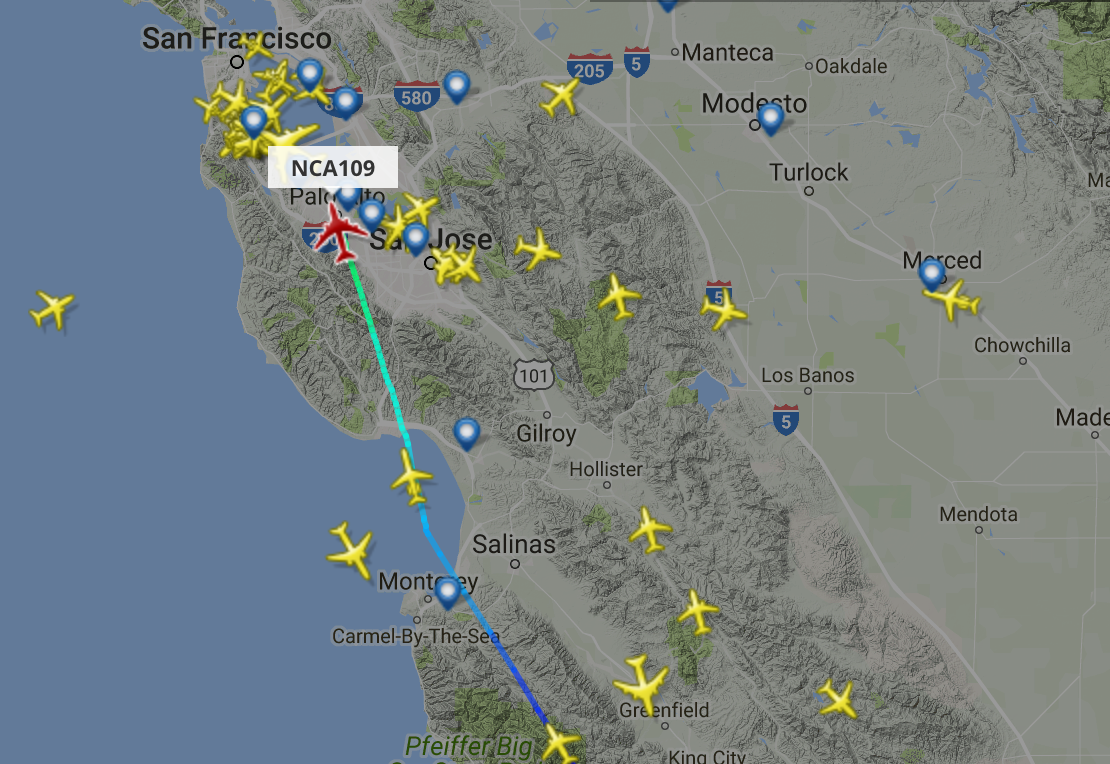
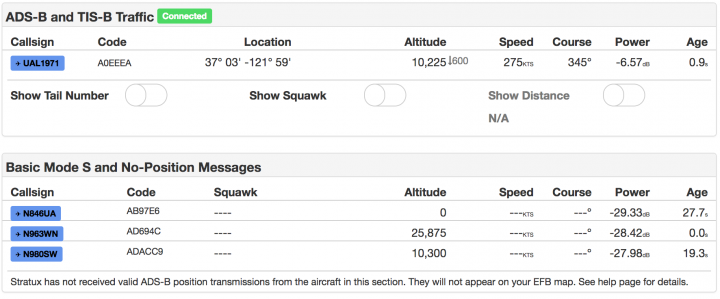
If you have some aircraft overhead (as I almost always do), you should see them listed on the ‘Traffic’ page. This is what mine looked like just a few minutes before writing this article:

Stratux Air Traffic page

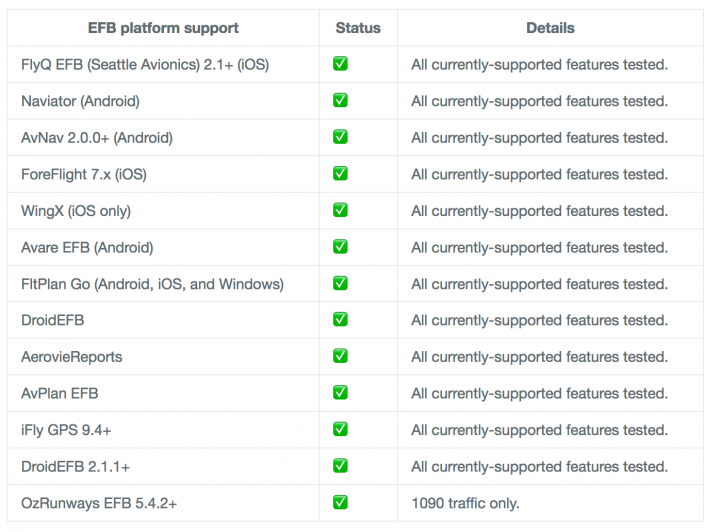
Now that you have this up and running, it can provide a GDL 90 data feed to variety of flight planning / monitoring software, including some free apps for iOS and Android. The full current list of software supported on the Stratux main page. Here is a snapshot of software support at this time:

Stratux Software support


casperJS – passing parameters on the command line (cli)

I like using the command line / shell to pass information to scripts and programs. Sure it has limitations but it’s generally pretty effective.

Each language seems to have it’s own method of handing them, and CasperJS does not seem to be any different. What I did find a little different from others, is how CapserJS splits out arguments from parameters (options in CapserJS speak).

Passing Arguments

Passing arguments is a fairly simple affair. His an example of passing some arguments on the command line to a screen capture utility I’m working on:

casperjs generic.screenshot.cjs http://www.someplace.com save_local
[
“http://www.someplace.com”,
“save_local”
]

They are placed into a list (integer indexed array), and can be addressed in the following way:

url = casper.cli.args[0];
mode = casper.cli.args[1];

This would result in ‘url’ = ‘http://www.someplace.com’ and ‘mode’ = ‘save_local’. Pretty straight forward. One major drawback, you must know the order of the parameters, add a new one, get one out of place and the entire house of cards collapses.

There is a better way!

Passing Parameters (options)

Passing options is a fairly simple affair as well. His an example of passing some option on the command line:

casperjs generic.screenshot.cjs –url=http://www.someplace.com –mode=save_local
{
“casper-path”: “/opt/casperjs”,
“cli”: true,
“url”: “http://www.someplace.com”,
“mode”: “save_local”
}

Note: “casper-path” and “cli” are injected automatically

They are placed into an array, and can be addressed in the following way:

url = casper.cli.options[‘url’];
mode = casper.cli.options[‘mode’];

This would result in ‘url’ = ‘http://www.someplace.com’ and ‘mode’ = ‘save_local’. Now, you do not need to worry about ordering of options, and adding more options doesn’t mean that you’ll have to worry about re-coding the variable localization, ordering etc. It’s also CLEAR to any user how the cli is formatted.

Now, go forth and parse, screen capture and automate your testing until your heart is content!

Installing CasperJS 1.1.4 on AWS (CentOS)

Installing CasperJS to work with PhantomJSs latest version 2.1.1

This is the current status of my test installation. My perviously hacked version of CaserpJS ( instructions are there: Helping CasperJS 1.1.0-beta3 play nice with PhantomJS 2.0.0 ), however it’s time to rev-up to the non-beta version of the code.

casperjs
CasperJS version 1.1.0-beta3 at /usr/lib/node_modules/casperjs, using phantomjs version 2.1.1

As of today:
Screen Shot 2016-02-08 at 10.42.19 AM

Step 1 — Clone CasperJS from Git

Hopefully you already have Git installed, and you are ready to clone:

git clone git://github.com/n1k0/casperjs.git
Cloning into ‘casperjs’…
remote: Counting objects: 14392, done.
remote: Compressing objects: 100% (7/7), done.
remote: Total 14392 (delta 0), reused 0 (delta 0), pack-reused 14385
Receiving objects: 100% (14392/14392), 8.50 MiB | 0 bytes/s, done.
Resolving deltas: 100% (8648/8648), done.
Checking connectivity… done.

Step 2 — Perform Installation

Using hints from the Instructions at CasperJS 1.1.0-DEV documentation, I first located my current casper image, moved it aside, then linked the new one into it’s location.

whereis casperjs
casperjs: /usr/bin/casperjs /usr/local/bin/casperjs /opt/n1k0-casperjs-e3a77d0/bin/casperjs /opt/casperjs/bin/casperjs /opt/casperjs/bin/casperjs.exe

mv /usr/bin/casperjs /usr/bin/casperjs.1.1.0-beta3

ln -sf `pwd`/bin/casperjs /usr/bin/casperjs

Step 3 — Verify Casper

Running casper, I checked to ensure it’s on the latest version:

casperjs
CasperJS version 1.1.0-beta5 at /opt/casperjs, using phantomjs version 2.1.1

This looks like it’s good to go.. now CASPER AWAY!!

Installing PhantomJS 2.1.1 on AWS (CentOS)

phantomjs-logoIt’s a gamble to do this, and according to the build script it’s going to take a long time to complete the compile / install of Phantom 2.1.1.

Note: If you are looking for instructions on building for Ubuntu, the steps are different. I’ve documented that process in this post: Installing PhantomJS 2.1.1 on Ubuntu.

Step 1 — install required dependencies

You may or may not have most of these on your AWS / CentOS system. I found that most of these were required to start the PhantomJS build.Here are the ones that I’ve confirmed I needed:

  • autoconf
  • pkgconfig.x86_64
  • python26-pyudev.noarch
  • python26-twisted.noarch
  • sip.x86_64
  • python27-pyudev.noarch
  • python27-twisted.noarch
  • gcc
  • flex
  • bison
  • xorg-x11-server-Xorg.x86_64
  • xorg-x11-server-devel.x86_64
  • xorg-x11-utils.x86_64
  • xorg-x11-proto-devel.noarch
  • sqlite-tcl.x86_64
  • sqlite-devel.x86_64
  • openssl.x86_64
  • crypto-utils.x86_64
  • openssl-devel.x86_64
  • libfontenc.x86_64
  • libfontenc-devel.x86_64
  • fontconfig.x86_64
  • fontconfig-devel.x86_64
  • libicu-devel.x86_64
  • freetype-devel.x86_64
  • libpng-devel.x86_64
  • libjpeg-turbo-devel.x86_64
  • libXext-devel.x86_64
  • libxcb-devel.x86_64
  • xcb-util.x86_64

Installing the packages went smoothly:

sudo yum install autoconf pkgconfig.x86_64 python26-pyudev.noarch python26-twisted.noarch sip.x86_64 python27-pyudev.noarch python27-twisted.noarch gcc flex bison xorg-x11-server-Xorg.x86_64 xorg-x11-server-devel.x86_64 xorg-x11-utils.x86_64 xorg-x11-proto-devel.noarch sqlite-tcl.x86_64 sqlite-devel.x86_64 openssl.x86_64 crypto-utils.x86_64 openssl-devel.x86_64 libfontenc.x86_64 libfontenc-devel.x86_64 fontconfig.x86_64 fontconfig-devel.x86_64 libicu-devel.x86_64 freetype-devel.x86_64 libpng-devel.x86_64 libjpeg-turbo-devel.x86_64 libXext-devel.x86_64 libxcb-devel.x86_64 xcb-util.x86_64

Step 2 — clone the Git repo to local drive:

git clone git://github.com/ariya/phantomjs.git
Cloning into ‘phantomjs’…
remote: Counting objects: 63695, done.
remote: Compressing objects: 100% (37/37), done.
remote: Total 63695 (delta 16), reused 0 (delta 0), pack-reused 63657
Receiving objects: 100% (63695/63695), 129.05 MiB | 4.08 MiB/s, done.
Resolving deltas: 100% (31013/31013), done.
Checking connectivity… done.

cd phantomjs

git checkout 2.1.1
Note: checking out ‘2.1.1’.
[…]
HEAD is now at d9cda3d… Set version to “2.1.1”

git submodule init
Submodule ‘3rdparty-win’ (https://github.com/Vitallium/phantomjs-3rdparty-win.git) registered for path ‘src/qt/3rdparty’
Submodule ‘qtbase’ (https://github.com/Vitallium/qtbase.git) registered for path ‘src/qt/qtbase’
Submodule ‘qtwebkit’ (https://github.com/Vitallium/qtwebkit.git) registered for path ‘src/qt/qtwebkit’

git submodule update
Cloning into ‘src/qt/3rdparty’…
Cloning into ‘src/qt/qtbase’…
Cloning into ‘src/qt/qtwebkit’…

Step 3 — Hack the QT build

It seemed that I needed to set some different flags for the qtbase build. It was not clear to me if this could be done with the build.py options, so I hacked the qt/qtbase/configure script.

vi src/qt/qtbase/configure

First off, I changed the settings of these two values near the top of the config file:

Then commented out part of the section around Werror, so that the build would not treat warnings as errors. The C++ macro options in the code will generate A LOT of errors, most of them from the flags defined in build.py. I tried the route of disabling those flags and ended up with more errors and more issues.. so changing the flags in the config was my next option:

[…]
#CFG_WERROR=auto
CFG_WERROR=no
[…]
#CFG_DEV=no
CFG_DEV=yes
[…]
warnings-are-errors|Werror)
# if [ “$VAL” = “yes” ] || [ “$VAL” = “no” ]; then
# CFG_WERROR=”$VAL”
# else
UNKNOWN_OPT=yes
# fi
;;
[…]

Step 4 — Build!

python build.py
—————————————-
WARNING
—————————————-

Building PhantomJS from source takes a very long time, anywhere from 30 minutes
to several hours (depending on the machine configuration). It is recommended to
use the premade binary packages on supported operating systems.

For details, please go the the web site: http://phantomjs.org/download.html.

Do you want to continue (Y/n)? Y

Step 5 — check the binary

Once the build has completed, you will find the binary to be built in the local directory bin/

ls -l bin/phantomjs
-rwxr-xr-x 1 root root 56736434 Feb 5 11:33 /usr/sbin/phantomjs

To complete the installation, you’ll need to replace the current phantomjs binary with the new one. To find the location if your current binary (if you have one), this should work:

whereis phantomjs
phantomjs: /usr/bin/phantomjs

Copy the new binary to that location and verify version:

cp bin/phantomjs /usr/bin/phantomjs
cp: overwrite ‘/usr/bin/phantomjs’? y

phantomjs -v
2.1.1

YOU ARE DONE!! It was just that easy

Installing PhantomJS 2.1.1 on Ubuntu

phantomjs-logoIt’s a gamble to do this, and according to the build script it’s going to take a long time to complete the compile / install of Phantom 2.1.1.

Note: If you run into build problems with some of the required components, such as the fonts, qtbase, etc., you will want to check my previous post Installing PhantomJS 2 on Ubuntu for some help.

Step 1 — install required dependencies

You may or may not have most of these on your Ubuntu system. I found that most of these were required to start the PhantomJS build.Here are the ones that I’ve confirmed I needed:

  • autoconf2.13

  • pkg-config

  • build-essential

  • qt5-qmake

  • g++

  • python

  • ruby

  • perl

  • sqlite

  • flex

  • bison

  • gperf

  • openssl

  • fontconfig

  • xorg

  • xorg-dev

  • xutils-dev

  • xcb-proto

  • libtool

  • libsqlite0

  • libssl-dev

  • libsqlite3-dev

  • libfontconfig1-dev

  • libicu-dev

  • libfreetype6

  • libssl-dev

  • libpng-dev

  • libpng12-dev

  • libjpeg-dev

  • libx11-dev

  • libxext-dev

  • libxcb-xkb-dev

Installing the packages went smoothly:

sudo apt-get install autoconf2.13 pkg-config build-essential qt5-qmake g++ python ruby perl sqlite flex bison gperf openssl fontconfig xorg xorg-dev xutils-dev xcb-proto libtool libsqlite0 libssl-dev libsqlite3-dev libfontconfig1-dev libicu-dev libfreetype6 libssl-dev libpng-dev libpng12-dev libjpeg-dev libx11-dev libxext-dev libxcb-xkb-dev x11proto-core-dev libxcb-render-util0 libqt5webkit5-dev

Step 2 — clone the Git repo to local drive:

git clone git://github.com/ariya/phantomjs.git
Cloning into ‘phantomjs’…
remote: Counting objects: 63695, done.
remote: Compressing objects: 100% (37/37), done.
remote: Total 63695 (delta 16), reused 0 (delta 0), pack-reused 63657
Receiving objects: 100% (63695/63695), 129.05 MiB | 4.08 MiB/s, done.
Resolving deltas: 100% (31013/31013), done.
Checking connectivity… done.

cd phantomjs

git checkout 2.1.1
Note: checking out ‘2.1.1’.
[…]
HEAD is now at d9cda3d… Set version to “2.1.1”

git submodule init
Submodule ‘3rdparty-win’ (https://github.com/Vitallium/phantomjs-3rdparty-win.git) registered for path ‘src/qt/3rdparty’
Submodule ‘qtbase’ (https://github.com/Vitallium/qtbase.git) registered for path ‘src/qt/qtbase’
Submodule ‘qtwebkit’ (https://github.com/Vitallium/qtwebkit.git) registered for path ‘src/qt/qtwebkit’

git submodule update
Cloning into ‘src/qt/3rdparty’…
Cloning into ‘src/qt/qtbase’…
Cloning into ‘src/qt/qtwebkit’…

python build.py
—————————————-
WARNING
—————————————-

Building PhantomJS from source takes a very long time, anywhere from 30 minutes
to several hours (depending on the machine configuration). It is recommended to
use the premade binary packages on supported operating systems.

For details, please go the the web site: http://phantomjs.org/download.html.

Do you want to continue (Y/n)? Y

NOTE: If you want to suppress the warning regarding perils of the long compile, you an use the –confirm flag to bypass the question. This is really helpful if you want to background the process and write it to a log. Where I find this most beneficial is when I want to/need to close the terminal window before the compile completes.

Here is an optional method of running that will background the process, auto-reply to the warning and write to a log file:

nohup ./build.sh –confirm –jobs 1 > build.log &

You might carp about not being able to monitor progress now! Well sure you can.. just do a following tail on the file. Exact command varies with system, I’ll provide the one for typical LINUX and for typical OSX:

For typical LINUX:
tailf build.log

For typical OSX:
tail -f build.log

Step 3 — check the binary

Once the build has completed, you will find the binary to be built in the local directory bin/

ls -l bin/phantomjs
-rwxr-xr-x 1 root root 56736434 Feb 5 11:33 /usr/sbin/phantomjs

To complete the installation, you’ll need to replace the current phantomjs binary with the new one. To find the location if your current binary (if you have one), this should work:

whereis phantomjs
phantomjs: /usr/bin/phantomjs

Copy the new binary to that location and verify version:

cp bin/phantomjs /usr/bin/phantomjs
cp: overwrite ‘/usr/bin/phantomjs’? y

phantomjs -v
2.1.1

YOU ARE DONE!! It was just that easy

Fun with ‘sed’ taking a list of table names and creating a list of T-SQL TRUNCATE commands

Woo.. I love *NIX, especially ‘sed’ (and awk too for that matter). Wonderful things you can do to automated your programming, speed up development and really REALLY cut down on cut-paste errors.

Today’s task, was to take this list of tables… and generate a single bit fat T-SQL command to truncate them all.. *however* these tables might not exist in a given environment so each Truncate is wrapped in a test to make sure the table is there. If it’s not there, nothing to do, not to mention avoid a potential fatal error trying to truncate a non-existent table.

Here is a snippet of the tables in question:


FCT_CRIMINOGENIC_NEED_TOP_DOMAINS
FCT_DETENTION_RISK_RESPONSE_DETAILS
FCT_DETENTION_RISK_RESPONSE_FULL

This is the desired T-SQL for these three tables

— Truncate table FCT_CRIMINOGENIC_NEED_TOP_DOMAINS
IF EXISTS (SELECT * FROM sys.objects WHERE NAME = ‘FCT_CRIMINOGENIC_NEED_TOP_DOMAINS’)
BEGIN
TRUNCATE TABLE FCT_CRIMINOGENIC_NEED_TOP_DOMAINS
END

— Truncate table FCT_DETENTION_RISK_RESPONSE_DETAILS
IF EXISTS (SELECT * FROM sys.objects WHERE NAME = ‘FCT_DETENTION_RISK_RESPONSE_DETAILS’)
BEGIN
TRUNCATE TABLE FCT_DETENTION_RISK_RESPONSE_DETAILS
END

— Truncate table FCT_DETENTION_RISK_RESPONSE_FULL
IF EXISTS (SELECT * FROM sys.objects WHERE NAME = ‘FCT_DETENTION_RISK_RESPONSE_FULL’)
BEGIN
TRUNCATE TABLE FCT_DETENTION_RISK_RESPONSE_FULL
END

The Sed Command

sed ‘s#^\(.*\)#– Truncate table \1 \’$’\nIF EXISTS (SELECT * FROM sys.objects WHERE NAME = \’\\1\’) \\’$’\n BEGIN \\’$’\n TRUNCATE TABLE \\1 \\’$’\nEND \\’$’\n#g’ MY_INPUT_FILE

Secret Sauce Ingredients

Setting up the string match. In this case it was simple.. I wanted the entire line which is represented with .*

\(.*\)

This loads the matching string into an internal register in ‘sed’ that can be references as ‘1’ within the output replacement expression. This is what it looks like in the command:

\1

Adding a newline in the output.. this was the big trick, and requires dropping into the shell to generate the desired output. The string in the command looks like this:

\’$’\n

You may notice after the first drop into the shell, the escaping has to be doubled for the substitution and the newline…

\\1 \\’$’\n

I cannot speak to the reason for this, but that is what I encountered and why the substitutions change in the latter part of the string. You may find that is not necessary, or might cause an issue in your environment. Adjust as necessary.

Installing CasperJS the compiled way

Installing CaspeJS from source is always fun, so I’m going to tell you how.

Step 1 – Get the source code

Getting the source code from CasperJS website. As of 16-OCT-2015 when I write this, the following command worked. When a new version is released.. this link might go away.. so.. a little hunting might be needed on your part.

The CaseperJS website is located HERE ( http://casperjs.org/ ).

wget https://github.com/n1k0/casperjs/zipball/1.1-beta3/n1k0-casperjs-1.1-beta3-0-g4f105a9.zip

Step 2 – unpack the files

Unpack the files and prepare for compiling:

unzip n1k0-casperjs-1.1-beta3-0-g4f105a9.zip

Step 2 – build it

Installing PhantomJS 2 on Ubuntu

phantomjs-logoIt’s a gamble to do this, and according to the build script it’s going to take a long time to complete the compile / install of Phantom 2.0.

Step 1 — locate the source, download and unzip:

wget https://bitbucket.org/ariya/phantomjs/downloads/phantomjs-2.0.0-source.zip
Length: 110092872 (105M) [application/zip]
Saving to: ‘phantomjs-2.0.0-source.zip’

unzip phantomjs-2.0.0-source.zip
Archive: phantomjs-2.0.0-source.zip
a2912c216d06df4d8b51f12ad4082a48c5fc7ba6
creating: phantomjs-2.0.0/
inflating: phantomjs-2.0.0/.gitignore
[…]
inflating: phantomjs-2.0.0/tools/preconfig.sh
inflating: phantomjs-2.0.0/tools/qscriptengine.h
inflating: phantomjs-2.0.0/tools/src.pro

Step 2 — install required dependencies

You may or may not have most of these on your Ubuntu system. I found that most of these were required to start the PhantomJS build.Here are the ones that I’ve confirmed I needed:

  • autoconf2.13
  • ruby
  • pkg-config
  • libicu-dev
  • gperf
  • bison
  • libjpeg-dev
  • g++
  • openssl
  • libtool
  • libssl-dev
  • libpng-dev
  • libpng12-dev
  • libjpeg-dev
  • fontconfig
  • sqlite
  • fontconfig
  • libsqlite0
  • qt5-qmake
  • xorg
  • xorg-dev
  • xutils-dev
  • xcb-proto
  • libxcb-xkb-dev
  • x11proto-core-dev
  • libxcb-render-util0
  • libqt5webkit5-dev

Installing the packages went smoothly:

apt-get install autoconf2.13 ruby pkg-config libicu-dev gperf bison libjpeg-dev g++ openssl libtool libssl-dev libpng-dev libpng12-dev libjpeg-dev fontconfig sqlite fontconfig libsqlite0 qt5-qmake xorg xorg-dev xutils-dev xcb-proto libxcb-xkb-dev x11proto-core-dev libxcb-render-util0 libqt5webkit5-dev

Step 3 — Build Freetype from source and link

Following this I grabbed the source code to install freetype2. Although freetype successfully installed, the required header files where not found. I decided it was bet to grab it and build from source:

wget http://download.savannah.gnu.org/releases/freetype/freetype-2.6.tar.gz
gunzip freetype-2.6.tar.gz
tar xvf freetype-2.6.tar
./configure
[…]
configure: creating ./config.status
config.status: creating unix-cc.mk
config.status: creating unix-def.mk
config.status: creating ftconfig.h
config.status: executing libtool commands
configure:
make & make install
[…]
/usr/bin/install -c -m 644 ./builds/unix/ftconfig.h \
/usr/local/include/freetype2/config/ftconfig.h
/usr/bin/install -c -m 644 /usr/local/freetype-2.6/objs/ftmodule.h \
/usr/local/include/freetype2/config/ftmodule.h
/usr/bin/install -c -m 755 ./builds/unix/freetype-config \
/usr/local/bin/freetype-config
/usr/bin/install -c -m 644 ./builds/unix/freetype2.m4 \
/usr/local/share/aclocal/freetype2.m4
/usr/bin/install -c -m 644 ./builds/unix/freetype2.pc \
/usr/local/lib/pkgconfig/freetype2.pc
/usr/bin/install -c -m 644 /usr/local/freetype-2.6/docs/freetype-config.1 \
/usr/local/share/man/man1/freetype-config.1

Now following that build, due to some inexplicable continuous oversight on the part of freetype’s maintainers.. OR.. phantom.. a link has to be make so that the build process can find the actual libraries required:

ln -s /usr/include/freetype2/freetype /usr/include/freetype

Step 4 — Install an updated version of libxkbcommon

Get the latest version.. and build it:

https://launchpad.net/ubuntu/+archive/primary/+files/libxkbcommon_0.5.0.orig.tar.gz
gunzip libxkbcommon_0.5.0.orig.tar.gz
tar xvf libxkbcommon_0.5.0.orig.tar
cd libxkbcommon-0.5.0
./autogen.sh
./configure

Step 5 — hack QtBase

After many times running thorough the process and resolving errors.. I decided to manually build QTBase. To do this I moved to the source directory for it under PhantomJS, and used this configuration command to get past a libxcb error:

cd src/qt/qtbase
./configure -developer-build -opensource -nomake examples -nomake tests -qt-xcb
./configure -opensource
make
make install

Step 6 — build

Now bulid.sh script. NOTE: if you are executing the compile on a VM (or in this case AWS), it’s recommended that the build process Does Not try to run parallel build jobs on the virtual cores. The PhantomJS website was not clear (to me) why.. but it did recommend using the –jobs 1 flag on the build.. which I am doing. You may omit that if you’d like to experiment.

cd phantomjs-2.0.0

./build.sh –jobs 1
—————————————-
WARNING
—————————————-

Building PhantomJS from source takes a very long time, anywhere from 30
minutes to several hours (depending on the machine configuration).
We recommend you use the premade binary packages on supported operating
systems.

For details, please go the the web site: http://phantomjs.org/download.html.

Do you want to continue (y/n)?
y
[…]

NOTE: If you want to suppress the warning regarding perils of the long compile, you an use the –confirm flag to bypass the question. This is really helpful if you want to background the process and write it to a log. Where I find this most beneficial is when I want to/need to close the terminal window before the compile completes.

Here is an optional method of running that will background the process, auto-reply to the warning and write to a log file:

nohup ./build.sh –confirm –jobs 1 > build.log &

You might carp about not being able to monitor progress now! Well sure you can.. just do a following tail on the file. Exact command varies with system, I’ll provide the one for typical LINUX and for typical OSX:

For typical LINUX:
tailf build.log

For typical OSX:
tail -f build.log

Step 7 — check the binary

Once the build has completed, you will find the binary to be built in the local directory bin/

ls -l bin/phantomjs
-rwxr-xr-x 1 root root 56587060 Sep 30 17:16 bin/phantomjs

To complete the installation, you’ll need to replace the current phantomjs binary with the new one. To find the location if your current binary (if you have one), this should work:

whereis phantomjs
phantomjs: /usr/bin/phantomjs

Copy the new binary to that location and verify version:

cp bin/phantomjs /usr/bin/phantomjs
cp: overwrite ‘/usr/bin/phantomjs’? y

phantomjs -v
2.0.0

YOU ARE DONE!! It was just that easy

PHP’s cURL and how to use CURLPROXY_SOCKS5_HOSTNAME

So, you’re running a proxy (say, something like TOR) on your locallopback.. but you keep getting this error (must have VERBOSE set to true to catch it):

* Hostname was NOT found in DNS cache
* Can’t complete SOCKS5 connection to 0.0.0.0:0. (2)
* Closing connection 0

Your code looks simple enough.. but it doesn’t work:

A little research later you find that the PROPER SOCKS5 protocol is SOCKS5H (hostname), so you use the proper flag..

[…]
curl_setopt($ch, CURLOPT_PROXYTYPE, CURLPROXY_SOCKS5_HOSTNAME);
[…]

only to get told that TOR doesn’t want to be used as an HTTP proxy (what’s the deal)?


It appears you have configured your web browser to use Tor as an HTTP proxy.
This is not correct: Tor is a SOCKS proxy, not an HTTP proxy.
Please configure your client accordingly.

Have not fear script-kiddies.. even though PHP as of 5.5.x does not seem to include this CRITICAL cURL FLAG, you can reference it directly with the integer value of 7. So… if you change your code to this… you’re as golden as the proverbial goose!

curl_setopt($ch, CURLOPT_PROXYTYPE, 7); // 7 = CURLPROXY_SOCKS5_HOSTNAME

So… now you know!

find my article helpful? print some coupons!

AWS EC2 Sendmail Configuration (with .procmail)

Sendmail.. how you frustrate people; but the power makes it difficult to turn away. I’ll now detail the steps required for me to setup a simple e-mail auto-processing service on an AWS EC2 instance without a dedicated hostname.

Setting up the Procmail Recepie

.procmail — you can do a lot of things with .procmail. The online resources are many, but for this example I’m going to keep it VERY simple.

First, create a procmail file in your local account. My AWS instances are CentOS based, and use the ‘ec2-user’ as the default account. I’m going to keep it simple here and stick with that paradigm.

-bash-4.1$ vi .procmailrc

I’m going to setup my .procmailrc file to look like this:

SHELL=/usr/bin/php
MAILDIR=$HOME/mail
LOGFILE=$HOME/logs/procmail.log

:0 # catch errors
* ^Subject: Returned mail:.*
logs/procmail.error.log

# — auto-catches
:0
|”$HOME/prod/MailIntake/process.mail.php” $1

Now that I have a .procmail setup… time to get down to making sendmail work.

Sendmail — allowing server to accept messages

To configure the sendmail files, I assume super user powers. If you are unable to assume superuser powers or run sudo.. I doubt you’ll be able to complete these configurations. Hopefully your responsible IT person is going to handle all this for you instead.

Main Sendmail File — sendmail.mc

Setting up the main Sendmail file. This file is fairly large, so I’m only going to highlight the sections I felt needed to be updated.

vi sendmail.mc

To allow use of the AWS mail relay, defined in this section:

define(`SMART_HOST’, `email-smtp.us-east-1.amazonaws.com’)dnl

Setup local hostname / domain identity

dnl # Also accept email sent to “localhost.localdomain” as local email.
dnl #LOCAL_DOMAIN(`localhost.localdomain’)dnl
LOCAL_DOMAIN(`ec2-52-6-000-000.compute-1.amazonaws.com’)dnl

Setting up the masquerade

MASQUERADE_DOMAIN(`ec2-52-6-000-000.compute-1.amazonaws.com’)dnl
MASQUERADE_AS(`ec2-52-6-000-000.compute-1.amazonaws.com’)dnl

access db configuration

Editing the access file to setup the local host relay, so messages can be sent from the various network interfaces on the machine. Obviously. one of those IP addresses was obscured. Where you see #private ip# substitute your AWS private IP (such as 172.123.321.1)

## By default we allow relaying from localhost…
localhost RELAY
127.0.0.1 RELAY
#private ip# RELAY
email-smtp.us-east-1.amazonaws.com RELAY

## Allowed Connections
Connect:127.0.0.1 OK
Connect:#private ip# OK
Connect:email-smtp.us-east-1.amazonaws.com OK

Defining Local Hostnames — local-host-names

For my configuration, I wanted to make sure the system understood it’s local non-FQDN identitiy, so I edited the local-host-names file to include three different ways to reference the system. The AWS DSN, public IP and private IP:

vi local-host-names

Contents of my file looks like this (my file contains real IPs and hostname)

# local-host-names – include all aliases for your machine here.
ec2-52-6-000-000.compute-1.amazonaws.com
52.6.000.000
172.30.000.000

The Mailer Table — mailertable

At this point I didn’t see a need to implement functions of the mailertable

Setting up trusted user file — trusted-users

Modified the trusted users file to allow my primary user, root and one alias to send mail without warnings:

vi /etc/mail/trusted-users

File contents:

# trusted-users – users that can send mail as others without a warning
# apache, mailman, majordomo, uucp, are good candidates
ec2-user, apps, proxy, root

Aliases — virtusertable

Entering user aliases to capture mail sent to various users, and route them to the local ‘ec2-user’.

vi /etc/mail/virtusertable

Contents of my file with aliases:

# A domain-specific form of aliasing, allowing multiple virtual domains to be
# hosted on one machine.
#
ec2-user@ec2-52-6-000-000.compute-1.amazonaws.com ec2-user@localhost
stuff@ec2-52-6-000-000.compute-1.amazonaws.com ec2-user@localhost
things@ec2-52-6-000-000.compute-1.amazonaws.com ec2-user@localhost

Rebuild Settings

Run a make on the directory to rebuild the sendmail db files

make -C /etc/mail
make: Entering directory `/etc/mail’
make: Leaving directory `/etc/mail’

Restart Sendmail!

Restart sendmail… watch for majik!

/etc/init.d/sendmail restart
Shutting down sm-client: [ OK ]
Shutting down sendmail: [ OK ]
Starting sendmail: [ OK ]
Starting sm-client: [ OK ]