Tag Archives: nosql

Install Redis on AWS EC2

redis-whiteRedis is fairly simple to install and get running. I found the best way to do this on CentOS based AWS EC2 nodes is to use the following steps.

Install Pre-Requisites

Redis will require several per-requisits. Your system may vary, but these are the cases I ran into when running the build in August 2015 with the latest AWS system updates. Some of these are required to run the tests, others are required for Redis itself.

TCL 8.5 or higher for Test

You need tcl 8.5 or newer in order to run the Redis test

yum install tcl

Download latest Redis package

Assume super user, move to a safe directory (I like /usr/local) and download the latest build:

sudo su –
cd /usr/local
wget http://download.redis.io/redis-stable.tar.gz

Extract Files

Once the main tarball has been downloaded, extract the files and start the configuration process.

tar xvzf redis-stable.tar.gz
cd redis-stable

Build the Binary

Build the binary. Redis does not seem to require ./config to be run, the necessary make files are already in place. Just run make and install!! If you decide to run the ‘make test’ (which I suggest you do), it maybe take 10-15 min. to complete depending on the power of your AWS instance.

make
make test
make install

Set Overcommit to TRUE

Redis is going to complain unless you have some level of overcommit memory enabled. This is easy to do (again, you must be root or sudoer to do this). Add ‘vm.overcommit_memory = 1’ to /etc/sysctl.conf and then reboot, IF you can safely do so on your machine (best to check and make sure there are no live service interruptions or other personnel using the system).

vi /etc/sysctl.conf

Add this to the end of the file:

# Required by Redis to enable overcommit setting:
vm.overcommit_memory = 1

Reboot

init 6

Configure Redis

Create a working directory for the redis disk files. I like to use the following:

mkdir /var/redis
mkdir /var/redis/db

Copy the base configuration file to /etc/ and customize to your environment.

mkdir /etc/redis
cp redis.conf /etc/redis/6379.conf
vi /etc/redis/6379.conf

I made the following changes to the configuration file. I can’t guarantee all or any of these will be correct for your configuration:

daemonize yes

bind 127.0.0.1

tcp-keepalive 60

logfile “/var/log/redis-server.log”

dir /var/redis/db

Copy the startup file into /etc/init.d

cp utils/redis_init_script /etc/init.d/redis

Add the start command to the root’s crontab. Yeah, so this might be a cheater method instead of adding this to the systems rd.X files, but it’s also easy to disable.

crontab -e

@reboot /etc/init.d/redis start

Start Redis Server

Starting the server from the command line is a good way to verify it’s functional. It’s easy to do, just type ‘resis-server’. Hit CNTL-C to kill and exit once you’ve tested launch. If it starts up, you should see something like this:

[root@ip-10-000-000-00 redis-stable]# redis-server

31408:C 04 Aug 21:55:00.578 # Warning: no config file specified, using the default config. In order to specify a config file use redis-server /path/to/redis.conf
31408:M 04 Aug 21:55:00.579 * Increased maximum number of open files to 10032 (it was originally set to 1024).

31408:M 04 Aug 21:55:00.581 # Server started, Redis version 3.0.3

31408:signal-handler (1438725473) Received SIGINT scheduling shutdown…
31408:M 04 Aug 21:57:53.628 # User requested shutdown…
31408:M 04 Aug 21:57:53.628 * Saving the final RDB snapshot before exiting.
31408:M 04 Aug 21:57:53.631 * DB saved on disk
31408:M 04 Aug 21:57:53.632 # Redis is now ready to exit, bye bye…

If that looks OK, then start using the startup back file. This should start redis as a deamon (service) depending on how you edited the configuration file. If you did it the way I did, then it will start as a deamon.

/etc/init.d/redis start

Starting Redis server…

Test to make sure it’s listening.. by using the ping command. If it’s alive and listening, you’ll receive back a ‘PONG’

redis-cli ping

PONG

FINAL STEPS — Reboot and Verify!

A good and proper final test, assuming you are able to reboot the system without causing trouble to any live services or other personnel… is.. REBOOT, then verify that it has restarted as expected.

init 6

Connection closed by remote host.

[ec2-user@ip-10-000-000-00 ~]$ redis-cli ping

PONG

CONGRATULATIONS!! You are now the proud owner/maintainer/RP of a Redis server!

NEXT…

Doing something productive with Redis… (to be continued)
Cassandra – Getting Started – (deployment Part 2 – Installing Ops Center)

<< Previous: Cassandra – Going into Production – Part 2.

With an empty cluster running, the next step I’m going to take is to install and configure OpsCenter from DataStax. This is a fantastic tool for monitoring the health and performance of your cluster.

Installing Ops Center

The first order of business is to create a directory to store the Ops Center code on the server. I opted to do this within the user account used for Cassandra, as the directory datastax

:~$ mkdir datastax
:~$ 

Next, download and extract the OpsCenter package:

:~/datastax$ wget http://downloads.datastax.com/community/opscenter-1.4-free.tar.gz
--2012-03-26 08:25:30--  http://downloads.datastax.com/community/opscenter-1.4-free.tar.gz
Resolving downloads.datastax.com... 173.203.57.192
Connecting to downloads.datastax.com|173.203.57.192|:80... connected.
HTTP request sent, awaiting response... 200 OK
Length: 21539843 (21M) [application/octet-stream]
Saving to: `opscenter-1.4-free.tar.gz'

100%[=======================================================================>] 21,539,843  3.72M/s   in 7.5s    

2012-03-26 08:25:38 (2.74 MB/s) - `opscenter-1.4-free.tar.gz' saved [21539843/21539843]

:~/datastax$ tar -xvzf opscenter-1.4-free.tar.gz
opscenter-1.4/
opscenter-1.4/log/
opscenter-1.4/bin/
opscenter-1.4/bin/create-keystore.bat
opscenter-1.4/bin/create-key-pair.bat
[...]
opscenter-1.4/conf/event-plugins/email.conf
opscenter-1.4/conf/ssl.conf
opscenter-1.4/conf/opscenterd.conf

:~/datastax$

Next is the setup for OpsCenter. Setup is done via a Python script, located in the BIN directory. Have your listening IP ready and know which port you want to use for the Ops Center web portal. I’m going to use the default of port 8888. Make sure you have the port open on your machine. (click here to jump to the my section on ports).

:~/datastax$ ls
opscenter-1.4  opscenter-1.4-free.tar.gz
:~/datastax$ cd opscenter-1.4
:~/datastax/opscenter-1.4$ bin/setup.py
Generating a 1024 bit RSA private key
.........++++++
...++++++
writing new private key to 'ssl/opscenter.key'
-----
MAC verified OK
Certificate was added to keystore

:~/datastax/opscenter-1.4$ 

Configure the Ops Center deamon. Set the listening IP to an IP available on the system. I’m going to node’s interal IP address (10.1.0.23). The values I’ve changed are in bold.

:~/datastax/opscenter-1.4$ vi conf/opscenterd.conf
[...]
[jmx]
# The default jmx port for Cassandra >= 0.8.0 is 7199.  If you are using
# Cassandra 0.7.*, the default is 8080, and you should change this to
# reflect that.
port = 8001
[...] 
[webserver]
port = 8888
interface = 10.1.0.23
staticdir = ./content
log_path = ./log/http.log
[...]
[cassandra]
# a comma-separated list of places to try for a connection to your Cassandra
# cluster:
seed_hosts = 10.1.0.23,10.1.0.26
[...]

Installing the Ops Center Agents

Each node in the cluster must have a running Ops Center agent. The installation package for this was generated by the Ops Center setup process, and saves a compressed file. This file then needs to be copied and extracted on each node you plan to monitor with the Ops Center.

:~/datastax$ mkdir opscenter-agent
:~/datastax$ cp opscenter-1.4/agent.tar.gz opscenter-agent/
:~/datastax$ cd opscenter-agent/
:~/datastax/opscenter-agent$ tar -xvzf agent.tar.gz
agent/opscenter-agent-2.5-standalone.jar
agent/conf/log4j.properties
agent/bin/setup.bat
[...]
agent/bin/ssl/agentKeyStore.p12
agent/bin/ssl/opscenter.key
agent/doc/LICENSE

:~/datastax/opscenter-agent$

Now run the agent’s setup, assigning it’s IP and the Ops Center’s IP. 10.1.0.26 is this node’s IP address. 10.1.0.23 is the location of the Ops Center install (this may or may not be on the same system or even the same IP address):

:~/datastax/opscenter-agent$ agent/bin/setup 10.1.0.26 10.1.0.23

Make sure you copy the agent file to ALL your other nodes and follow the same setup procedure (this is an example of how I copied the file, your system, ports etc. may be different), and repeat the steps above, with the appropriate IPs.

:~/datastax/opscenter-agent$ scp -P41718 agent.tar.gz bigdata@10.1.0.26:.
RSA key fingerprint is 2b:5b:26:03:87:a4:b1:ea:90:b5:4e:42:60:88:cd:d1.
bigdata@10.1.0.26's password: 
agent.tar.gz                                                                   100%   10MB  10.3MB/s   00:01    
:~/datastax/opscenter-agent$ 

Start up Ops Center

On the Ops Center machine, move back to it’s installed directory and start the process.

:~/datastax$ cd opscenter-1.4
~/datastax/opscenter-1.4$ bin/opscenter &

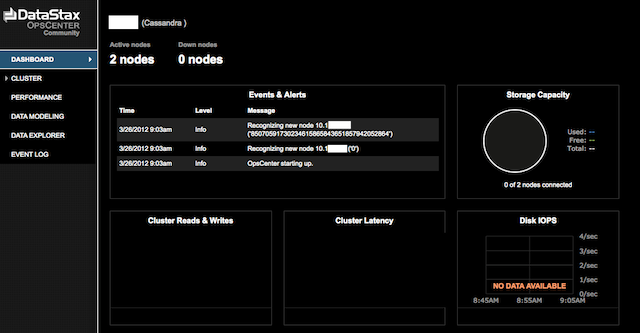
Now connect to the IP address and port and you should see a base Ops Center instance. This is what you would typically see before starting up your agents:

DataStax Ops Center 1.4

Start up the Node Agents

The last step is to start up the Agent deamons so that the OpsCenter knows the status of each node.

:~/datastax/opscenter-1.4$ cd ../opscenter-agent/
:~/datastax/opscenter-agent$ agent/bin/opscenter-agent &
:~/datastax/opscenter-agent$  INFO [main] 2012-03-26 09:12:40,465 Loading conf files: conf/address.yaml
 INFO [main] 2012-03-26 09:12:40,505 Java vendor/version: Java HotSpot(TM) 64-Bit Server VM/1.7.0_03
 INFO [main] 2012-03-26 09:12:40,505 Waiting for the config from OpsCenter
 INFO [main] 2012-03-26 09:12:40,637 SSL communication is enabled
 INFO [main] 2012-03-26 09:12:40,637 Creating stomp connection to 10.1.0.23:61620

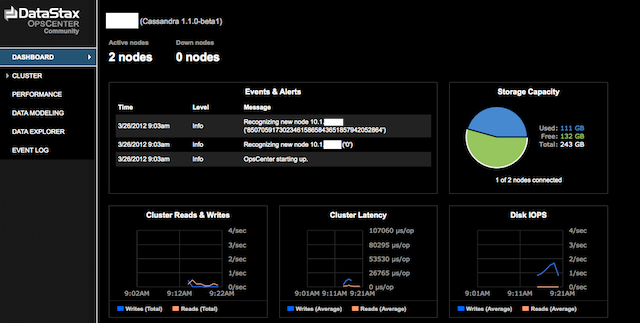
With the Agents fired up, you will see a nice dashboard, showing the current status of the cluster, and some metrics on performance.

Ops Center up and running.

Conclusion

This basically concludes the fast deployment steps required to download, install, configure and start up Cassandra, along with the DataStax Ops Center.

Total time required to deploy was under 4 hours.

Cassandra – Getting Started – (deployment Part 1 – Installing Cassandra)

It’s been almost a month since I started the Apache Cassandra investigation, and now it’s time to move into a production stance. Some of these steps will differ from the original steps documented here in my blog. Later this week I will go back and amend those posts to point at this post as the more recent information. Those old links are already being referenced by multiple sites, so deleting them would not be a kind thing to do. Thus.. onward we move!

Getting the right JVM/JDK/JRE

Originally, the OpenJDK was being used for this introduction and research into Cassandra. Being a proponent of Open Source, I was going to avoid the use of Oracle’s potentially proprietary JDK/JRE in this environment. I have since seen first had, that the JDK DOES IN FACT MATTER, and the one that supports the latest tools is the one from Oracle.

That is located here:

Downloading the JRE/JDK from Oracle has enabled the reliable use of DataStax’s OpsCenter management tool (more on that later).

These are the recommended minimums for Cassandra and OpsCenter from DataStax, a respected partner of the Apache Cassandra project.

Sun Java Runtime Environment 1.6.0_19 or later
Python 2.5, 2.6, or 2.7
OpenSSL version listed in Configuring SSL unless you disable SSL

I ended up selecting the JDK (linked here) and deposited it in the following location on my system as user root (create the directory path if you don’t already have it):

/opt/java/64/jdk-7u3-linux-x64.tar.gz

Extract the file:

:/opt/java/64# tar -xvzf jdk-7u3-linux-x64.tar.gz
jdk1.7.0_03/
jdk1.7.0_03/include/
jdk1.7.0_03/include/jvmti.h
jdk1.7.0_03/include/jawt.h
[...]
jdk1.7.0_03/jre/plugin/desktop/sun_java.desktop
jdk1.7.0_03/jre/COPYRIGHT
jdk1.7.0_03/LICENSE
jdk1.7.0_03/COPYRIGHT
:/opt/java/64# 

The Cassandra Build I decided to use is this one: apache-cassandra-1.1.0-beta1. I downloaded the file to the user I created for this using wget:

:~$ wget http://apache.deathculture.net/cassandra/1.1.0/apache-cassandra-1.1.0-beta1-bin.tar.gz
--2012-03-25 22:52:27--  http://apache.deathculture.net/cassandra/1.1.0/apache-cassandra-1.1.0-beta1-bin.tar.gz
Resolving apache.deathculture.net... 173.236.158.254
Connecting to apache.deathculture.net|173.236.158.254|:80... connected.
HTTP request sent, awaiting response... 200 OK
Length: 12505037 (12M) [application/x-gzip]
Saving to: `apache-cassandra-1.1.0-beta1-bin.tar.gz'

100%[=======================================================================>] 12,505,037  8.84M/s   in 1.3s    

2012-03-25 22:52:29 (8.84 MB/s) - `apache-cassandra-1.1.0-beta1-bin.tar.gz' saved [12505037/12505037]

Next the file is extracted, moved to a shorter directory name:

:~$ tar -xvzf apache-cassandra-1.1.0-beta1-bin.tar.gz
:~$ mv apache-cassandra-1.1.0-beta1 cass-beta1

Configuring a Node

Now the configuration is edited to define the node ring. The first file to edit is the cassandra.yaml file.

This initially will be only a 2 node cluster, but the tokens must still be calculated. Here are the node tokens I generated using a PERL script I wrote (see: Cassandra and Big Data – building a single-node “cluster” – Extra Credit for the code):

:~/cass-beta1$ ./token.pl 2
Calculate tokens for 2 nodes
factor = 170141183460469231731687303715884105728
node 0	token: 0
node 1	token: 85070591730234615865843651857942052864
:~/cass-beta1$ 

Edit the cluster name. I’m not testing, so I changed the name to one descriptive of the data I was storing. ‘ip’. In the example below, I’m showing configs for the 2nd of the two nodes. Note: The first node would have a different IP address and also a different initial token, in this case ‘0’, as calculated by the tool.

:~$ cd cass-beta1/
:~/cass-beta1$ vi conf/cassandra.yaml

[...]

# The name of the cluster. This is mainly used to prevent machines in
# one logical cluster from joining another.
cluster_name: 'ip'

[...]

 If blank, Cassandra will request a token bisecting the range of
# the heaviest-loaded existing node.  If there is no load information
# available, such as is the case with a new cluster, it will pick
# a random token, which will lead to hot spots.
initial_token: 85070591730234615865843651857942052864

[...]

# directories where Cassandra should store data on disk.
data_file_directories:
    - /home/bigdata/data/

[...]

# commit log
commitlog_directory: /home/bigdata/commitlog/

[...]

# saved caches
saved_caches_directory: /home/bigdata/saved_caches/

[...]

          # seeds is actually a comma-delimited list of addresses.
          # Ex: ",,"
          - seeds: "10.1.100.101,10.1.100.102"
[...]

# Setting this to 0.0.0.0 is always wrong.
listen_address: 10.1.1.101

[...]

rpc_address: 10.1.1.101

[...]

# Time to wait for a reply from other nodes before failing the command (this was done to increase timeout to 30 seconds, sometimes the search I need to run is pretty nasty)
rpc_timeout_in_ms: 30000

Following that, the shell file needs to be modified to designate the JMX listening port:

:~/cass-beta1$ vi conf/cassandra-env.sh

[...]

# Specifies the default port over which Cassandra will be available for
# JMX connections.
JMX_PORT="8001"

[...]

Make sure your logfile is in the desired location. I decided to keep it within the account itself for now:

vi cassA-1.0.8/conf/log4j-server.properties
[...]

log4j.appender.R.File=/home/bigdata/log/cassA.log

[...]

Next I set the paths in the .bash configuration file for the account, using the following 3 environment variables (ANT_HOME is used by the ANT compiler, if you are not writing code, your JAVA_HOME will point at the JRE, not the JDK, and you won’t need the ANT_HOME path at all):

vi ~/.bash_profile
export JAVA_HOME=/opt/java/64/jdk1.7.0_03
export ANT_HOME=/usr/lib/ant/
export CASS_BIN=$HOME/cass-beta1/bin
export PATH=$PATH:$ANT_HOME/bin:$CASS_BIN

Systems Administration

Make sure there is a location for the cassandra server to write it’s log files. You’ll need your SysAdmin, or root privs, to do this. I set the ownership to root and the user under which I’m currently running cassandra (bigdata):

root:/data/feed/indata# cd /var/log
root:/var/log# mkdir cassandra
root:/var/log# chown root:bigdata cassandra
root:/var/log# chmod 775 cassandra

The following ports need to be opened up, if you are running a firewall on each system (you ARE, right!?!), to allow Cassandra nodes to communicate with each other. This is a snippet from my rules-based firewall control file.


Port Usage:

  • 9160 – Thrift port, where the API is serviced for Reads/Writes to Cassandra
  • 8001 – Individual node listening port. This is used for the command line (cli)
  • 7000 – Commands and Data TCP port, used nodes for communications
  • 7001 – SSL port used for storage communications
  • 8888 – Only used on systems that will host an Ops Center installation
  • 61620 – Required for Ops Center Agent Communications

## Cassandra
ACCEPT          loc             $FW             tcp     9160,8001,7000,7001
## OpsCenter
ACCEPT          loc             $FW             tcp     8888,61620


Starting up the Cluster

This is where the truth is told. The rubber meets the road. The money is placed where your mouth is. Light ’em up!

:~$ cassandra
:~$  INFO 23:52:54,232 Logging initialized
 INFO 23:52:54,236 JVM vendor/version: Java HotSpot(TM) 64-Bit Server VM/1.7.0_03
 INFO 23:52:54,237 Heap size: 6291456000/6291456000
[...]
INFO 23:52:55,162 Node /10.1.0.23 state jump to normal
 INFO 23:52:55,163 Bootstrap/Replace/Move completed! Now serving reads.

IT LIVES!! Now start your other node(s), and check to verify you have a complete ring, properly configured. You should see something like this in subsequent nodes, I’ve highlighted the references to the other member node:

[...]
INFO 23:54:16,042 Node /10.1.0.23 has restarted, now UP
 INFO 23:54:16,043 InetAddress /10.1.0.23 is now UP
 INFO 23:54:16,043 Node /10.1.0.23 state jump to normal
 INFO 23:54:16,088 Compacted to [/home/bigdata/data/system/LocationInfo/system-LocationInfo-hc-6-Data.db,].  544 to 413 (~75% of original) bytes for 4 keys at 0.003425MB/s.  Time: 115ms.
 INFO 23:54:16,109 Completed flushing /home/bigdata/data/system/LocationInfo/system-LocationInfo-hc-5-Data.db (163 bytes)
 INFO 23:54:16,110 Node /10.1.0.26 state jump to normal
 INFO 23:54:16,111 Bootstrap/Replace/Move completed! Now serving reads.

Run nodetool:

:~$ nodetool -h10.1.0.23 -p 8001 ring
Address         DC          Rack        Status State   Load            Owns    Token                                       
                                                                               85070591730234615865843651857942052864      
10.1.0.23      datacenter1 rack1       Up     Normal  17.77 KB        50.00%  0                                           
10.1.0.26      datacenter1 rack1       Up     Normal  17.66 KB        50.00%  85070591730234615865843651857942052864      
 

WE HAVE A RING!

NEXT: SETTING UP OPS CENTER

Inserting and Reading data from a Cassandra Cluster

Rubber meeting the road. Time to insert some column families, then some data and finally pull it back off the stack.

First off, the keyspace was already defined, so I’m going to simply list it’s structure:

[default@unknown] describe ip_store;

Keyspace: ip_store:
  Replication Strategy: org.apache.cassandra.locator.SimpleStrategy
  Durable Writes: true
    Options: [replication_factor:2]

With a keyspace ready for some column families, those are created next. Here I’m establishing that there will be 4 families in this single keyspace. This is contrary to suggestions in the High Performance Cassandra Handbook, but follows all other documentation I’ve seen. Considering that this is NOT a production implementation, I’m going to go with a more conventional strategy of organizing related data in the same keyspace.

The first action is to assume the desired keyspace, then add the desired column families:

[default@unknown] use ip_store;
Authenticated to keyspace: ip_store

[default@ip_store] create column family warehouse with comparator = UTF8Type;
595945d0-71ce-11e1-0000-13393ec611bf
Waiting for schema agreement...
... schemas agree across the cluster

[default@ip_store] create column family hourly with comparator = UTF8Type;
65ea2170-71ce-11e1-0000-13393ec611bf
Waiting for schema agreement...
... schemas agree across the cluster

[default@ip_store] create column family daily with comparator = UTF8Type; 
6aaeae60-71ce-11e1-0000-13393ec611bf
Waiting for schema agreement...
... schemas agree across the cluster

[default@ip_store] create column family 30day with comparator = UTF8Type;
7b85bf30-71ce-11e1-0000-13393ec611bf
Waiting for schema agreement...
... schemas agree across the cluster

OK, a basic schema has been established. Now.. to load the data. I’ll post the relevant sections of the loader code at a later date. At this point you only need to consider that the loader DOES work and it’s loading data. We’ll look at the extraction of the data following loading a very small set.

time host=10.1.0.23 port=9160 ks=ip_store cf=warehouse ttl=0 datafile=5.ips ant -DclassToRun=loader.bulkIpLoader run
Buildfile: cBuild/build.xml

init:

compile:
    [javac] Compiling 1 source file to cBuild/build/classes

dist:
      [jar] Building jar: cBuild/dist/lib/cass.jar

run:
     [java] ks       ip_store
     [java] cf       warehouse
     [java] ttl      0
     [java] datafile 5.ips

BUILD SUCCESSFUL
Total time: 1 second

Of the set, there are three unique IPs and 2 are duplicates of other data (IMPORTANT NOTE: The IP’s have been changed to protect the innocent and clueless):

2016468288	1011	suspicious	2012-03-13 18:40:01
2016468288	1011	suspicious	2012-03-13 18:40:02
3149138705	1011	suspicious	2012-03-13 18:40:00
3149138705	1011	suspicious	2012-03-13 18:40:01
2179293112	1011	suspicious	2012-03-13 18:39:59

Having loaded these, I re-launch the command line interface, authenticate to the desired keyspace, and then a VERY important command to set an assumption about how we’re going to reference the keys. If you get a strange error like this “cannot parse ‘187.180.11.17’ as hex bytes“, that means you likely forgot to issue the assumes command. Commands I issued are in bold.

cass
Connected to: "ak-ip" on 10.1.0.23/9160
Welcome to Cassandra CLI version 1.0.8

[default@unknown] use ip_store

[default@ip_store] assume warehouse keys as utf8;   
Assumption for column family 'warehouse' added successfully.

[default@ip_store]  get warehouse['3149138705'];

=> (column=2012-03-13 18:40:00, value=7b227265706f72746564223a22323031322d30332d31332031383a34383a3031222c22617474726962757465223a22737573706963696f7573222c2270726f705f6964223a2231303131222c2270726f7065727479223a22426f74204375747761696c222c226465746563746564223a22323031322d30332d31332031383a34303a3030222c226d65746164617461223a22222c226970223a223139302e3137342e3235312e313435227d, timestamp=1332168862658)
=> (column=2012-03-13 18:40:01, value=7b227265706f72746564223a22323031322d30332d31332031383a34383a3031222c22617474726962757465223a22737573706963696f7573222c2270726f705f6964223a2231303131222c2270726f7065727479223a22426f74204375747761696c222c226465746563746564223a22323031322d30332d31332031383a34303a3031222c226d65746164617461223a22222c226970223a223139302e3137342e3235312e313435227d, timestamp=1331689681)
Returned 2 results.
Elapsed time: 39 msec(s).

There we go. A single key row ip_store[‘warehouse’][‘3149138705’] containing to column records, each with a JSON blob within it. Now.. the next step, to set the assumption of utf8 when recalling the records and get output mere mortals such as yourselves can understand.

[default@ip_store] assume warehouse validator as ascii; 
Assumption for column family 'warehouse' added successfully.

[default@ip_store]  t warehouse['3149138705'];  
     
=> (column=2012-03-13 18:40:00, 
  value={
   "reported":"2012-03-13 18:48:01",
   "attribute":"suspicious",
   "prop_id":"1011",
   "detected":"2012-03-13 18:40:00",
   "ip":"187.180.11.17"
  }, timestamp=1331689680)

=> (column=2012-03-13 18:40:01, 
  value={
    "reported":"2012-03-13 18:48:01",
    "attribute":"suspicious",
    "prop_id":"1011",
    "detected":"2012-03-13 18:40:01",
     "ip":"187.180.11.17"
  }, timestamp=1331689681)

Returned 2 results.
Elapsed time: 2 msec(s).

There is it! Data written, data read. Now, it’s up to you to think about how you might use this simple, flexible and powerful storage engine to solve your business needs.

Drop keyspace using Cassandra Cli

Dropping a an entire keyspace using the cassandra-cli is exceptionally simple.

First, access your cluster using the cli. I have an alias in my .bash_profile so I only need to type ‘cass’ to access the clid. In an attempt to be helpful though, I shall show the full command syntax for my environment. Your host and port may vary.

  alias cass='cassandra-cli -h 10.1.0.26'

In this example, I am going to drop the keyspace I was loading with test data in previous posts, ks33.

hpcass: ~$ cass
Connected to: "Test1" on 10.1.0.23/9160
Welcome to Cassandra CLI version 1.0.8

Type 'help;' or '?' for help.
Type 'quit;' or 'exit;' to quit.

DROP keyspace ks33;

07ad5e00-7120-11e1-0000-13393ec611bd
Waiting for schema agreement...
... schemas agree across the cluster
[default@unknown] 

That’s all there was to it. Keyspace destroyed.

Previous Cassandra related articles