Tag Archives: OSX

Replace Text Recursively using grep and sed on MacOS (osX).

As with many MacOS’isms, you have to change up your old school LINUX to work with the slightly different command syntax of the MacOS tools. Specifically in the this case xargs and sed.

xargs can be an amazingly powerful ally when automating commands line functionality, wrapping the reference command with auto-substitutions using the ‘@’ meta-character.

I’ll get to the meat of this. While trying to automated a grep -> sed pipeline, I encountered this error:

egrep -rl 'version 0.0.1' src/* | xargs -i@ sed -i 's/version 0.0.1/version 0.0.1c/g' @
xargs: illegal option -- i

It turns out that MacOS xargs like -I instead of -i.. (a quick trip to man sorted that out).

     -I replstr
             Execute utility for each input line, replacing one or more occurrences of replstr in up to replacements (or 5 if no -R flag is specified) arguments to utility
             with the entire line of input.  The resulting arguments, after replacement is done, will not be allowed to grow beyond 255 bytes; this is implemented by con-
             catenating as much of the argument containing replstr as possible, to the constructed arguments to utility, up to 255 bytes.  The 255 byte limit does not apply
             to arguments to utility which do not contain replstr, and furthermore, no replacement will be done on utility itself.  Implies -x.

Next I ran into an errors with sed.. when using the ‘edit in place’ flag -i. (yes, that makes for a confusing debug when you have the “offending” switch in two places).

egrep -rl 'version 0.0.1' src/* | xargs -I@ sed -i 's/version 0.0.1/version 0.0.1c/g' @
sed: 1: "src/com/ingeniigroup/st ...": bad flag in substitute command: 'a'
[...]

With a little testing of the individual command, and another trip to man, it took a little noodly to deduce that the error message was being generated because it was trying the sed commmand as the output file suffix and the filename as the sed command! Adding an empty string designator after sed’s -i solved this.

     -i extension
             Edit files in-place, saving backups with the specified extension.  If a zero-length extension is given, no backup will be saved.  It is not recommended to give
             a zero-length extension when in-place editing files, as you risk corruption or partial content in situations where disk space is exhausted, etc.

Final Command Query
The objective was to simply hammer through the source code and update the version tag from 0.0.1 to 0.0.1c. Running egrep in recursive filename list mode ( egrep -rl ) for the string I wanted ( ‘version 0.0.1’ ) gave me a file list, which was then piped into xargs, which expanded that list into the sed command ( sed -i ” ‘s/version 0.0.1/version 0.0.1c/g’ ). And viola.. 18 files changed with just a little big of effort:

egrep -rl 'version 0.0.1' src/* | xargs -I@ sed -i '' 's/version 0.0.1/version 0.0.1c/g' @

Since this took me more than 5 minutes to figure out, I decided I’d take 5 more and hopefully help someone else down the line.
Upgrading OSX and impacts to Gearman PHP components

Originally posted June 2013
Being on the Apple Developers list, I’ve installed the latest edition of the OS and am doing some Beta testing of my apps.

A few days after upgrading, my Gearman test code stopped working with this error:

Fatal error: Class ‘GearmanClient’ not found in connect.class.php on line 35

That triggered a slight bit of panic, however I knew my libraries were mostly in tact as I was able to start my gearmand service without a problem at all. Hoping against odds I decided to simply run a new make and install of the Gearman PHP components.

UPDATE: If you do not have the latest Gearman libraries for PHP, they are located here: http://pecl.php.net/package/gearman I recommend you download the latest version and build from that.. My page on building PHP Gearman on OSX is located [HERE]

I cd’d to the directory where I’d built my Gearman PHP libraries a few days prior:

david$ cd /usr/local/gearman-1.1.2

NOTE: If you have not recently built PHP Gearman modules, this page [ HERE ] detailed getting to the next step.

Then I ran a make and a make install in the directory.

gearman-1.1.1 david$ make
/bin/sh /usr/local/gearman-1.1.2/libtool –mode=install cp ./gearman.la /usr/local/gearman-1.1.2/modules
cp ./.libs/gearman.so /usr/local/gearman-1.1.2/modules/gearman.so
cp ./.libs/gearman.lai /usr/local/gearman-1.1.2/modules/gearman.la
[…]
Build complete.
Don’t forget to run ‘make test’.

gearman-1.1.1 david$ sudo make install
/bin/sh /usr/local/gearman-1.1.2/libtool –mode=install cp ./gearman.la /usr/local/gearman-1.1.2/modules
cp ./.libs/gearman.so /usr/local/gearman-1.1.2/modules/gearman.so
cp ./.libs/gearman.lai /usr/local/gearman-1.1.2/modules/gearman.la
———————————————————————-
Libraries have been installed in:
/usr/local/gearman-1.1.2/modules

[…]
———————————————————————-
Installing shared extensions: /usr/lib/php/extensions/no-debug-non-zts-20090626/

This worked perfectly, and following a RE-CREATION of my /etc/php.ini file (which I also lost), I was good to go!

include_path=.:/mnt/crawler
extension=”gearman.so”

Viola.. Gearman development back underway!!

Patching OSX against the ‘ShellShock’ exploit

While everyone waits for Apple to release a patch for the ShellShock bug, one of the maintainers of BASH assisted with detailing out how to patch BASH (and SH) on OSX to prevent the Vuln. This comes from the helpful Apple section of Stack Exchange.

NOTE: To perform this patch you MUST be granted sudo privs on your machine — if not you won’t be able to move the new files into the required location.

Testing to see if you are vulnerable

First things first.. see if you are vulnerable by checking your version of BASH. The desired version is this; GNU bash, version 3.2.54:
Screen Shot 2014-09-29 at 8.05.00 AM

If you are not seeing that, then you should check to see if you have the vuln. When I checked my updated version of OX Mavericks, I was on Bash 3.2.52 and it was vulnerable to the exploit.

If you see the word ‘vulnerable’ when you run this, your at risk!
env x='() { :;}; echo vulnerable' bash -c 'echo hello'

This is a PASS (OK):
env x='() { :;}; echo vulnerable' bash -c 'echo hello'
hello

This is a FAIL:
env x='() { :;}; echo vulnerable' bash -c 'echo hello'
vulnerable
hello

Time to get down to patching

This process is going to require you to do some command line work, namely compiling bash and replacing the bad versions with the good ones. If you are NOT comfortable do that.. best to wait for Apple to create the installable patch. If your geek level is above basic, continue forward:

First, agree to using xcodebuild
If you have no run xcodebuild, you are going to need to run it, then agree to the terms, before you’ll be able to finish this build. I recommend you run it NOW and get that out of the way:
xcodebuild

Set environment to NOT auto-include
This capability is part of the reason the exploit exists. It’s highly recommend you turn this on before starting the build. Ignore at your own peril. This parameter is used in the build stage for two patches:

export ADD_IMPORT_FUNCTIONS_PATCH=YES

Make a place to build the new objects
I dropped everything into the directory ‘new-bash’… and did it thus. NOTE: I am not using sudo, (yet)

mkdir new-bash

Download base-92 source
Move to that directory and download the the bash-92 source using good old curl and extract the compressed tarball:

cd new-bash
curl https://opensource.apple.com/tarballs/bash/bash-92.tar.gz | tar zxf -

Get the patch packages next
CD to the source directory for bash, and then download 2 patch packages:

cd bash-92/bash-3.2
curl https://ftp.gnu.org/pub/gnu/bash/bash-3.2-patches/bash32-052 | patch -p0
curl https://ftp.gnu.org/pub/gnu/bash/bash-3.2-patches/bash32-053 | patch -p0

Start creating the patches
Execute these two commands, in order two build and apply the two patches:

[ "$ADD_IMPORT_FUNCTIONS_PATCH" == "YES" ] && curl http://alblue.bandlem.com/import_functions.patch | patch -p0
[ "$ADD_IMPORT_FUNCTIONS_PATCH" == "YES" ] || curl https://ftp.gnu.org/pub/gnu/bash/bash-3.2-patches/bash32-054 | patch -p0

Start building!
Traverse back up the tree and start running the builds. It is recommended that you NOT run xcodebuild at this point. Doing so could enable root powers in the shell and that is something that you certainly do not want!

xcodebuild

OK.. PATCH MADE!
At this point you have a new bash and sh object build to replace the exploitable ones. Backup your old versions, move these into place and you are now safe.

# Test your versions:
build/Release/bash --version # you should see "version 3.2.54(1)-release"
build/Release/sh --version # you should see "version 3.2.54(1)-release"

# move the files into location
sudo mv /bin/bash /bin/bash.BAD
sudo mv /bin/sh /bin/sh.BAD
sudo mv build/Release/bash /bin
sudo mv build/Release/sh /bin

Now clean up the local mess
Now the local directory where you build bash is no longer needed. I don’t like to leave cruft around on my system that creates a confusing environment. Removing the source tree is my last task. You can leave it if you like, but if I need to do this again I’m going to perform a full fresh rebuild, so this will not be re-used.

cd
rm -rf new-bash

YOU ARE DONE!

BIG HUGE THANKS TO ALL THAT DID THE REAL WORK HERE.. the people maintaining bash, the people that post awesome solutions to StackExchange and all the other fantastic resources on the net!

Installing HomeBrew for OSX

Installing Homebrew

This process appeared to be fairly trivial. Run the following command. The script will tell you want it wants to do. I stuck with the default responses and let it do it’s worst. You will probably want to read the HomeBrew page [HERE] first, before just trusting me.


david$ ruby -e "$(curl -fsSL https://raw.github.com/mxcl/homebrew/go)"

Next step was to run the Brew Doctor and address any major issues raised there, of which I had a few. The most pressing of which was this:

Warning: Xcode is installed to a directory with a space in the name.
This will cause some formulae to fail to build.

I deleted XCode 4.3.3 (my latest installed version) and re-installed which gave me version 4.6.2. Next I had to install the ‘Command Line Tools’ (no longer embeded in XCode). That can be found in the XCode Preferences -> Downloads.

I had a few other issues, stray libraries from botched builds past. I worked through my issued and then tried to installing components.

Since Boost seems to be very commonly referenced, I went ahead and installed it with Brew as it’s first task:

Installing Boost using Brew

Then went about installing boost with HomeBrew, since it did not seem to get all the components I needed when installed via MacPorts/Fink.


david$ brew install boost

This appears to have installed boost-1.53.0

* DONE *

Now, you may Brew!

Gearman — Starting the Java-Gearman-Service process

gearmanlogo
These notes apply to testing on a MAC OSX portable, and may or may not apply to your implementation. They are provided as an adjunct to my main Getting Gearman Going post elsewhere in this blog.

The project page for Java-Gearman-Service is located [HERE] on Google Code.

The full set of instructions for staring up Gearman’s Java-Gearman-Service were not clearly linked to the main Gearman project page, so I’m including the link [HERE] to save you the few Google dorkings I did to find it.

Starting up the Java service should be as simple as this:


java -jar java-gearman-service-0.6.6.jar

HOWEVER, I received this instead.. an error:


david$ java -jar java-gearman-service-0.6.6.jar
Exception in thread "main" java.lang.UnsupportedClassVersionError: org/gearman/impl/Main : Unsupported major.minor version 51.0
at java.lang.ClassLoader.defineClass1(Native Method)
at java.lang.ClassLoader.defineClassCond(ClassLoader.java:631)
at java.lang.ClassLoader.defineClass(ClassLoader.java:615)
at java.security.SecureClassLoader.defineClass(SecureClassLoader.java:141)
at java.net.URLClassLoader.defineClass(URLClassLoader.java:283)
at java.net.URLClassLoader.access$000(URLClassLoader.java:58)
at java.net.URLClassLoader$1.run(URLClassLoader.java:197)
at java.security.AccessController.doPrivileged(Native Method)
at java.net.URLClassLoader.findClass(URLClassLoader.java:190)
at java.lang.ClassLoader.loadClass(ClassLoader.java:306)
at sun.misc.Launcher$AppClassLoader.loadClass(Launcher.java:301)
at java.lang.ClassLoader.loadClass(ClassLoader.java:247)

Checking my version shows that I am on 1.6 not 1.7 as I had thought;


david$ java -version
java version "1.6.0_45"
Java(TM) SE Runtime Environment (build 1.6.0_45-b06-451-11M4406)
Java HotSpot(TM) 64-Bit Server VM (build 20.45-b01-451, mixed mode)

To get the proper version, I navigated to the Oracle page located [HERE], agreed to their terms (do I really have a functional choice… not if I want/need to use Java…) and pushed forward.

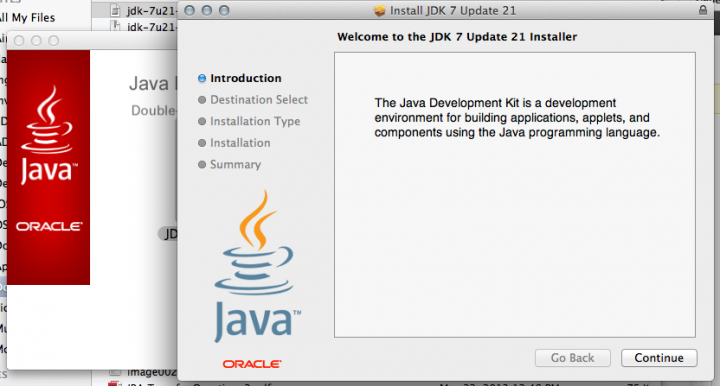
If you are running the install for 1.7, you should see a dialog like this:
Screen Shot 2013-06-03 at 2.12.16 PM

That has at least resolved this part of the issue, and will attempt to restart the server.


david$ java -version
java version "1.7.0_21"
Java(TM) SE Runtime Environment (build 1.7.0_21-b12)
Java HotSpot(TM) 64-Bit Server VM (build 23.21-b01, mixed mode)

Now I’m going to restart, specific a custom port and get it kicked off in the background:


david$ java -jar java-gearman-service-0.6.6.jar -p6315 &

At this point the process is running on my Job Service box and next step will be to craft some code to see how it all works.

CIDR Calculator App picked up by Softpedia

This just in…. (seems like a good thing). Notice that my new App CIDR Calculator for the MAC (in the wide for barely 24 hours now), was found by Softpedia, and linked in their site.

Congratulations,

CIDR Calculator, one of your products, has been added to Softpedia’s
database of software programs for Mac OS. It is featured with a description
text, screenshots, download links and technical details on this page:
http://mac.softpedia.com/get/Utilities/DeMartini-CIDR-Calculator.shtml

The description text was created by our editors, using sources such as text
from your product’s homepage, information from its help system, the PAD
file (if available) and the editor’s own opinions on the program itself.

Nothing wrong with a little free exposure. No ratings so far, but I hope to get some good feedback. It’s already sold several units so I know someone is out there giving it a test.

If you want to learn more about this entry in Softpedia, [ HERE IS THE LINK ].

If you want to check out the App itself at the Apple MAC App Store.. just click on the button below!

Buy at the Mac App Store

Writing an Apple Help Book

Writing and distributing Apps for OSX compared to those written for the iOS environment is mostly an entirely new adventure. The underlying code is the same, but the concepts of UI design are radically different. Then there is the entire topic of Help Files, or in the case of OSX, the Apple Help Book.

Having several decades of experience as a software designer, developer and distributor, the concept is not new territory. Deploying it in OSX is, however a new skill to be learned. To help those that follow boil all this down I’m going to expose my personal notes on the subject. These notes were derived while using XCode 4.2, in January 2010 [ Detailed Online Information at developer.apple.com ]

Why Apple Help Book?

Flexibility — Writing and deploying an Apple Help Book with the application provides indexed search capability of the Help data, via the OSX Help menu while running the App. Once registered in the Application package itself, it integrates smoothly into the user experience.

What is special about Apple Help Books

They are HTML based. — This makes production of help files for the Application simple. HTML editors are widely available for those that do not have the technical chops to produce the file the good old fashioned way.

Rich Content — Help books can contain video content and even Apple Script to automate help navigation or even perform application manipulation directly from the Help construct. Niiiiiice.

What is a Help Book?

HTML Content — The book consists of a collection of HTML files that constitute the Help documentation for your application.

Indexing Help — Apple provides Help Book Indexing tool located in /Developer/Applications/Utilities, when the Developer package is installed. .

Help API — Contextual help is made available, from the Help Book via a provided Apple Help API. You do not need to utilize this capability for basic help function, but it’s available for advanced Help capabilities.

Exact Match Search for small words — A common problem with basic search functions, is that small or common letter groups may product far to general of a response. Example would be searching for the term ‘CD’. A Help Book with the properly configured Exact Match Searching would be able to return targeted help results for ‘CD’.

Can live In the Cloud — Concept of Apple Help supports the ability to access and deliver content from remote servers (aka the cloud), in three different ways; Internet-only, Internet-primary and Local-primary. It also has the ability to signal need to download and updated Help file for local (end-user) storage.

Links to Online Resources — It’s perfectly acceptable to code the Help Book and it’s title items to be links to locations on the web. An example of this might be a link from the Help system back to the producer’s main website for support or additional help content.

Authoring a Help Book

Full Document Online –[ Click Here ] for the full article on Apple’s Developer Website.

OSX Lion (10.7) Arrives

The LION has arrived, and is being installed on millions of devices around the world. Or, so it would seem based on how long it took to download the 3+ Gigabyte latest version of Apple’s OSX operating system. And at the reduced (by $100 from the last update) price of $30, I imagine it’s going to fly off the virtual shelves. I say that because, for the first time, there are NO CD install options (or so said Apple during WWDC 2011). Watch that long but informative video here:

WWDC 2011 – LION, iOS5, iCloud Preview

Before I ramble on about some of my favorite features, it’s important to point out that this upgraded is not for everyone. Slower Code 2 Duo systems will see a little slowdown in how things run. Even on my early Core 2 Duo system with a measly 2GB of memory, it’s not much more than an occasional annoyance when things load. Once everything is up and running, I don’t see any performance hit. The new version is also limited to certain processor classes, so unless you have one of these processors, the installation instructions say you won’t be able to enjoy the latest:

    Supported Processors

  • Core 2 Duo
  • i3
  • i5
  • i7

Once you download the software, it took about 40 minutes to complete the installation. It’s a hands-off install (I ran mine overnight) once you have it started. You can walk away, come back about 1 hour later and you are ready to go. No nasty multiple restarts and driver re-installs or trash like that.

By now, you might be wondering, or saying out loud “So what? How do I buy this supposedly great upgrade?!?”. It’s not a single step operation, but overall all it’s pretty simple.

The first thing you will need to do is run the Software Update:

Select the 'Software Update' option from Apple dropdown.

This will upgrade your Apple App Store (seen down there in the taskbar, this is not the same thing as your Apple iTunes App store for handheld devices).

Find the App Store in Taskbar (3rd from right in mine)

From there, you will easily find the LION product you can purchase.

Apple App Store - LION download is VERY easy to find.

If you have not yet purchased it under your Apple ID, then you will be offered the product at around $30. Now, here is the part that I really like, if you have already purchased the upgrade (such as me), you don’t have to pay for it again, to install it on another device that you own, and have linked to your Apple ID! This is fantastic! Not only is it very inexpensive, the installation process is designed to work well for families and people with multiple systems. Something a competitor might learn something from…. (although I’m sure they would screw it up 1000-way to Sunday, LOL).

Once installed, you are flooded with 250 NEW features in the latest incarnation of OSX. That’s not 250 enhancements, that 250 NEW Features! Wow. So, what are those features? I’m not going to list all 250. I’m not even going to spend much time trying to describe them myself, so I’ll direct you do the Apple website, and you can pick the ones YOU are interested in:

250+ New Features in OSX LION

Now, the ones I’ve really enjoy so far are these:

Launchpad

[details] I like to keep the items I run often in my taskbar, but there is not room to keep everything I might ever run there. When I want to go find some seldom used app, I used to have to use the Finder, open Applications and poke through list. NOT ANY MORE! With a simple 4-finger swipe on the track pad (or clicking that rocket icon you might have noticed in my screen shot above) you are given an iOS (that’s iPhone/iPad/iPod style interface for the techno-neophytes that are now lost). ALL of the apps are there. If you have too many to fit on one page, well, you just swap left and right, find what you want an LAUNCH! It’s a really cool feature!

View of the Launch Pad

You can see that Apps in sub-directories are presented in the same method as they are on the iOS OS. When Apple said they took usability lessons from iOS and brought them to LION, it was much more than just some marketing hype. It’s real, and it works.

Mission Control

[details] Spaces has been changed too, and now it’s Mission Control. Like multiple desktops (like me) then you can access, add, remove them with a simple 3-finger up-swipe to see all your desktops:

Spaces - access to multiple desktops

It’s easy to move running apps from space to space too, and you might notice the dashboard is the first desktop on the right, so you can get there using spaces. So, why is that cool? Well, to shift from space to space it’s a simple matter of a 3-finger swipe left or right to access the space you want. Again, it’s just that simple!

Autosave

[details] This is such an awesome, intelligent, useful feature. Gone are the days of you cursing because you forgot to save a document, and for some reason the application closed, maybe because you restarted and forgot it was open (although the OS will remind you), or the system crashed (I’ve NEVER had my MAC crash.. EVER), or you simple hit the wrong button and didn’t save! OH NO. Well, this has you covered. Gone are the annoying popups (do you want to save?), because it will save it for you, when you need it to. Combined with Versions.. you have a very secure and safe environment in which to create, anything.

Versions

[details] And it will save different versions of your document AS YOU EDIT, so you can revert back to a previous state at any time. If you are familiar with time machine, you’ll understand how it works. I don’t have a demo to show you on my computer (yet) but I’ve tested it on another. This is one you want to read about for sure!

Having used the new OS for only 24 hours how, I’ve just scratched the surface of the new capabilities. I will say with complete confidence, I am glad that I upgraded, I’m using the Launch Pad and Mission Control heavily already.

Starting gearmand deamon

Getting the gearmand deamon running. Should be simple work, yet, as with a lot of thing in the software world, it’s not quite that simple. My first attempt to start up gearmand failed with the following error:

Corsa-3:~ root# gearmand
Error creating socket: IO::Socket::INET: Address already in use
Corsa-3:~ root#

Now, I’m not sure why that would be the case, since I checked the system process list and did NOT see any other instance of gearman executing (if you are not sure what you are looking at, the only thing found matching gearman, was the grep against the process list itself, not what I’m looking for)

Corsa-3:~ root# ps -ealf | grep gearman
0 33324 32942 4006 0 31 0 2425520 168 - R+ 5bb5a80 ttys000 0:00.00 grep gearman 0:00.00

A check of netstat did not reveal a listener on either of the known gearman ports (7003 or the new official port: 4730 ).

** TO BE COMPLETED **

Installing GEARMAN on MAC OSX 10.6


So, today I set about installing gearmand on my laptop, to test out some massively distributed computing ideas I’m working on. Turns out, it’s not just a matter of downloading the .dmg file and hitting ‘RUN’. Nope.. you better have 1/2 a pot of coffee and your copy of XCode installed on the machine or you are dead in the water.

Actually, you’re going to need more than that, if you are working with a vanilla Snow Leopard install.

Step 1 – install XCode:

But first things first. You can download XCode from the Apple website, or you can install it from your ‘Extras’ folder on the OS disk. I did the later, since the distro is pretty big, something like 600MB. Get that done first.

Step 2 – install MacPorts:

Now this is where the fun begins. Now, if you followed my other blog page on installing MacPorts, you can move onto Step 3. If you have not, then, proceed at hast to installing it (follow this link too).

Step 3 – install libevent

If you enjoyed installing MacPorts, you are going to LOVE this! 🙂 Now, the step of building libevent from source, probably not *required* but, after three installs that were not picked up by the gearmand, I though I’d just, do this the old fashioned way too. I have a writeup for installing libevent here (link to my page).

Step 3 – install wget

wget. How I love you, let me count the ways… MANY. wget is great. It’s a non-interactive text web client. Some of the cool things that wget can do, is recursively traverse a page, grabbing all the content, images, links pages (and their images, objects etc.). It’s also almost impossible to compromise with conventional XSS or other tricky DOM / JavaScript methods. No drive-by downloads here folks!

So, go ahead and get wget installed, because it’s going to be used to reach the final objective, retrieving gearman.

#root: port install wget

For me, on my lousy ComCrap connection, it took me a fairly long time. I think it’s safe to say, run the install command, and walk away. Check back in 10-15 minutes, see if it’s done. How will you konw if it worked? Simple, if you download the file in Step 5, it worked.

Step 5 – Finally, download and extract the Gearman bundle

This is where wget comes into play. Make sure you are in the directly you want. I suggest /opt. And execute the wget command to grab the distro. NOTE: The current distribution might be later than this (higher number). A check of the Gearman main site will probably give you the number you need, if this is not the latest and greatest:

#root: wget http://launchpad.net/gearmand/trunk/0.12/+download/gearmand-0.12.tar.gz
#root: gunzip gearmand-0.12.tar.gz,
#root: tar xvf gearmand-0.12.tar

Step 6 – BUILD!

Build the package. This part is the simplest of all the steps.

#root: ./configure
#root: make
#root: make install

YOU ARE DONE (installing that is)

Next article, will be a writeup on how to use Gearman, some time in the next week.


NOTE: This is part of a series of posts, centered around installation and evaluation of Gearman as a distributed scheduling product. Here are the other articles in this group: