Texas Highway Turnarounds – an idea with real merit

Upon arriving in Texas, one of the first things I had to get used to was the difference in highway design philosophy compared to other states I’ve driven in. Personally, I think it’s a brilliant idea. It even works in the city cores, which is where I clipped this short video from yesterday.

Part of that design, is ability to implement these easy turn-around lanes, and I use these all daily. I like the way the turnarounds (generally, there are a few that do) do not require traffic controls, which improves the overall flow of traffic. Typically, if I needed to change direction on a freeway, you’d have to exit, wait for the right of way to make 2 left turns, and then re-enter the freeway.

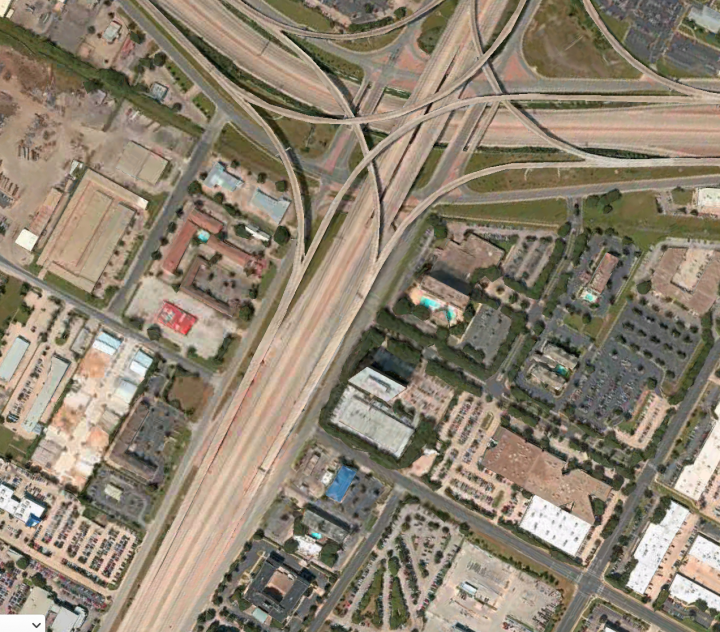
You might be able to see, in this street map, there is a loopback lane that connects the opposing directions of the frontage roads.

These little turn-arounds are dedicated lanes that let you zip under (and sometimes over) the main roadway to return the other direction, either on the frontage road or the main road via a separate onramp. This is what the sat view of this intersection looks like:

This is basically how it works:

New Dashcam Test – Testing DDPai Mini Smart Dash Cam

Trying to catch up to the year 2010, I’ve finally installed a purpose made dash cam, as opposed to my temporary GoPro installs (which were disappointing at best) of the years past.

After a few days of testing, I feel that the installation location is good, and the amount of dashboard reflections I’m seeing have been minimized to the maximum extent I can.

The camera I am testing is the DDPai Mini Smart Dash Cam which I paid $46 for on Amazon.

To date I have clipped a hand full of videos, looking at hte day and nighttime performance. I plan a more informational post in the next week, but for now, his is a short example I shot while getting gas at a local Buc-ee’s station here in Texas.

Here is a snapshot for a night time clip. There may be settings I can adjust on the camera to improve night capture. It works OK, but unless headlights are on, it’s able to resolve almost nothing.

STRATUX – Add swap and logging partitions.

It’s back! The STRAUX project lives again. With a fresh build of Stratux, it’s time to re-configure the SD card for swap space (new!) and a large logging partition to keep a full filesystem from crashing the device.

Get Current Partition Information

Once logged into the Straux box, switch to the root user and interrogate the disk partitions.

pi@raspberrypi: sudo su -
root@raspberrypi: fdisk -l
[...]

Device Boot Start End Sectors Size Type
/dev/mmcblk0p1 8192 131071 122880 60M W95 FAT32 (LBA)
/dev/mmcblk0p2 131072 3700592 3569521 17.G Linux

The important aspects you will want to record as the End block ids for each partition, this is important in the next step, creating more partitions.

Creating the Extended Partition

First task is I want to create the extended partition that can be used for swap. This will eventually contain the swap and log partitions.

Running the fdisk tool, start to edit the partition. You will want to reference the base block of the device.. eg: /dev/mmcblk0

root@raspberrypi: fdisk /dev/mmcblk0

Command (m for help): p

Device Boot Start End Sectors Size Type
/dev/mmcblk0p1 8192 131071 122880 60M W95 FAT32 (LBA)
/dev/mmcblk0p2 131072 3700592 3569521 17.G Linux

Command (m for help): n

Partition type
p primary (2 primary, 0 extended)
l logical (numbered from 5)
Select (default p): l

At this point, the tool threw an error adding partition 5…

Partition 5 is already defined. Delete it before re-adding it

Listing the partitions shows this:

Device Boot Start End Sectors Size Type
/dev/mmcblk0p1 8192 131071 122880 60M W95 FAT32 (LBA)
/dev/mmcblk0p2 131072 3700592 3569521 1.7G Linux
/dev/mmcblk0p3 3700593 62333951 5863d359 28G Extended
/dev/mmcblk0p5 2191 4194446 4192256 2G Linux

Re-running ‘n option and letting it setup partition 6, got me where I wanted to be. This process didn’t seem like it worked right.. but the end result matches up with my goal of a huge partition and a smaller 2G to be used for swap:

Command (m for help): n

Partition type
p primary (2 primary, 0 extended)
l logical (numbered from 5)
Select (default p): l

Adding logical partition 6
First Sector: 4198400
Last Sector: 62333951

Created a new partition 6 of type 'Linux and a size of 27.7 GiB

Command (m for help): p
Device Boot Start End Sectors Size Type
/dev/mmcblk0p1 8192 131071 122880 60M W95 FAT32 (LBA)
/dev/mmcblk0p2 131072 3700592 3569521 1.7G Linux
/dev/mmcblk0p3 3700593 62333951 5863d359 28G Extended
/dev/mmcblk0p5 2191 4194446 4192256 2G Linux
/dev/mmcblk0p6 4198400 62333951 58135552 27.7G Linux

Command (m for help): w

.. this is where the Ending block of your p2 partition number comes into play. The starting sector will be the ending number of your last partition (3569521) + 1 for next sector:


First Sector: 3700593
Last Sector: 62333951 (this was the default/max)

Created a new partition 3 of type 'Extended' and of size 28 GiB

Command (m for help): n

Partition type
p primary (2 primary, 0 extended)
l logical (numbered from 5)
Select (default p): l

Adding the largest partition, for log file storage

Now repeat this process to add the 2nd new partition, this one will consume the rest of the device, and eventually will be where the `/log` directory is mounted.

root@raspberrypi: fdisk /dev/mmcblk0

Command (m for help): p

Device Boot Start End Sectors Size Type
/dev/mmcblk0p1 8192 131071 122880 60M W95 FAT32 (LBA)
/dev/mmcblk0p2 131072 3700592 3569521 1.7G Linux
/dev/mmcblk0p3 3700593 7895039 4194447 2G Extended

Command (m for help): n

Partition type
p primary (2 primary, 0 extended)
l logical (numbered from 5)
Select (default p): l

First Sector: 4194448

Curry Chicken

A tasty single pan curry dish.

Prep Time: 10 min.
Cooking Time: 20 min.
Servings: 4 Servings

Ingredients

    1 1/2 lbs. boneless, skinless chicken breast, cut into 1-inch pieces
    1 tbs. sesame (or olive) oil
    1 small onion, diced
    3 garlic cloves, minced
    2 1/2 Tbsp. yellow curry powder
    1 tsp. ground ginger
    1 head cauliflower, cut into florets (~ 4 cups)
    1 can (13.5 oz) coconut milk
    1/3 cup lower sodium chicken broth
    Salt and black pepper to taste

Cooking

Season chicken with salt and pepper. Heat oil in a large skillet over medium-high heat, add chicken and cook until lightly browned (about 5 min.). Transfer chicken to plate.

Reduce heat and medium-low. Add onion, garlic, curry and ginger to the same skillet. If you drained off all the liquid after cooking chicken, add a small amount of oil to pan. Cook until fragrant (about 2 min.).

Add cauliflower, coconut milk and broth, cover and simmer until vegetables are crisp-tender (about 5 min.).

Add chicken back to the pan and cook until sauce reduces and thickens (about 8 min.)

Notes

Draining off the liquid after cooking chicken produced a thicker sauce. Some chicken is injected with water and this step will ensure the sauce is not too thin.
You may want to use less chicken broth if you like a thicker sauce. One option is to use 1 chicken bullion cube, instead of broth; this maintains the flavor without the extra liquid.
Instead of ground ginger powder, try freshly grated ginger root, increasing amount by 50%

Baked Catfish with Lemon Aioli

A family favorite, this catfish recipe is simple and flavorful, but not fishy tasting.

Prep Time: 5 min.
Cooking Time: 15 min.
Servings: 4 Servings

Ingredients

    1 tsp. dried thyme
    1/8 tsp. cayenne pepper
    1 1/2 pounds catfish filets
    1/4 cup mayonnaise (light works OK too)
    1 1/2 tsp. fresh lemon juice
    1 small garlic clove, minced
    1/8 tsp. salt
    1/8 tsp. black pepper
    Additional salt and black pepper to taste.

Cooking

Heat oven to 400F.

Mix thyme, cayenne, salt and pepper and rub onto fish, seasoning both sides.

Coat a 9″ x 13″ baking dish with cooking spray (I prefer to use an olive oil spray). Bake fish until opaque and cooked through; about 15 min.

While fish is baking, combine mayonnaise, lemon juice and garlic in a small mixing bowl to make aioli topping for fish.

Notes

Always best with some vegetable side dish.

Mustard Crusted Steak

Steak and mustard provide a nice flavor profile for this meal.

Prep Time: 15 min.
Cooking Time: 15 min.
Servings: 4 Servings

Ingredients

    2 garlic cloves, minced
    1 Tbsp. course Dijon mustard
    1 Tbsp. Worcestershire sauce
    1 tsp. ground mustard
    1/8 tsp. salt
    1/2 tsp. ground black pepper
    2 lbs. bonless top round steak; 3/4″ thick

Cooking

Heat oven to boril.

Combine garlic, Dijon mustard, Worcestershire sauce, ground mustard, salt, and pepper into small mixing bowl.

Line a broiler pan with foil and place steak on top. Coat evenly with mustard mixture and let stand f10 minutes. Broil steak to desired doneness, 4 minutes per side for medium-rare. Let stand 5 min. before slicing and serving.

Notes

Broil for 3 minutes longer per side when thicker top round, or when cooking for people that like to waste mean (aka. well-done).

STRATUX — Database Log Rotator

Space in the /var/log directory of a Stratux device, can quickly become consumed, if you don’t have a log management / rotation strategy.

I use a couple of mitigation methods, including a dedicated filesystem for /var/log (so the system does not become unstable and crash).

On the Stratux device itself, I use the following script to auto-rotate the sqlite database file every 24 hours, using a crontab entry.

crontab entry
PATH=/root/go/bin:/usr/local/sbin:/usr/local/bin:/usr/sbin:/usr/bin:/sbin:/bin # Run the Stratux DB Rollover 5 6 * * * /root/stx-rollover.sh >> /var/log/stx-rollover.log
Rotation script

stx-rollover.sh

#!/bin/bash # Startup Settings STARTTIME=`date +%m-%d_%T`; TIMESTAMP=`date +%m-%d`; LOGPATH="/var/log"; OLDFILE="$LOGPATH/stratux.sqlite"; NEWFILE="$LOGPATH/stratux.sqlite.$TIMESTAMP"; echo "$STARTTIME === Stratux Rollover === " echo "Stratux STOP" service stratux stop echo "Check for $OLDFILE" ls -ltr $OLDFILE if [ -e "$OLDFILE" ] then echo "Moving $OLDFILE ==> $NEWFILE" mv $OLDFILE $NEWFILE else echo "ERROR - Unable to locate database $OLDFILE" fi ## Startup Stratux Now. echo "Stratux START" service stratux start if [ -s "$NEWFILE" ] then echo "Moved DB to $NEWFILE" ls -l $NEWFILE echo "Compressing $NEWFILE" gzip $NEWFILE else echo "ERROR - Unable to locate $NEWFILE" fi echo "Rollover Completed"

End result of this process, is a list of gzipped date stamped databases:

[...] 152905988 Nov 4 01:05 stratux.sqlite.11-04.gz 135434058 Nov 6 11:04 stratux.sqlite.11-05.gz 148176518 Nov 6 11:45 stratux.sqlite.11-06.gz 157341677 Nov 7 13:10 stratux.sqlite.11-07.gz [...]

In addition to this logfile rotation strategy, I also pull off these files on a daily basis and archive them to another *NIX based system in my local network. This process is handled using the rsync utility. This process is run every 24 hours, using a cron job on the archival system.

rsync file archiving process

download.dbs.sh

echo '======================================' date rsync -a --remove-source-files -e "ssh -l root" 192.100.0.21:/var/log/stratux.sqlite.*.gz /Development/STRATUX/sqlite-dbs/.

This should be a good starting point for your own Stratux logfile management strategy.