Tag Archives: apple

Patching OSX against the ‘ShellShock’ exploit

While everyone waits for Apple to release a patch for the ShellShock bug, one of the maintainers of BASH assisted with detailing out how to patch BASH (and SH) on OSX to prevent the Vuln. This comes from the helpful Apple section of Stack Exchange.

NOTE: To perform this patch you MUST be granted sudo privs on your machine — if not you won’t be able to move the new files into the required location.

Testing to see if you are vulnerable

First things first.. see if you are vulnerable by checking your version of BASH. The desired version is this; GNU bash, version 3.2.54:
Screen Shot 2014-09-29 at 8.05.00 AM

If you are not seeing that, then you should check to see if you have the vuln. When I checked my updated version of OX Mavericks, I was on Bash 3.2.52 and it was vulnerable to the exploit.

If you see the word ‘vulnerable’ when you run this, your at risk!
env x='() { :;}; echo vulnerable' bash -c 'echo hello'

This is a PASS (OK):
env x='() { :;}; echo vulnerable' bash -c 'echo hello'
hello

This is a FAIL:
env x='() { :;}; echo vulnerable' bash -c 'echo hello'
vulnerable
hello

Time to get down to patching

This process is going to require you to do some command line work, namely compiling bash and replacing the bad versions with the good ones. If you are NOT comfortable do that.. best to wait for Apple to create the installable patch. If your geek level is above basic, continue forward:

First, agree to using xcodebuild
If you have no run xcodebuild, you are going to need to run it, then agree to the terms, before you’ll be able to finish this build. I recommend you run it NOW and get that out of the way:
xcodebuild

Set environment to NOT auto-include
This capability is part of the reason the exploit exists. It’s highly recommend you turn this on before starting the build. Ignore at your own peril. This parameter is used in the build stage for two patches:

export ADD_IMPORT_FUNCTIONS_PATCH=YES

Make a place to build the new objects
I dropped everything into the directory ‘new-bash’… and did it thus. NOTE: I am not using sudo, (yet)

mkdir new-bash

Download base-92 source
Move to that directory and download the the bash-92 source using good old curl and extract the compressed tarball:

cd new-bash
curl https://opensource.apple.com/tarballs/bash/bash-92.tar.gz | tar zxf -

Get the patch packages next
CD to the source directory for bash, and then download 2 patch packages:

cd bash-92/bash-3.2
curl https://ftp.gnu.org/pub/gnu/bash/bash-3.2-patches/bash32-052 | patch -p0
curl https://ftp.gnu.org/pub/gnu/bash/bash-3.2-patches/bash32-053 | patch -p0

Start creating the patches
Execute these two commands, in order two build and apply the two patches:

[ "$ADD_IMPORT_FUNCTIONS_PATCH" == "YES" ] && curl http://alblue.bandlem.com/import_functions.patch | patch -p0
[ "$ADD_IMPORT_FUNCTIONS_PATCH" == "YES" ] || curl https://ftp.gnu.org/pub/gnu/bash/bash-3.2-patches/bash32-054 | patch -p0

Start building!
Traverse back up the tree and start running the builds. It is recommended that you NOT run xcodebuild at this point. Doing so could enable root powers in the shell and that is something that you certainly do not want!

xcodebuild

OK.. PATCH MADE!
At this point you have a new bash and sh object build to replace the exploitable ones. Backup your old versions, move these into place and you are now safe.

# Test your versions:
build/Release/bash --version # you should see "version 3.2.54(1)-release"
build/Release/sh --version # you should see "version 3.2.54(1)-release"

# move the files into location
sudo mv /bin/bash /bin/bash.BAD
sudo mv /bin/sh /bin/sh.BAD
sudo mv build/Release/bash /bin
sudo mv build/Release/sh /bin

Now clean up the local mess
Now the local directory where you build bash is no longer needed. I don’t like to leave cruft around on my system that creates a confusing environment. Removing the source tree is my last task. You can leave it if you like, but if I need to do this again I’m going to perform a full fresh rebuild, so this will not be re-used.

cd
rm -rf new-bash

YOU ARE DONE!

BIG HUGE THANKS TO ALL THAT DID THE REAL WORK HERE.. the people maintaining bash, the people that post awesome solutions to StackExchange and all the other fantastic resources on the net!


Create a Self-Signed wildcard SSL Certificate

Justification

Are you a developer that commonly uses SSL / HTTPS communications on your websites? Do you have multiple development environments hosted on the same domain (such as separate client demo/eval/testing VirtualHosts?), then a wildcarded SSL cert might be for you.

Generating one is very simple process. You will need to have the OpenSSL libraries installed on your computer. All but the worst of Operating systems is likely to have this already installed. If not, you can always go here and get a package: [OpenSSL.org]

Enough reasoning and rationalization, time to get down to business.

Overview

First you must have a private key generated and installed. Second that key is then used to generate a simultaneous signing request and cert signing operation.

Once you have your files created, reference them in the Webserver of your choice (such as nginX or Apach2, if you are using IIS… my heart aches for your plight), using the documentation for that webserver. I’m not going to go into there here, because I’m just taking the time to share this simple process fore generating the CERT.

Step 1 – Generate your private key

If you do not have a private key generated, I’m going to show you have to do it. If you have one that you want to use already, and you know where it is, move onto the next step.

Open a termnal window and execute the following openssl command to generate a private key. For my own installations I never use a key shorter than 2048. Most of the time, I use one that is quite a bit longer. That said, 2048 should provide a sufficiently long key for any practical SSL purposes. Yes, SSL has security issues and a motivated hacker can likely piggy-back it, regardless of your key size… but for the sake of argument and getting through this post, we’ll pretend the Interwebs are a safe place.

Move to the location where you will store your private key (this is a typical location, you can use whatever you want):

cd /etc/ssl/private

Run the command to generate the key:

openssl genrsa 2048 > my.super-awesome.hostname.key

Generating RSA private key, 2048 bit long modulus
......................................+++
.........+++
e is 65537 (0x10001)

So, now we have a key:

ls -l
-rw-r--r-- 1 root wheel 1679 Jan 9 09:41 my.super-awesome.hostname.key

Step 2 – Generate your CERT

This is the fun part, and the 2nd of the super easy steps. To complete this you’ll want to know up front, some important pieces of data, such as the hostname for your site (I’m going to use super-awesome.net for this example). You want to have the address you want to use handy, including the country. Also want to have an e-mail address that will be published in the SSL cert to contact you, and a department and company name if so inclined. Below the actual command and responses will be in bold:


openssl req -new -x509 -nodes -sha1 -days 3650 -key my.super-awesome.hostname.key > my.super-awesome.hostname.cert

You are about to be asked to enter information that will be incorporated
into your certificate request.
What you are about to enter is what is called a Distinguished Name or a DN.
There are quite a few fields but you can leave some blank
For some fields there will be a default value,
If you enter '.', the field will be left blank.
-----
Country Name (2 letter code) [AU]: US
State or Province Name (full name) [Some-State]: Kellyfornia
Locality Name (eg, city) []: Sac-of-Tomatoes
Organization Name (eg, company) [Internet Widgits Pty Ltd]: Crazy Assembly House
Organizational Unit Name (eg, section) []: Committee on wasting tax payer money
Common Name (eg, YOUR name) []: *.super-awesome.net
Email Address []: admin@super-awesome.net

Verify that you have the file:

ls -l
-rw-r--r-- 1 root wheel 1927 Jan 9 09:50 my.super-awesome.hostname.cert

That’s all there is to it! You’re done. Now you have a Self-Signed SSL wildcard sert for super-awesome.net. This would allow you to secure (and I always use the word secure with a certain degree of sarcasm) any sub-domain / hostname under super-awesome.net. Examples of what it would handle:

  https://www.super-awesome.net
  https://qa-server.super-awesome.net
  https://some-client.super-awesome.net
  https://another-client.super-awesome.net
  https://ya-client.super-awesome.net

Now, it’s important to note that this DOES NOT secure anything beyond that first level.. here are a couple more examples:

  https://www.super-awesome.net --  OK
  https://qa-server.super-awesome.net -- OK
  https://some.client.super-awesome.net -- FAILS
  https://another-client.super-awesome.net -- OK
  https://test.ya-client.super-awesome.net -- FAILS
Extra Credit – viewing the contents of your CERT

It’s all well and good to generate the cert, but what if you want to verify it’s properly setup? What if you find a cert on your system and you want to know what it covers, when it expires, whom might own it, etc. Well, that’s possible too. Running a simple command we’ll examine the SSL Cert just created. The important info is in the ‘Issuer’ and ‘Subject’ blocks.

  openssl x509 -noout -text -in my.super-awesome.hostname.cert

Certificate:
    Data:
        Version: 3 (0x2)
        Serial Number:
            c4:3d:66:b4:e3:cc:61:86
        Signature Algorithm: sha1WithRSAEncryption
        Issuer: C=US, ST=Kellyfornia, L=Sac-of-Tomatoes, O=Crazy Assembly House, OU=Committe on wasting tax payer money, CN=*.super-awesome.net/emailAddress=admin@super-awesome.net
        Validity
            Not Before: Jan  9 17:50:56 2012 GMT
            Not After : Jan  6 17:50:56 2022 GMT
        Subject: C=US, ST=Kellyfornia, L=Sac-of-Tomatoes, O=Crazy Assembly House, OU=Committe on wasting tax payer money, CN=*.super-awesome.net/emailAddress=admin@super-awesome.net
        Subject Public Key Info:
            Public Key Algorithm: rsaEncryption
            RSA Public Key: (2048 bit)
                Modulus (2048 bit):
[...]  /*  removed the modulus to keep the post short */
               Exponent: 65537 (0x10001)
        X509v3 extensions:
            X509v3 Subject Key Identifier: 
                9D:72:0C:A0:E6:EB:77:2C:77:EF:E8:9E:B7:BC:9F:53:81:1A:40:9D
            X509v3 Authority Key Identifier: 
                keyid:9D:72:0C:A0:E6:EB:77:2C:77:EF:E8:9E:B7:BC:9F:53:81:1A:40:9D
                DirName:/C=US/ST=Kellyfornia/L=Sac-of-Tomatoes/O=Crazy Assembly House/OU=Committe on wasting tax payer money/CN=*.super-awesome.net/emailAddress=admin@super-awesome.net
                serial:C4:3D:66:B4:E3:CC:61:86

            X509v3 Basic Constraints: 
                CA:TRUE
    Signature Algorithm: sha1WithRSAEncryption
[...]  /*  removed the signature to keep the post short */


Looking at the Subject breaks downs as follows:

  Subject: C=US, ST=Kellyfornia, L=Sac-of-Tomatoes, O=Crazy Assembly House, OU=Committe on wasting tax payer money, CN=*.super-awesome.net/emailAddress=admin@super-awesome.net

  C=US - Country code  'US'
  ST=Kellyfornia  -  State or Provence. 
  Sac-of-Tomatoes   -  City/Location
  O=Crazy Assembly House  -  Company or Organization name
  OU=Committe on wasting tax payer money Organizational Unit (department, etc.)
  CN=*.super-awesome.net  -  Canonical Name (hostname / domain) that
 the CERT services.  In this case it's a wildcard, signfied by the '*'

That's all there is to it. Now, secure those website communications!

CIDR Calculator App picked up by Softpedia

This just in…. (seems like a good thing). Notice that my new App CIDR Calculator for the MAC (in the wide for barely 24 hours now), was found by Softpedia, and linked in their site.

Congratulations,

CIDR Calculator, one of your products, has been added to Softpedia’s
database of software programs for Mac OS. It is featured with a description
text, screenshots, download links and technical details on this page:
http://mac.softpedia.com/get/Utilities/DeMartini-CIDR-Calculator.shtml

The description text was created by our editors, using sources such as text
from your product’s homepage, information from its help system, the PAD
file (if available) and the editor’s own opinions on the program itself.

Nothing wrong with a little free exposure. No ratings so far, but I hope to get some good feedback. It’s already sold several units so I know someone is out there giving it a test.

If you want to learn more about this entry in Softpedia, [ HERE IS THE LINK ].

If you want to check out the App itself at the Apple MAC App Store.. just click on the button below!

Buy at the Mac App Store

Writing an Apple Help Book

Writing and distributing Apps for OSX compared to those written for the iOS environment is mostly an entirely new adventure. The underlying code is the same, but the concepts of UI design are radically different. Then there is the entire topic of Help Files, or in the case of OSX, the Apple Help Book.

Having several decades of experience as a software designer, developer and distributor, the concept is not new territory. Deploying it in OSX is, however a new skill to be learned. To help those that follow boil all this down I’m going to expose my personal notes on the subject. These notes were derived while using XCode 4.2, in January 2010 [ Detailed Online Information at developer.apple.com ]

Why Apple Help Book?

Flexibility — Writing and deploying an Apple Help Book with the application provides indexed search capability of the Help data, via the OSX Help menu while running the App. Once registered in the Application package itself, it integrates smoothly into the user experience.

What is special about Apple Help Books

They are HTML based. — This makes production of help files for the Application simple. HTML editors are widely available for those that do not have the technical chops to produce the file the good old fashioned way.

Rich Content — Help books can contain video content and even Apple Script to automate help navigation or even perform application manipulation directly from the Help construct. Niiiiiice.

What is a Help Book?

HTML Content — The book consists of a collection of HTML files that constitute the Help documentation for your application.

Indexing Help — Apple provides Help Book Indexing tool located in /Developer/Applications/Utilities, when the Developer package is installed. .

Help API — Contextual help is made available, from the Help Book via a provided Apple Help API. You do not need to utilize this capability for basic help function, but it’s available for advanced Help capabilities.

Exact Match Search for small words — A common problem with basic search functions, is that small or common letter groups may product far to general of a response. Example would be searching for the term ‘CD’. A Help Book with the properly configured Exact Match Searching would be able to return targeted help results for ‘CD’.

Can live In the Cloud — Concept of Apple Help supports the ability to access and deliver content from remote servers (aka the cloud), in three different ways; Internet-only, Internet-primary and Local-primary. It also has the ability to signal need to download and updated Help file for local (end-user) storage.

Links to Online Resources — It’s perfectly acceptable to code the Help Book and it’s title items to be links to locations on the web. An example of this might be a link from the Help system back to the producer’s main website for support or additional help content.

Authoring a Help Book

Full Document Online –[ Click Here ] for the full article on Apple’s Developer Website.

Xcode 4 – very simple way to open a website from App

This is going to be a VERY quit little missive. Basically, it’s about knowledge retention. The more I write about something, the better chance I have remembering some detail months or years hence. Today, I’m recording, for posterity (sounds pretty snooty, I know), the Objective-C command for opening a URL.

I won’t pretend to know all the details of this, and why it requires so many messages to be passed. In this case I’m admitting I was a cut-and-paste code monkey, standing on the shoulders of others. So, enough babbling, here is the meat of it. This ASSUMES you have a way to call this, such as a class method, or something. To clarity, this is writting into your implementation (.m) file.


- (IBAction)visitAuthorWebsite {
[[UIApplication sharedApplication] openURL:[NSURL URLWithString:@"http://apps.daviddemartini.com/icidr"]];
}

The above does NOT maintain context within your app. This tosses the user out into Safari to view the page. Had I added a URL View page to the application, it would have appeared there. Perhaps in version 2.1, but for now, for today, this works. I’ve tested it, verified it, and trust it.

Here it is again, broken out into chunks


- (IBAction)visitAuthorWebsite {
[
[
UIApplication sharedApplication
]
openURL:[
NSURL URLWithString:@"http://apps.daviddemartini.com/icidr"
]
];
}

I was thrilled when the example turned out to be so simple. I hope someone finds this useful.

iOS5 – 200 new features and improvements, the highlights


Here is a breakdown, from Apple, highlighting the over 200 and new features in iOS 5!!

Notifications

  • Swipe from the top of any screen to view notifications in one place with Notification Centerthis is one of my favorite features. When you receive messages, voicemail or calls while ‘away’ from your phone the alerts are stacked on a screen that can be accessed by simply swiping down the screen. Much less intrusive, and very, very useful
  • New notifications appear briefly at the top of the screenbig improvement over the modal dialogs that popped up on previous versions that disrupted anything you where doing at the time
  • View notifications from lock screenswipe down from the lock screen and jump right to a notice, message, call, etc.
  • Slide the notification app icon to the right on the lock screen to go directly to the app

iMessage

  • Send and receive unlimited text, photo, and video messages with other iOS 5 usersthis is a great feature. For instance I’m able to communicate with my daughter’s iPhone from my iPad, no need to grab my phone if I want to send her some info I found on my iPad – great productivity boost. Plus, it does not required the cellular SMS transport technology!
  • Track messages with delivery and read receiptsknow when the recipient read the message – very nice
  • Group messaging and secure encryption
  • Works over cellular network and Wi-Fi*very nice!! avoid SMS charges when roaming, especially overseas. While in Spain I communicated with my boss with SMS quite often, but when I got home 1/2 of big fat cell bill were SMS charges!!! This should reduce if not eliminate that.

Newsstand

  • Automatically organizes magazine and newspaper subscriptions on Home Screen
  • Displays the cover of the latest issue
  • Background downloads of new issues

Reminders for managing to do lists

  • Syncs with iCloud, iCal and Outlookkeep calendars on multiple devices in sync. I’ve had some issues with this where any calendar entry already synced across devices, now created a separate entry from each device, messy. Might be something I didn’t do right.. but I’m not totally tech ignorant, so I think others will find that glitch annoying
  • Location-based reminders when you leave or arrive at a location for iPhone 4S and iPhone 4

Built-in support for Twitter

  • Sign-in once in Settings and tweet directly from Camera, Photos, Maps, Safari and YouTube
  • Add location to any tweet
  • View twitter profile pictures and usernames in Contacts

Camera improvements for devices with cameras

  • Double click the home button when device is asleep to bring up a camera shortcut on iPhone 4S, iPhone 4, iPhone 3GS and iPod touch (4th generation)
  • Volume Up button to take a pictureever hold the phone in landscape mode and fumbled to press the front button, well I have, and enabling a side button is a real awesome feature, sort of like a ‘real’ camera
  • Optional grid lines to line up shotsThis really helps me, I often tild my cameras for some reason, nothing like a little help
  • Pinch to zoom in the preview screen
  • Swipe to camera roll from preview screen
  • Tap and hold to lock focus and exposure, iPad 2 and iPod touch (4th generation) only support exposure lock

Photo improvements for devices with cameras

  • Crop and rotate
  • Red eye removal
  • One tap enhance
  • Organize photos into albums

Mail improvements

  • Format text using bold, italic, or underlined fonts
  • Indentation control
  • Drag to rearrange names in address fields
  • Flag messages
  • Mass mark messages as flagged, read or unreadwhat once was just an option to bulk delete, now offers these other bulk actions, a nice improvement
  • Customize mail alert soundsOK, this is the first I’ve not done myself, but I love the custom sounds for SMS, so I’m going to be trying this today!
  • S/MIME

Calendar improvements

  • Year view on iPad and new Week view for iPhone and iPod touch
  • Tap to create an event
  • View and add event attachments

Game Center improvements

  • Use personal photos for your Game Center account
  • Compare your overall achievement scores with your friends
  • Find new Game Center friends with friend recommendations and friends of friends
  • Discover new games with custom game recommendations

AirPlay Mirroring for iPad 2 and iPhone 4S

    Multitasking Gestures for iPad

    • Use four or five fingers to pinch to the Home Screen
    • Swipe up to reveal the multitasking bar
    • Swipe left or right to switch between apps

    On-device setup, activation and configuration with Setup Assistant

      Software updates available over the air without tethering

      • this is great, no longer need to plug into the computer, get your apps and music ‘magically’ over the air via iCloud.. awesomeness

      iCloud support

      • iTunes in the Cloudawesome, using it a lot
      • Photo Stream
      • Documents in the Cloud
      • Apps and Books automatic download and purchase historymega awesomeness, new apps I bought appeared everywhere I wanted it, no need to do much of anything at all!
      • Backup
      • Contacts, Calendar, and MailSyncing all devices behind the scenes, off-line and without hands-on action. As noted, the only thing I’ve had issues with were some duplicate calendar entries
      • Find My iPhone

      Redesigned Music app for iPad

        Hourly weather forecast

          Real-time stock quotes

            Wireless sync to iTunes

              Keyboard improvements

              • Split keyboard for iPadI dig this (see my other post) thumbs much happier now
              • Improved autocorrection accuracy
              • Improved Chinese and Japanese input
              • New Emoji keyboard
              • Personal dictionary for autocorrection
              • Optionally create keyboard short cuts for frequently used words

              Accessibility improvements

              • Option to light LED flash on incoming calls and alerts for iPhone 4S and iPhone 4
              • Custom vibration patterns for incoming calls on iPhone
              • New interface for using iOS with mobility-impairment input devices
              • Option to speak a selection of text
              • Custom element labeling for VoiceOver

              Exchange ActiveSync improvements

              • Wirelessly sync tasks
              • Mark messages as flagged, read or unread
              • Improved offline support
              • Save a new contact from a GAL service

              Products compatible with this software update:

              • iPhone 4S
              • iPhone 4
              • iPhone 3GS
              • iPad 2
              • iPad
              • iPod touch (4th generation)
              • iPod touch (3rd generation)

              iPhone 4S almost here, FedEx tracking site not even NRT.

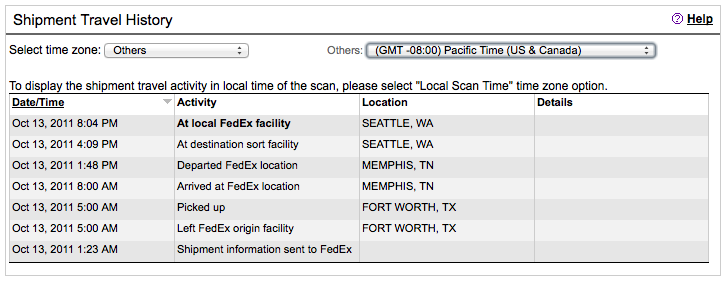
              I received the shipping confirmation and tracking code yesterday. I’m quite excited about tracking my little phone package back and forth across the US:

              The FedEx site seems to lag several hours behind the tracking updates. As of midnight, the status was still showing;

              At 03:00 this morning, it’s showing that it arrived at BFI yesterday evening:

              iPhone Package Tracking

              I was hoping for a something a little more NRT (Near Real Time).

              Those of you that have checked out my new website see that I’m all about displaying the latest data I can acquire.

              Then there is the question of why I am awake at 03:00 PDT to even LOOK at this data. Insomnia is a regular part of my life.. something I’ve battled for years.. and some of it might be childish anticipation of playing with an awesome new toy, phone.

              Even when it arrives some time Friday (today), I will have to go through several steps to get it activated. How many.. a lot.. (me thinks). This is direct from my ‘Welcome to the Borg’ e-mail sent from AT&T:

              Congratulations! With AT&T, you get the nations’ fastest mobile broadband network* and the best coverage worldwide – more phones that work in more countries**.

              To Activate your Device and utilize the entire suite of features included with your service, you MUST follow these steps IN ORDER;

              1. Charge your iPhone.

              2. Check all voicemail messages on your existing device. Once your new iPhone has been activated, all voicemail messages and greetings on the former device will be lost. (Existing AT&T Customers Only).

              3. Turn it ON and follow the on-screen instructions. Your iPhone may prompt you to connect to iTunes via a Mac or PC. Install it for FREE!

              4. Synch iPhone with your contacts, calendars and bookmarks on your computer and with music, video and other content from your iTunes library.

              5. Activate your device online at some-website or by calling 1-555-555-1212 from another phone.

              6. Turn ON your iPhone and make a test call. If your test call is not successful, wait one hour to allow the activation process to complete then try to make another call.

              Once in hand, it’s going to be at least an hour of charging before I can even start to migrate the many gigabytes of information, contacts, photos, songs, videos and notes from the old white 3GS to my new white 4S.

              I’m glad they released the white phone right out of the gate this time. I think they lost some initial iPhone 4 sales while people who like white phones (such as myself) waited out the initial order surge. Could this explain the massive initial orders that completely blew away the iPhone 4 release records? Probably not, but it was a factor for me. It removed the decision to wait for the white phone or order the new black one and live with it.

              So.. here I sit, at 04:12, typing up a half-coherent ranty blog, wondering if I’ll get back to sleep or I’ll simply fire up the VPN and perform some of my day job.

              iOS 5 – what I really like about the new iPhone OS

              What’s not to like about a shiny new OS update for the Apple Mobile platforms? It’s new, so, it has to be better? RIGHT?

              Well, yes, it IS BETTER! And it fixes some long nagging short complaints I’d had, mostly simple little things. The most interesting ones I have tried so far, are discussed here.

              Check out my ‘iOS New Features Rundown Post for more details!

              Now you can assign custom Text Notification Tones

              YES! Finally! I can set a custom tune (like a silent one.. for those really annoying people) for both phone and text communications for any Contact in your Contacts List. And not only that, they implemented it so you don’t need to use the same tone for both. This is something I really REALLY like!

              Setting separate Ringtone and SMS Tones - new in iOS5

              iPad Split Keyboard. Thumb-typing made easy!

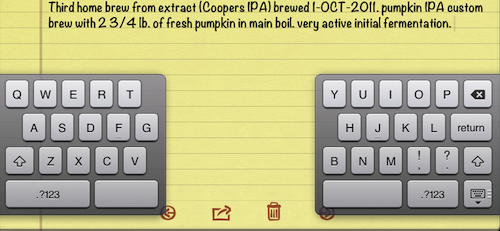
              Every wish that your thumbs were a little longer to reach the keys in the center of the iPad keyboard? Well, maybe you wouldn’t want them longer, how weird would your hand look, right? Well, at least they could have done something….. and…. they did. Introducing the split keyboard on the iPad.

              Split keyboard makes thumb-typing easier on the iPad!

              Above, I am testing out this cool new feature while updating my Brewer’s Log. Too bad most of you won’t be able to taste this amazing Pumpkin IPA when it get’s kegged in less than a week!

              iCloud delivery of your purchased Apps, from the cloud!

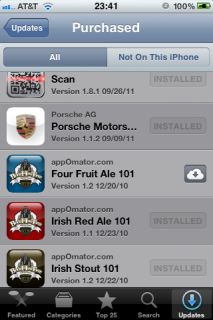
              I’ve already found this to be one VERY useful feature. What I’m showing here is the App Store on my phone, and you can see one of the Apps has the little cloud icon next to it. That means I’ve purchased this application, but it’s not installed on this device. Now, instead of having to be wired into a computer to get easy access to my already purchased Apps, it’s available, over the cellular network, or WiFi, from a cloud storage area just for your apps. So, what’s the big deal? Well, if you want to add the app to this device, it’s as simple as pushing the ‘iCloud’ button and viola.. it’s downloading to your device!

              iCloud and App Store working together

              Another really nice feature, that is not illustrated in this photo, is that you can configure your account to automatically download any purchased app to ALL your devices (automatically, not need to sync) from this iCloud account. I’ve use this feature already as well and I love it. Again, no need to plug into the computer, or track down the app in the App store. It’s all done for you (of course you can turn this feature off it you like), easy as Apple pie!

              News Stand – get your electronic magazines on your mobile device!

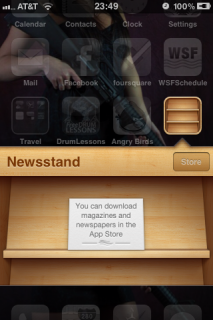
              Do you have a hard-copy magazine that you subscribe to? Maybe they have a mobile version too. If that is the case, you can (again automatically) receive the latest edition, downloaded to your News Stand (here comes that iCloud thing again…) as soon as it’s published. This is a feature I’ll be making use of for certain (sorry, I’d not yet tracked down my magazines when I took this photo… I’ll be sure to update it when I do).

              New App - the Apple Newstand - get it hot off the presses!

              Handling of SMS and E-mail alerts on various screens

              For you current iPhone users, you know how annoying it is to get an SMS (or if you have e-mail alerts on, and e-mail) while on the phone or using another app. It pops up a modal dialog box and completely interferes with whatever it is that you are doing.

              NO MORE! The alert boxes are no longer modal, and if you receive an voice mail and an SMS at nearly the same time, the alerts are neatly stacked together, and after a few seconds, these automatically disappear from the screen. They are smaller, less obnoxious and they GO AWAY on their own! Finally!

              IPad, Tool with no Purpose or Technology Masterpiece

              Unpublished from last year. this entry was started on this iPad when I purchased it almost exactly one year ago today. At the end of the article Is an update on how this first year with the devices has been.

              October 2010
              What is that weird little device that seems to serve no purpose? It’s not a laptop, not phone, not a book nor hot plate.

              Well, I am about to find out, and those of you following my blog can too. In fact I’m typing this blog entry with one right now. It’s only spent 4 days in my care to date, but so far this weird ‘little’ thing has engendered itself to me, my kids and a couple of other people whom have had some time to really try one out, beyond a little demo at the local electronics retailer

              Even if this becomes little more than an eBook reader, I feel good about the investment. I do think this will find a place in my daily technology and recreation routines.

              For instance, I can say already that it’s a fantastic way to enjoy a streamed movie or TV show anywhere you have some network but no TV. My first test of this was to enjoy 3 episodes of Galactica, streamed by Netflix to the iPad. I loved it.

              I’ll have much more to say about it as I try out some daily business tasks. One of the first will be setting up some sample photography galleries to show prospective clients.

              Another will be use of the device in the day to day administration of systems and IT management.

              Stick around as I explore the ups and downs of the iPad over the next month or so.

              Along with the iPad I am testing out Apples new Apple TV. Both are getting rave reviews in my house right now.

              October 2011

              iPad

              It’s been a year with the iPad and I find it far more useful today than I had anticipated. it finds duty as a video blog reader (keeping up on the latest on CSS3 and HTML5 is a lot more comfortable to do on the couch with the little iPad than in my office at the laptop), as a second device to keep reference material handy while developing websites, and also as a very handy entertainment device.

              An example of it’s utility would be as a very handy repository of Radio Control reference, setup and instruction documentation while at the race track. not needing to haul around my expensive laptop, power supplies for a long day, and the space a laptop would take up in the pits are all reasons the iPad shines.

              in fact , I am comfortably using it to update this blog entry. I just wish I’d kept on task with the plan to write reviews as I explored this very cool device. and now with iOS 5 installed,it’s even
              more useful (for instance I can send SMS like iMessage communications to other iOS5 devices over WiFi (no. cellular network required).

              AppleTV

              In short. it’s fantastic. So happy and impressed am I with the AppleTV that I’ve recommended it to (and sometimes installed for) friends and family. It’s ability to access and deliver online content to the comfort of a living room.

              Integration with Netflix was impressive enough that I totally cancelled my cable, switched to DSL and saved myself several hundred dollars a year. My kids and I have not missed it at all. If I need to get any sort of broadcast news, I can pull true HD off the air for free, with a $5 set of old-school rabbit ears. Talk about bargain.

              If you enjoy YouTube, Vimeo or Internet Radio, Apple TV has that covered as well. It’s an integrated entertainment system in a box little more than a pack of cards I size. You do need an HDMI compatible TV / entertainment system to take advantage of this awesome little black box that pulls content off a CAT5 cable or WiFi network. You do need a high speed Internet connection of some type for it to function.

              That’s all for today’s update. I’ll make an honest effort to write a more detailed review of each, but we are having a rare sunny day and I’m going to go and take advantage of that!!

              OSX Lion (10.7) Arrives

              The LION has arrived, and is being installed on millions of devices around the world. Or, so it would seem based on how long it took to download the 3+ Gigabyte latest version of Apple’s OSX operating system. And at the reduced (by $100 from the last update) price of $30, I imagine it’s going to fly off the virtual shelves. I say that because, for the first time, there are NO CD install options (or so said Apple during WWDC 2011). Watch that long but informative video here:

              WWDC 2011 – LION, iOS5, iCloud Preview

              Before I ramble on about some of my favorite features, it’s important to point out that this upgraded is not for everyone. Slower Code 2 Duo systems will see a little slowdown in how things run. Even on my early Core 2 Duo system with a measly 2GB of memory, it’s not much more than an occasional annoyance when things load. Once everything is up and running, I don’t see any performance hit. The new version is also limited to certain processor classes, so unless you have one of these processors, the installation instructions say you won’t be able to enjoy the latest:

                Supported Processors

              • Core 2 Duo
              • i3
              • i5
              • i7

              Once you download the software, it took about 40 minutes to complete the installation. It’s a hands-off install (I ran mine overnight) once you have it started. You can walk away, come back about 1 hour later and you are ready to go. No nasty multiple restarts and driver re-installs or trash like that.

              By now, you might be wondering, or saying out loud “So what? How do I buy this supposedly great upgrade?!?”. It’s not a single step operation, but overall all it’s pretty simple.

              The first thing you will need to do is run the Software Update:

              Select the 'Software Update' option from Apple dropdown.

              This will upgrade your Apple App Store (seen down there in the taskbar, this is not the same thing as your Apple iTunes App store for handheld devices).

              Find the App Store in Taskbar (3rd from right in mine)

              From there, you will easily find the LION product you can purchase.

              Apple App Store - LION download is VERY easy to find.

              If you have not yet purchased it under your Apple ID, then you will be offered the product at around $30. Now, here is the part that I really like, if you have already purchased the upgrade (such as me), you don’t have to pay for it again, to install it on another device that you own, and have linked to your Apple ID! This is fantastic! Not only is it very inexpensive, the installation process is designed to work well for families and people with multiple systems. Something a competitor might learn something from…. (although I’m sure they would screw it up 1000-way to Sunday, LOL).

              Once installed, you are flooded with 250 NEW features in the latest incarnation of OSX. That’s not 250 enhancements, that 250 NEW Features! Wow. So, what are those features? I’m not going to list all 250. I’m not even going to spend much time trying to describe them myself, so I’ll direct you do the Apple website, and you can pick the ones YOU are interested in:

              250+ New Features in OSX LION

              Now, the ones I’ve really enjoy so far are these:

              Launchpad

              [details] I like to keep the items I run often in my taskbar, but there is not room to keep everything I might ever run there. When I want to go find some seldom used app, I used to have to use the Finder, open Applications and poke through list. NOT ANY MORE! With a simple 4-finger swipe on the track pad (or clicking that rocket icon you might have noticed in my screen shot above) you are given an iOS (that’s iPhone/iPad/iPod style interface for the techno-neophytes that are now lost). ALL of the apps are there. If you have too many to fit on one page, well, you just swap left and right, find what you want an LAUNCH! It’s a really cool feature!

              View of the Launch Pad

              You can see that Apps in sub-directories are presented in the same method as they are on the iOS OS. When Apple said they took usability lessons from iOS and brought them to LION, it was much more than just some marketing hype. It’s real, and it works.

              Mission Control

              [details] Spaces has been changed too, and now it’s Mission Control. Like multiple desktops (like me) then you can access, add, remove them with a simple 3-finger up-swipe to see all your desktops:

              Spaces - access to multiple desktops

              It’s easy to move running apps from space to space too, and you might notice the dashboard is the first desktop on the right, so you can get there using spaces. So, why is that cool? Well, to shift from space to space it’s a simple matter of a 3-finger swipe left or right to access the space you want. Again, it’s just that simple!

              Autosave

              [details] This is such an awesome, intelligent, useful feature. Gone are the days of you cursing because you forgot to save a document, and for some reason the application closed, maybe because you restarted and forgot it was open (although the OS will remind you), or the system crashed (I’ve NEVER had my MAC crash.. EVER), or you simple hit the wrong button and didn’t save! OH NO. Well, this has you covered. Gone are the annoying popups (do you want to save?), because it will save it for you, when you need it to. Combined with Versions.. you have a very secure and safe environment in which to create, anything.

              Versions

              [details] And it will save different versions of your document AS YOU EDIT, so you can revert back to a previous state at any time. If you are familiar with time machine, you’ll understand how it works. I don’t have a demo to show you on my computer (yet) but I’ve tested it on another. This is one you want to read about for sure!

              Having used the new OS for only 24 hours how, I’ve just scratched the surface of the new capabilities. I will say with complete confidence, I am glad that I upgraded, I’m using the Launch Pad and Mission Control heavily already.