Tag Archives: software

Is Google looking at a rough 2015?

Screen Shot 2014-12-18 at 10.09.15 AMInteresting read about possibly looming troubles for Google. I will say that in the past I used Google to look for products, but most of the items I found that way were from shaky looking distributors, or links to Amazon, where I found they had a very competitive price.

Perception is reality, my personal perception is that Amazon is a trustworthy enough for me to buy from them. Over the last few months I’ve simply quit Googling for products and checked Amazon first, and only using Google if I felt that Amazon didn’t offer the product or the price was more than I wanted to pay.


Google’s stocks have taken a dive recently. It was a rocky 2014 but the last month has seen a nose dive in stock trading value:
Screen Shot 2014-12-18 at 10.12.44 AM

That’s not all. As the Mercury News (headquartered in Silicon Valley) reported last month, FireFox has dropped Google as it’s default search engine:
http://www.mercurynews.com/business/ci_26971412/firefox-drops-google-yahoo-default-search-engine

Here is a link to an opinion piece on LinkedIn that discusses this further:

https://www.linkedin.com/pulse/googles-very-rough-transition-nicholas

Installing Gearman PHP components for OSX

Locating the latest PHP Components

The Gearman.org page has links to the PHP code on the Downloads page, however the link is very old. The latest code is located at: http://pecl.php.net/package/gearman.

As of 23-OCT-2014, the current stable version is gearman-1.1.2.

I like to drop these files in my /opt directory, and work on them there and unball the package.

mv ~/Downloads/gearman-1.1.2.tgz /opt/.
tar xvzf gearman-1.0.2.tgz
cd gearman-1.0.2

Configuring for Build

The following commands prepared the PHP package to build on OSX Yosemite (10.10).

phpize
Configuring for:
PHP Api Version: 20121113
Zend Module Api No: 20121212
Zend Extension Api No: 220121212

./configure
checking for grep that handles long lines and -e… /usr/bin/grep
checking for egrep… /usr/bin/grep -E
checking for a sed that does not truncate output… /usr/bin/sed
[…]
appending configuration tag “CXX” to libtool
configure: creating ./config.status
config.status: creating config.h

Building the Library

Next step is to run the compile and install the built objects:

make
/bin/sh /opt/gearman-1.1.2/libtool –mode=compile cc -I. -I/opt/gearman-1.1.2 -DPHP_ATOM_INC -I/opt/gearman-1.1.2/include -I/opt/gearman-1.1.2/main -I/opt/gearman-1.1.2 -I/usr/include/php -I/usr/include/php/main -I/usr/include/php/TSRM -I/usr/include/php/Zend -I/usr/include/php/ext -I/usr/include/php/ext/date/lib -I/usr/local/include -I/usr/local/include -DHAVE_CONFIG_H -g -O2 -Wall -c /opt/gearman-1.1.2/php_gearman.c -o php_gearman.lo
mkdir .libs
[…]
Build complete.
Don’t forget to run ‘make test’.

make install
Installing shared extensions: /usr/lib/php/extensions/no-debug-non-zts-20121212/

Telling PHP about gearman

You will need to identify your relevant php.ini file, and edit it, letting PHP know where the library file are located.

Typically under OSX, this file does not exist, and it must be created.

Edit the file:

vi /etc/php.ini

Either way, make sure these two lines are in the file:

Add these lines:

include_path=.:/mnt/crawler
extension=gearman.so

DONE

At this point you should be able to reference Gearman library in your PHP code.

These lines of code, should not throw an error:

$client = new GearmanClient(); // instance
$worker = new GearmanWorker(); // instance

node.js — using cheerio.js to find all script elements in a page

Finding <script> nodes in a page

Why.. why? Just because it’s useful when pages had dynamic content in javascript. Is there a way to subsequently evaluate the javascript parsed.. that’s for another article, but for now, I’m going to assume you have node.js installed, and you have at least come idea of how to use it.

The idea

Finding all the <script> nodes in an HTML page, rendered using

‘request.get()’

.

In the example, url (in this case www.amazon.com) is resolved and the HTML loaded. The loaded HTML is then passed to cheerio using this expression:

var $ = cheerio.load(html,{ normalizeWhitespace: false, xmlMode: false, decodeEntities: true });

.. then iterated upon using the .each( ..) object method.

$(‘script’).each( function () {…

In the very simple example the follows the script is logged to the console (STDOUT) for display. In an more advanced and useful implementation, the returned javascript would be interacted with, parsed or some other action taken.

The Script

// MAKE REQUIREMENTS
var request = require(‘request’);
var cheerio = require(‘cheerio’);

// Local Vars
var url = ‘https://www.amazon.com’;

// Define the requests default params
var request = request.defaults({
jar: true,
headers: { ‘User-Agent’: ‘Mozilla/5.0 (Macintosh; Intel Mac OS X 10.8; rv:24.0) Gecko/20100101 Firefox/24.0’ },
})

// execute request and parse all the javascript blocks
request(formUrl, function (error, response, html) {
if (!error && response.statusCode == 200) {

// load the html into cheerio
var $ = cheerio.load(html,{ normalizeWhitespace: false, xmlMode: false, decodeEntities: true });

// iterate on all of the JS blocks in the page
$(‘script’).each( function () {
console.log(‘JS: %s’,$(this).text());
});
}
else {
console.log(‘ERR: %j\t%j’,error,response.statusCode);
}
});

End

node.js — parse page title (simple example)

node.js — Toolkit of the Code Gods!!

Or, so some would have you believe. Is it pretty awesome, YES. I’m I sold on it yet, NO. But it’s growing on me.

Since parsing webpages has been my business for nearly 15 years now, I’ve used a lot of tools and strategies, but it was only recently I decided to try out node.js for a few of my projects.

Starting with node.js

If you are new to node.js, go check out these URLS here. They more than successfully cover getting started with node.

The goal here is to answer a question that for some reason eluded my best searches for code examples. I thought I had the syntax dialed but still saw some strange responses. This page will show you definitively how to get a page title. Every time (every time the page loads at least).

How I parsed the title off a page

Here is how I did it, using cheerio and request:

/*
* MAKE REQUIREMENTS
*/
var request = require(‘request’);
var cheerio = require(‘cheerio’);

/*
* Handle Commandline Params
*/
var url = process.argv[2];

/*
* Local Vars
*/
// Define the requests default params
var request = request.defaults({
headers: { ‘User-Agent’: ‘Mozilla/5.0 (Macintosh; Intel Mac OS X 10.8; rv:24.0) Gecko/20100101 Firefox/24.0’ },
})

// DO THE WORK!!
request(url, function (error, response, html) {
if (!error && response.statusCode == 200) {
var $ = cheerio.load(html,{ normalizeWhitespace: true, decodeEntities: true });
var title = $(‘title’).text();
console.log(“TITLE: %j”,title);
}
else {
console.log(‘ERR: %j\t%j’,error,response.statusCode);
}
});

Running the example from the command line looks like this (I’m using the 1st available parameter to pass my URL, hard-coding is for fools):

node get.title.js http://www.yahoo.com
TITLE: “Yahoo”

Conclusion

The reason I’ve posted this blog, is that this specific node.js cheerio syntax was not clearly specd:

var title = $(‘title’).text();

Enjoy toying around with node.js to parse your super-awesome pages.

Patching OSX against the ‘ShellShock’ exploit

While everyone waits for Apple to release a patch for the ShellShock bug, one of the maintainers of BASH assisted with detailing out how to patch BASH (and SH) on OSX to prevent the Vuln. This comes from the helpful Apple section of Stack Exchange.

NOTE: To perform this patch you MUST be granted sudo privs on your machine — if not you won’t be able to move the new files into the required location.

Testing to see if you are vulnerable

First things first.. see if you are vulnerable by checking your version of BASH. The desired version is this; GNU bash, version 3.2.54:
Screen Shot 2014-09-29 at 8.05.00 AM

If you are not seeing that, then you should check to see if you have the vuln. When I checked my updated version of OX Mavericks, I was on Bash 3.2.52 and it was vulnerable to the exploit.

If you see the word ‘vulnerable’ when you run this, your at risk!
env x='() { :;}; echo vulnerable' bash -c 'echo hello'

This is a PASS (OK):
env x='() { :;}; echo vulnerable' bash -c 'echo hello'
hello

This is a FAIL:
env x='() { :;}; echo vulnerable' bash -c 'echo hello'
vulnerable
hello

Time to get down to patching

This process is going to require you to do some command line work, namely compiling bash and replacing the bad versions with the good ones. If you are NOT comfortable do that.. best to wait for Apple to create the installable patch. If your geek level is above basic, continue forward:

First, agree to using xcodebuild
If you have no run xcodebuild, you are going to need to run it, then agree to the terms, before you’ll be able to finish this build. I recommend you run it NOW and get that out of the way:
xcodebuild

Set environment to NOT auto-include
This capability is part of the reason the exploit exists. It’s highly recommend you turn this on before starting the build. Ignore at your own peril. This parameter is used in the build stage for two patches:

export ADD_IMPORT_FUNCTIONS_PATCH=YES

Make a place to build the new objects
I dropped everything into the directory ‘new-bash’… and did it thus. NOTE: I am not using sudo, (yet)

mkdir new-bash

Download base-92 source
Move to that directory and download the the bash-92 source using good old curl and extract the compressed tarball:

cd new-bash
curl https://opensource.apple.com/tarballs/bash/bash-92.tar.gz | tar zxf -

Get the patch packages next
CD to the source directory for bash, and then download 2 patch packages:

cd bash-92/bash-3.2
curl https://ftp.gnu.org/pub/gnu/bash/bash-3.2-patches/bash32-052 | patch -p0
curl https://ftp.gnu.org/pub/gnu/bash/bash-3.2-patches/bash32-053 | patch -p0

Start creating the patches
Execute these two commands, in order two build and apply the two patches:

[ "$ADD_IMPORT_FUNCTIONS_PATCH" == "YES" ] && curl http://alblue.bandlem.com/import_functions.patch | patch -p0
[ "$ADD_IMPORT_FUNCTIONS_PATCH" == "YES" ] || curl https://ftp.gnu.org/pub/gnu/bash/bash-3.2-patches/bash32-054 | patch -p0

Start building!
Traverse back up the tree and start running the builds. It is recommended that you NOT run xcodebuild at this point. Doing so could enable root powers in the shell and that is something that you certainly do not want!

xcodebuild

OK.. PATCH MADE!
At this point you have a new bash and sh object build to replace the exploitable ones. Backup your old versions, move these into place and you are now safe.

# Test your versions:
build/Release/bash --version # you should see "version 3.2.54(1)-release"
build/Release/sh --version # you should see "version 3.2.54(1)-release"

# move the files into location
sudo mv /bin/bash /bin/bash.BAD
sudo mv /bin/sh /bin/sh.BAD
sudo mv build/Release/bash /bin
sudo mv build/Release/sh /bin

Now clean up the local mess
Now the local directory where you build bash is no longer needed. I don’t like to leave cruft around on my system that creates a confusing environment. Removing the source tree is my last task. You can leave it if you like, but if I need to do this again I’m going to perform a full fresh rebuild, so this will not be re-used.

cd
rm -rf new-bash

YOU ARE DONE!

BIG HUGE THANKS TO ALL THAT DID THE REAL WORK HERE.. the people maintaining bash, the people that post awesome solutions to StackExchange and all the other fantastic resources on the net!

PHP array_shift() not a function for general use

While looking at metrics an monitoring the processing of a CBMHDHS*, I noticed that the active job queue would become quiescent for minutes at a time. Most markedly with the one specific tasklist. My gut told me it was an issue with the way PHP was handling my simple list (700,000 items give or take). So some performance testing was required. What I found was astonishing. PHP’s array_shift is horribly inefficient.

Here is an example to demonstrate this.

When shifting 2500 items (one at a time) off the array (list), it can take 30 or more seconds. Keep in mind this is all in memory! This test is with only 108,000 items:


2013-08-16 18:21:06 # STARTING ARRAY_SHIFT TEST: Q:108581
2013-08-16 18:21:43 # DONE removed 2500 Q:106081

It took 37 seconds, to be exact. To me, that seemed like a long time. Doing a little research I found that when you rewind an array to it’s beginning (using PHP), one of it’s side effects is that it returns the element at that pointer. Reset looks like a scary operation. It does not ‘reset’ the array in the sense of flushing it out, it just resets the pointer to the top. At any rate. the code looked like this:


$element = reset($array);

So, in theory one could use this to get the first element off an array automatically, without removing it. OK, but shift_array does this ANY removes the element. So this is not really the same action. However… (and you know there is a point there), there is another PHP function with a useful side effect. The ‘key() function‘ that returns the key value of at the current pointer (which in this case is the same location we returned the element above). It looks like this:


$key = key($array);

Now, with those two lines of code I have the element (value) and the key at the top of the array. So this is 2 lines of code where array_shift() is just one.. but we’re not even done yet.. we have to perform the most important part (for this exercise) and remove the element. So.. that’s a 3rd line of code like this, right?


unset($array[$key]);

OK.. so taking a line of code right out of the processor, there is a direct comparison. array_shift on the left, reset, key, unset on the right.

Array Shift method Array Reset, Key and Unset method
$key = array_shift($this->QUEUE)) {
$payload = $this->DATA[$key];
$appkey  = reset($this->QUEUE);
$payload = $this->DATA[$appkey];
$key     =  key($this->QUEUE);
unset($this->QUEUE[$key]);

What I didn’t expect to find is how dramatically FASTER the more complex (looking) code is. In The numbers don’t lie.. see for yourself.

Array Shift method.

Total time for 2500 items removed is 37 seconds:


2013-08-16 18:21:06 # STARTING ARRAY_SHIFT TEST: Q:108581
2013-08-16 18:21:43 # DONE removed 2500 Q:106081

Array Reset, Key + Unset method.

Total time for 2500 items removed is <1 second:


2013-08-16 18:21:46 # STARTING ARRAY_RESET TEST: Q:108581
2013-08-16 18:21:46 # DONE removed 2500 Q:106081

Those numbers include getting the payload data out of the 2nd array.

Mind blowing in my opinion. It’s not even a contest. Writing your own is at least 15 times faster than PHP’s native operation, that for all intents, accomplishes the same objective.

The point of all this?

If you are seeing an inexplicable slowdown somewhere in PHP.. and you can narrow it down to 1-2 operations… it’s probably worth your while to try to do it another way, even if that way looks more complex!

I could not believe this when I tried it. When I implement this in the processor, I should be able to remove hours of useless waiting to ‘shift’ items off the list. At some point I’d hope Zend would fix this. Keep in mind I ran this test on PHP 5.5.3 (the latest stable release I could get my mitts on, at the time).

*Cloud Based Massivly Horizontal Distributed Harvesting System

Installing HomeBrew for OSX

Installing Homebrew

This process appeared to be fairly trivial. Run the following command. The script will tell you want it wants to do. I stuck with the default responses and let it do it’s worst. You will probably want to read the HomeBrew page [HERE] first, before just trusting me.


david$ ruby -e "$(curl -fsSL https://raw.github.com/mxcl/homebrew/go)"

Next step was to run the Brew Doctor and address any major issues raised there, of which I had a few. The most pressing of which was this:

Warning: Xcode is installed to a directory with a space in the name.
This will cause some formulae to fail to build.

I deleted XCode 4.3.3 (my latest installed version) and re-installed which gave me version 4.6.2. Next I had to install the ‘Command Line Tools’ (no longer embeded in XCode). That can be found in the XCode Preferences -> Downloads.

I had a few other issues, stray libraries from botched builds past. I worked through my issued and then tried to installing components.

Since Boost seems to be very commonly referenced, I went ahead and installed it with Brew as it’s first task:

Installing Boost using Brew

Then went about installing boost with HomeBrew, since it did not seem to get all the components I needed when installed via MacPorts/Fink.


david$ brew install boost

This appears to have installed boost-1.53.0

* DONE *

Now, you may Brew!

Installing Gearman PHP components for OSX- (less fun that it should be)

gearmanlogo

NOTES: Installing Geaman’s PHP components on OSX is a frustrating and rather complex task. Know this going in. The only way I was finally able to do this was by reading this page here, from one of PHP’s own engineers, got me pretty close but it was still not a full solution. [HERE]. YOU HAVE BEEN WARNED!!

FIRST THINGS FIRST — Get the right versions!!

Do not use gearman.1.1.7!
As of this writing (7-JUN-2013) the current version of gearmand (gearmand-1.1.7) has a bug that prevents it from properly building on OSX. I waste probably 2 days before in a deep corner of the mind I thought.. “If 1.1.7 has a known bug in OSX, and they have not fixed it yet.. let’s try 1.1.6!, and that worked!! The main Gearman download page has multiple versions so just avoid 1.1.7.

Get the lateset PHP source, (gearman-1.1.2) NOT the one linked off the Gearman page!
Yes.. this wasted even more time. The Gearman page didn’t have a quick easy link to the full set of available versions, and the linked version from the page was very much out of date. There is another build bug regarding PHP. One of the engineers decided to get fancy and change the privacy of the objects members somewhere in 1.0.x tree. This BREAKS build on OSX. They did as recently as this year release a FIX for this which is version gearman-1.1.2. All of them can be had on this page [HERE].

Getting Library Dependancies Worked Out

After fighting with source code, screaming at the screen, and even getting completely frustrated with what I was able to (or not able to) install with MacPorts.. I decided to install HomeBrew and give that a run. It’s not a big deal but I moved that to it’s own page located [HERE].

libevent must be built/installed

You’re going to need libevent, and installing it straight up from brew (nor Mac Ports) did the job for me. Check out my previous pages on installing libevent located [HERE] for details on that exciting exercise.

You Must Install Gearmand (sever) regardless

Regardless of how you plan to user Gearman with PHP, you must have the GearmanD server compiled to create the required libraries. There are no two ways about it, just resign yourself to that and keep moving forward!

First, obtain the Gearmand source code for compile from [HERE]. I dropped min in /usr/local

Unball the file and cd into source code directory, configure and build with the following commands:

david$ cd gearmand-1.1.12/
david$ ./configure -disable-shared -prefix=/usr/local
david$ make && make install

A couple of adjunct notes

If you are having problems location the libevent.. or basically seeing this error:

checking test for a working libevent… no
configure: error: Unable to find libevent

Try setting these two environment variables, to tell the configurator exactly where to locate these libraries, if you’ve managed to build libevent from source:

[gearmand]$ export CPPFLAGS=’-I/usr/local/include’
[gearmand]$ export LDFLAGS=’-L/usr/local/lib’

Gearman — Starting the Java-Gearman-Service process

gearmanlogo
These notes apply to testing on a MAC OSX portable, and may or may not apply to your implementation. They are provided as an adjunct to my main Getting Gearman Going post elsewhere in this blog.

The project page for Java-Gearman-Service is located [HERE] on Google Code.

The full set of instructions for staring up Gearman’s Java-Gearman-Service were not clearly linked to the main Gearman project page, so I’m including the link [HERE] to save you the few Google dorkings I did to find it.

Starting up the Java service should be as simple as this:


java -jar java-gearman-service-0.6.6.jar

HOWEVER, I received this instead.. an error:


david$ java -jar java-gearman-service-0.6.6.jar
Exception in thread "main" java.lang.UnsupportedClassVersionError: org/gearman/impl/Main : Unsupported major.minor version 51.0
at java.lang.ClassLoader.defineClass1(Native Method)
at java.lang.ClassLoader.defineClassCond(ClassLoader.java:631)
at java.lang.ClassLoader.defineClass(ClassLoader.java:615)
at java.security.SecureClassLoader.defineClass(SecureClassLoader.java:141)
at java.net.URLClassLoader.defineClass(URLClassLoader.java:283)
at java.net.URLClassLoader.access$000(URLClassLoader.java:58)
at java.net.URLClassLoader$1.run(URLClassLoader.java:197)
at java.security.AccessController.doPrivileged(Native Method)
at java.net.URLClassLoader.findClass(URLClassLoader.java:190)
at java.lang.ClassLoader.loadClass(ClassLoader.java:306)
at sun.misc.Launcher$AppClassLoader.loadClass(Launcher.java:301)
at java.lang.ClassLoader.loadClass(ClassLoader.java:247)

Checking my version shows that I am on 1.6 not 1.7 as I had thought;


david$ java -version
java version "1.6.0_45"
Java(TM) SE Runtime Environment (build 1.6.0_45-b06-451-11M4406)
Java HotSpot(TM) 64-Bit Server VM (build 20.45-b01-451, mixed mode)

To get the proper version, I navigated to the Oracle page located [HERE], agreed to their terms (do I really have a functional choice… not if I want/need to use Java…) and pushed forward.

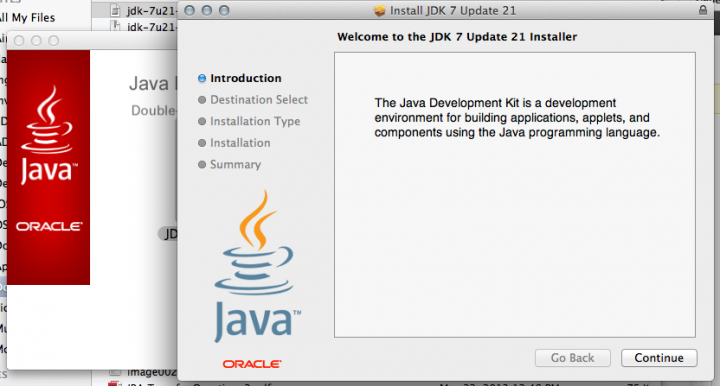
If you are running the install for 1.7, you should see a dialog like this:
Screen Shot 2013-06-03 at 2.12.16 PM

That has at least resolved this part of the issue, and will attempt to restart the server.


david$ java -version
java version "1.7.0_21"
Java(TM) SE Runtime Environment (build 1.7.0_21-b12)
Java HotSpot(TM) 64-Bit Server VM (build 23.21-b01, mixed mode)

Now I’m going to restart, specific a custom port and get it kicked off in the background:


david$ java -jar java-gearman-service-0.6.6.jar -p6315 &

At this point the process is running on my Job Service box and next step will be to craft some code to see how it all works.

Deploying Java Gearman Job Server

gearmanlogo
OK, after more than a year it’s time to get down to really building out a Gearman system.

I’ve recently taken on a project that I believe to be the perfect fit for the pipelined distributed work manager of Gearman. I’m of course, not at liberty to discuss the various details of this project, but I can provide some high-level description for the purposes of justification.

The Project – distributed harvesting

The objective of the project is to provide a distributed method of web page scraping and parsing. This project requires that the scraping and profiling occur for 2,000,000+ websites in under 18 hours. No small feat for certain. The good news is that I’ve built a systems in the past (circa 2006) that did just this using MySQL as the task manager. It worked, but it had it’s issues, and almost every single one of them can be mitigated by using Gearman. The rest will be mitigated with the application of NoSQL solutions for site list management.

What is Gearman

Here is the synopsis from the Gearman.org main page.

Gearman provides a generic application framework to farm out work to other machines or processes that are better suited to do the work. It allows you to do work in parallel, to load balance processing, and to call functions between languages. It can be used in a variety of applications, from high-availability web sites to the transport of database replication events. In other words, it is the nervous system for how distributed processing communicates.

The Job Server — implementing in Amazon’s ES2 environment

For the project I’m working on, I’ve opted for the Java implementation of the Job Server. This implementation’s main page is located [HERE].

Information about the Java Job Server:

Java Gearman Service is an easy-to-use distributed network application framework implementing the gearman protocol used to farm out work to other machines or processes that are better suited to do the work. It allows you to do work in parallel, to load balance processing, and to call functions between languages.

04-23-2012 java-gearman-service v0.6 has been released. [DOWNLOAD]

  • The service now uses the slf4j logging facade, allowing the user to have better control over logging
  • Persistent background jobs are now supported though an application hook
  • The API has been updated to be more user friendly, and it makes it easier to create divide-and-conquer/mapreduce applications (breaks the code of previous versions)
  • A .properties file now may be used to set property values and fine-tune the application.
Requirements to deploy the Java job server:
  • Java SE 7
  • slf4j 1.6.4+

For my implementation, I’ve extracted the zip into a vendor directory form where I’ll plan to launch the .jar. Development is occurring on an Apple OSX portable, then deployed to the AWS EC2 cluster for production. It’s expected that some library pathing and configuration will be required to make this all work.

Starting up the Java Gearman Service

It took a little time to locate the instructions for Starting up the Java implementation of the Gearman Service. It is located [HERE].

Instructions on how I started the GearMan server on my OSX development machine are located [HERE].

Once started, you should be able to communicate with it with your Client and Worker code!!

Next steps:

Installing Gearman PHP components

Build a GearMan Client Demonstrator

Build a GearMan Worker Demonstrator